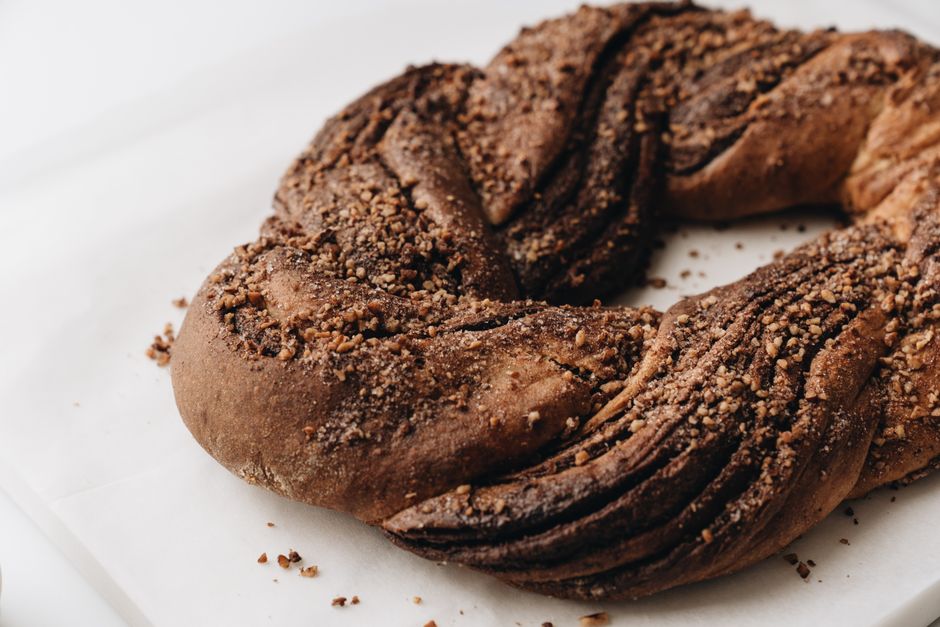
Babka Unbraided: The Science of the Twisted Yeast Cake That Turns Leftovers Into Luxury
There is an inherent magic in the alchemy of yeast, flour, and butter that transforms simple pantry staples into a masterpiece of structural architecture. Among the pantheon of leavened doughs, few command the visual awe and sensory indulgence of the babka. Originating from the Jewish communities of Eastern Europe, this cake—or perhaps more accurately, this enriched bread—sits comfortably at the intersection of comfort food and high-end pastry. It requires patience, yes, but it rewards the baker with a marbled, buttery interior that shatters into delicate, sugar-dusted shards with every bite. Understanding the temperament of this dough is the difference between a dense, lackluster brick and a cloud-like, decadent confection that looks as if it were plucked from the display case of a Parisian boulangerie.
At "Blame The Chef," we believe that every home cook possesses the capacity for such culinary alchemy, provided they respect the science of hydration and lamination. A traditional babka relies on a rich, brioche-style dough, characterized by a high fat content that necessitates a specific approach to kneading and proofing. When we talk about "unbraiding" the mystery of this bake, we are talking about manipulating gluten networks and controlling temperature to ensure the chocolate or cinnamon filling remains suspended in beautiful ribbons rather than seeping into the dough as a soggy mess. It is a process that demands a cold-chain mentality, where the refrigerator becomes your most essential tool for achieving those clean, crisp layers.
As we embark on this deep dive into the craft of the babka, remember that your environment plays a pivotal role in the final result. Yeast is a living organism, and its activity is governed by the ambient temperature of your kitchen and the heat generated by your own hands during the mixing process. We will explore the nuances of the bulk fermentation, the precision of the chilling stage, and the artistry of the final twist, ensuring that your next weekend project results in a pastry that elevates leftovers into true luxury. By the time you finish this guide, you will have moved beyond following a recipe to mastering the fundamental physics of dough, allowing you to experiment with flavors ranging from classic dark chocolate to savory pesto or nutty praline.
The Foundation: Mastering the Enriched Dough
The success of any babka begins long before the rolling pin hits the bench. Because we are working with an enriched dough—meaning one heavily fortified with eggs, butter, and sugar—the structure of the gluten is under immense pressure. The fat molecules coat the protein strands, effectively "shortening" the gluten network. While this provides the tender, melt-in-the-mouth texture we crave, it makes the dough inherently delicate and prone to tearing if not handled with scientific precision. You must aim for a windowpane test consistency, where the dough can be stretched thin enough to allow light through without snapping, signaling that the protein matrix is sufficiently developed to support the weight of the butter.
The Role of Temperature in Fermentation
Temperature control is the silent partner in your baking journey. For a standard babka, you want your ingredients—specifically the eggs and milk—to be at a cool room temperature, roughly 68°F (20°C). If the butter is incorporated while the dough is too warm, the fats will melt prematurely, leading to a greasy, oily mass that will refuse to hold its shape during the twisting phase. Conversely, if the environment is too cold, the yeast will go dormant, leading to a stalled rise that results in a dense, gummy center. Use a digital thermometer to monitor your dough temperature; keeping it between 74°F and 78°F (23-26°C) post-mixing is the sweet spot for optimal yeast activity.
"The true art of the babka lies not in the speed of the bake, but in the patience of the chill. If you force the dough, you lose the texture. Let the refrigerator do the heavy lifting, and the structure will reward you with unparalleled flake and lift."
Ingredient Ratios for Professional Results
To achieve that professional-grade bounce, your ratio of fat to flour is critical. A high-hydration dough is sticky, but it is also the key to a long shelf life and a soft crumb. We recommend using a high-protein bread flour (12-13% protein) to provide the necessary tensile strength. For every 500 grams of flour, aim for approximately 250 grams of whole milk, 2 large eggs, and 150 grams of high-quality, unsalted European-style butter (82% fat or higher). This ratio ensures that the dough is supple enough to be rolled into a thin rectangle, which is essential for maximizing the surface area of your filling.
The Art of the Filling and Lamination
Once your dough has completed its first rise and undergone a stint in the refrigerator—which firms the butter and makes the dough significantly easier to manage—the focus shifts to the filling. The most common mistake home bakers make is over-filling the dough, which leads to leakage and a soggy bottom. The filling should be a spreadable paste, not a liquid slurry. If using chocolate, incorporate a small amount of melted butter or heavy cream into your cocoa and sugar mixture to create a ganache-like consistency. This ensures that the filling stays pliable when cold but sets firmly during the baking process.
Spreading and Layering Techniques
When rolling out the dough, aim for a rectangle approximately 12 by 16 inches. The thickness should be uniform throughout, roughly 1/4 inch. Use an offset spatula to spread your filling, leaving a half-inch margin along the edges to ensure a clean seal. Many bakers skip the step of sprinkling a bit of toasted, finely ground nut or a dusting of cinnamon sugar over the chocolate, but this is a mistake. This dry layer acts as a moisture barrier, preventing the fat in the ganache from compromising the integrity of the dough sheets during the final roll.
The Mechanical Fold
After the dough is filled and rolled into a tight log, it is crucial to chill the log again before slicing. We recommend at least 30 to 45 minutes in the freezer or an hour in the fridge. This serves two purposes: first, it prevents the butter and filling from smearing when you cut through the layers with a serrated knife; second, it makes the "twist" much easier to execute. When slicing the log down the middle, use a sharp, lightly floured blade and aim for one smooth, decisive motion to expose the beautiful cross-section of dough and chocolate.
The Geometry of the Twist
The beauty of the babka is found in the interplay of light and shadow, which is achieved through the physical twisting of the dough. Once your log is sliced lengthwise, place the two halves parallel to each other, cut-side up. This exposes the interior, making the layers of dough and filling the focal point. Cross one half over the other, working from the center outward, to form a simple rope-like structure. Do not over-twist; three or four tight turns are sufficient. If you twist too many times, you lose the distinct definition of the layers, turning the interior into a muddy, indistinct swirl rather than a refined marble pattern.
Structural Integrity and Shaping
After the twist, tuck the ends of the dough under each other to create a neat, rounded finish that fits perfectly into your prepared loaf pan. Lining your pan with parchment paper is non-negotiable; even with non-stick coatings, the sugar in the filling can caramelize and fuse to the metal, causing your beautiful bake to break during removal. Use a generous amount of butter on the paper itself as an extra insurance policy. Once shaped, the babka needs a final proof. This should happen in a draft-free space, away from direct heat, until the dough has expanded by roughly 50%—do not wait for it to double, as an over-proofed babka will collapse in the oven.
"A babka is a living structure. When you twist the dough, you are not just shaping a loaf; you are weaving layers of fat and starch into a structural cage that will expand in the oven. If you treat the dough with tension rather than force, you ensure the integrity of every individual ribbon."
Troubleshooting the Final Proof
If your kitchen is cold, place your loaf pan inside your oven (turned off) with a bowl of boiling water nearby. This creates a warm, humid environment—a makeshift proofing cabinet—that prevents the surface of the dough from drying out. A dry skin on the dough can prevent the cake from rising properly in the oven, leading to a restricted final volume. If you notice the dough forming a crust, lightly mist it with a fine spray of water.
Baking for the Golden Finish
Baking is the final act of the transformation. A babka requires a relatively high temperature to start, usually around 375°F (190°C), to encourage a rapid "oven spring." The sudden blast of heat causes the water in the dough and the butter to evaporate, pushing the layers apart and creating that characteristic lift. After the first 15 minutes, reduce the temperature to 350°F (175°C) to allow the interior to cook through without scorching the exterior. A standard loaf will take roughly 35 to 45 minutes, but the true test is the internal temperature, which should hit 190°F (88°C).
The Sugar Syrup Glaze
The hallmark of a professional babka is the sugar syrup soak applied immediately upon removing the loaf from the oven. While the cake is still piping hot, brush it generously with a mixture of equal parts granulated sugar and water (boiled together until dissolved). This syrup does more than just add shine; it keeps the crust from hardening too quickly and locks in moisture, ensuring that the cake remains soft for days. Don’t be shy with this step; the heat of the cake will absorb the syrup, creating a localized layer of sweetness that enhances the depth of the dark chocolate or spice filling.
Cooling and Storage
Though the temptation to slice into a warm babka is immense, patience is required. Letting the cake cool in the pan for at least 15 minutes allows the crumb to set. Transferring it too early can result in the loaf sagging or falling apart, as the delicate structure is still fragile while hot. Once fully cooled on a wire rack, store your babka in an airtight container at room temperature for up to three days. If you find the loaf drying out on the second day, a quick five-minute stint in a 300°F (150°C) oven will revitalize the crumb and crisp up the outer layers.
Beyond the Chocolate: Innovations in Flavor
Once you have mastered the classic chocolate-hazelnut babka, the door is open to a world of culinary experimentation. The babka dough is a blank canvas, perfectly suited for both sweet and savory applications. Consider swapping the chocolate for a cinnamon-pecan streusel filling, which provides a satisfying crunch. Alternatively, you can incorporate citrus zests, such as orange or lemon, into the dough itself to brighten the richness of the butter. These small modifications show how a foundational recipe can be adapted to reflect the season or your own personal preferences.
Savory Babka: A New Frontier
Don't be afraid to take the savory route. A pesto-and-parmesan babka, or one filled with caramelized onions, goat cheese, and fresh herbs, makes for an extraordinary centerpiece at a brunch or dinner party. When pivoting to savory, adjust your sugar ratio in the dough—reducing it slightly—and ensure your filling is well-seasoned with salt and pepper. The technique remains exactly the same, but the result is a sophisticated bread that blurs the lines between appetizer and main course. The same rules regarding the chill-and-roll process apply, ensuring you get those beautiful, distinct layers regardless of the flavor profile.
Scaling and Professional Tips
For those looking to scale up production, remember that dough behaves differently in large volumes. The friction created by a commercial stand mixer can heat the dough rapidly, so use ice-cold liquids or even small amounts of crushed ice in your flour blend to keep the temperature in check. If you are baking in multiple pans, ensure there is enough airflow in the oven to allow for even heat distribution. Professional bakers often rotate their trays halfway through the bake to compensate for hot spots, a habit you should adopt in your home kitchen to ensure uniform browning.
Always use a digital scale* for baking; volume measurements are too inconsistent for enriched doughs.
Invest in high-quality cocoa powder* (Dutch-processed) for a deeper color and flavor in your filling.
Keep your workspace clean and cool*; flouring your bench excessively will dry out your dough.
Never skip the fridge time*; it is the most critical step for achieving clean layers.
The Science of Leftovers and Longevity
One of the greatest qualities of a well-made babka is its longevity, provided it is handled correctly. However, even the best babka will eventually turn stale. Instead of reaching for the bin, embrace the "luxury of leftovers." A day-old babka is the perfect candidate for French toast. By slicing the loaf into thick slabs, dipping them into a custard of cream, eggs, and a hint of vanilla, and searing them in butter, you elevate a simple breakfast into a decadent culinary experience. The sugar in the filling caramelizes against the pan, creating a crisp, burnt-sugar edge that is entirely different from the fresh cake.
Repurposing and Transforming
If you find yourself with an abundance of babka, consider incorporating it into a bread pudding. The enriched, butter-heavy dough acts as the ultimate sponge for a rich custard. Alternatively, you can slice it thin and toast it in a low-temperature oven to create babka biscotti. These crisp, chocolate-ribboned shards are the ideal accompaniment to a morning espresso. By viewing your leftovers as a valuable ingredient rather than a stale cake, you honor the effort that went into the initial bake and continue the cycle of culinary enjoyment long after the first slice is gone.
The Chef's Perspective on Waste
At "Blame The Chef," we emphasize a no-waste kitchen culture. The process of making a babka is labor-intensive, which is why preserving the final product is so important. When you master the science behind the bake, you reduce the likelihood of failed loaves that need to be tossed. Understanding the hydration levels and the importance of the cold-chain ensures that every loaf you produce is of restaurant quality, ready to be enjoyed, shared, or repurposed. It is the ultimate display of respect for your ingredients and your craft as a home baker.
"The secret to longevity is not found in preservatives, but in the precision of the bake. A perfectly hydrated, properly glazed babka resists the aging process naturally. Treat your leftovers with the same care as your fresh loaves, and you will find that the luxury only increases with time."
Final Thoughts
The journey of the babka is one of patience, precision, and an appreciation for the structural beauty of dough. By breaking down the process into its scientific components—temperature control, gluten development, and thermal management—we demystify what once seemed like an intimidating, professional-only pastry. You now possess the knowledge to manipulate the dough, build the layers, and finish with the characteristic shine that marks a truly successful bake. Whether you choose to stick with the classic dark chocolate or venture into the savory, the principles of the unbraided babka remain your steady guide.
As you step into your kitchen to tackle this project, remember that the "Blame The Chef" philosophy is centered on learning through doing. Do not be discouraged if your first attempt isn't perfectly marbled; the flavor will be extraordinary regardless of the visual outcome. Each time you handle the dough, your tactile intuition will improve, and your ability to control the fermentation will sharpen. Baking is an iterative process, and the babka is one of the most rewarding challenges you can undertake. It is a lesson in patience, a masterclass in texture, and, ultimately, a delicious testament to the power of a few simple ingredients combined with intent and care.
Take pride in the dust of flour on your apron and the scent of yeast and butter filling your home. You are not just baking a cake; you are honoring a culinary tradition that has traveled through generations, now elevated by your own touch and understanding of the science. Once you have mastered the twist, there is no limit to what you can achieve in the world of enriched doughs. Share your creations, enjoy the process, and never hesitate to blame the chef—or in this case, credit the chef—for the inevitable success that awaits you in the oven. Happy baking, and may your ribbons of chocolate always remain distinct and your crumb always be light.
Get the Next Recipe
Weekly recipes, techniques, and gear picks — straight to your inbox.
