
Bread Loaf Pan vs Dutch Oven for Sourdough
The world of sourdough baking is often framed as a binary choice between the rustic, craggy boule and the uniform, sandwich-friendly loaf. Many home bakers find themselves standing in their kitchens, staring at their starter, and wondering if the vessel they choose will dictate the final soul of their bread. Whether you are aiming for that shatteringly crisp, blistered crust that defines a professional bakery loaf, or a soft, sliceable crumb perfect for a morning buttered toast, the battle between the Dutch oven and the bread loaf pan is a fundamental rite of passage. This post aims to deconstruct the thermal physics, hydration requirements, and structural integrity of both methods to ensure you never blame your tools for a flat loaf again. We will dive deep into the nuances of steam management, heat retention, and crumb structure so you can decide which method aligns with your current baking goals.
Baking bread is an exercise in managing variables, and the vessel you choose acts as your primary agent of control. While the artisan aesthetic of a round loaf baked in a heavy cast-iron Dutch oven is undeniable, the practicality of a standard loaf pan offers its own unique set of advantages that often go overlooked by the sourdough enthusiast. It is not merely about shape; it is about how these vessels interact with the dough's moisture and the surrounding environment of your oven. Throughout this journey, we will look at how high-hydration doughs behave differently in enclosed spaces compared to open-air settings. By mastering these distinctions, you will gain the confidence to pivot between styles depending on whether you are hosting a dinner party or prepping for a week of school lunches.
Many aspiring bakers approach sourdough with a fair amount of trepidation, fearing that a single misstep in temperature or timing will result in a hockey puck. However, the secret to consistency often lies in understanding the synergy between your flour, your hydration, and your equipment. If you have ever felt frustrated by a loaf that refused to spring or one that burned on the bottom before the center was set, the problem rarely lies in your recipe—it lies in your thermal management. Today, we are going to peel back the curtain on these two iconic baking methods. Prepare to refine your technique, calibrate your instincts, and perhaps even change your approach to the entire sourdough process as we weigh the pros and cons of the humble loaf pan versus the legendary Dutch oven.
The Science of Steam and Crust Development
The Dutch Oven Advantage
The Dutch oven serves as a miniature, self-contained steam chamber. When you score your sourdough boule and place it into a preheated Dutch oven, the moisture evaporating from the dough is trapped within the vessel. This high-humidity environment is critical for oven spring and the creation of a glossy, mahogany-colored crust. By keeping the lid on for the first 20 minutes at 450°F (232°C), you prevent the exterior of the loaf from setting too quickly. This extended "soft" period allows the yeast and bacteria a final burst of activity, resulting in the high-volume rise that characterizes artisan loaves.
The secret to a bakery-quality crust is not just heat; it is the management of moisture at the very moment of expansion. Without that initial enclosure, your bread sets into a crust far too early, effectively capping its potential for vertical growth.
When the lid is removed, the concentrated heat radiates directly onto the crust, facilitating the Maillard reaction, which is responsible for those deep, complex flavors and the dark, caramelized finish we all crave. This transition from a moist environment to a dry one is essential for achieving a crisp shell. The Dutch oven also provides a stable base of heat, which is vital if your home oven has hotspots or poor airflow.
Loaf Pan Physics
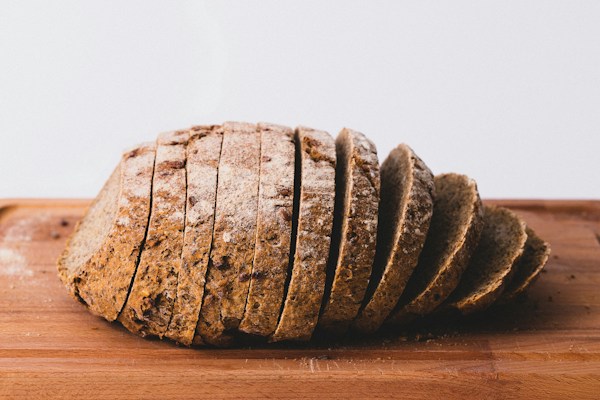
A bread loaf pan, by contrast, provides a structural scaffold. Because the dough is supported by the walls of the pan, you can work with much higher hydration levels—sometimes pushing into the 85-90% range—without the dough losing its shape. The loaf pan essentially acts as a mold, forcing the gas upward rather than outward. This results in a tight, uniform crumb structure that is significantly easier to slice and store than the erratic, open crumb of a boule.
If you are struggling with your dough spreading like a pancake on a baking stone, the loaf pan is your best friend. The downside is that you lose the intense steam effect of the Dutch oven. To compensate, many professional bakers utilize a secondary pan of hot water on the bottom rack of the oven during the first half of the bake. This creates a humid atmosphere that mimics the Dutch oven’s environment, allowing for a decent rise and a thinner, but still pleasant, crust.
Mastering Heat Retention and Thermal Conductivity
Cast Iron vs. Steel and Aluminum
The thermal mass of a cast-iron Dutch oven is its greatest asset. Cast iron absorbs energy and releases it slowly and steadily, which helps mitigate the temperature fluctuations that occur every time you open your oven door. When baking at 475°F (246°C), that steady, aggressive heat is exactly what you need to drive the oven spring in the first ten minutes. It is the ultimate tool for a baker who values a thick, crackling crust and a deep, chewy texture.
Aluminum or steel loaf pans, however, are significantly thinner and possess lower thermal conductivity. While they do not provide the same heat retention, they offer a faster heat transfer, which can result in a more even bake for denser doughs. Because they are thinner, they are prone to browning on the sides and bottom quite rapidly. If you find your bread is getting too dark on the bottom, try double-stacking your pans or placing a cookie sheet underneath the loaf pan to act as an insulated buffer.
The Role of Preheating
Regardless of the vessel, preheating is non-negotiable. If you are using a Dutch oven, it should be in the oven for at least 45 to 60 minutes before you drop the dough in. This ensures that the lid and the base are uniformly saturated with heat. With a loaf pan, the preheat is less about the vessel itself and more about ensuring your oven has hit the set temperature and saturated the ambient air.
Hydration and Flour Choice Considerations
Tailoring Hydration to Your Vessel
The hydration ratio of your dough significantly influences how it will perform in either vessel. For a Dutch oven boule, a hydration of 70-75% is usually the sweet spot for beginners. It is manageable enough to handle but wet enough to provide a nice open crumb. If you go too high, the dough will be difficult to score and may end up flattening out if your shaping technique isn't precise.
When using a loaf pan, you have more freedom. Because the sides of the pan constrain the dough, you can push the hydration higher. A 80% hydration sourdough loaf baked in a pullman pan or a standard loaf pan will result in a remarkably moist, tender crumb that stays soft for several days. This is the ideal strategy for sandwich bread, where you want a "sandwich-style" crumb that won't crumble apart under the weight of mustard and deli meat.
Flour Types and Strength
Using high-protein bread flour is generally recommended for both methods. You want a protein content between 12.5% and 14% to ensure the gluten network is strong enough to hold the carbon dioxide produced by the wild yeast. If you are using freshly milled flour or whole wheat, consider increasing your autolyse time to 2-3 hours. These flours contain bran, which can act as tiny, sharp shards that cut through your gluten strands, potentially hindering your rise.
Strength is not just about the flour; it is about the build. If your sourdough starter isn't active and bubbly, even the best Dutch oven in the world won't save your loaf from being dense and gummy.
When incorporating high percentages of whole grains, the loaf pan is often superior because it provides the structure that a weak gluten network might fail to provide on its own. A 50% whole wheat sourdough will rarely hold its shape in a boule, but it will thrive in a pan, giving you a nutritious, delicious loaf that maintains a consistent shape throughout the cooling and slicing process.
Essential Techniques for the Modern Baker
Scoring for Success
Scoring is where science meets art. In a Dutch oven, you are creating a deliberate point of failure, allowing the steam to escape through a controlled vent rather than the bread bursting at the sides. A deep, angled score (using a lame) allows for a "ear" to develop. With a loaf pan, you are often looking for a more uniform expansion. You can still score the top, but a simple straight line down the center is often sufficient to guide the rise.
Some bakers prefer to let the bread self-destruct in the pan, which creates that rugged, rustic farmhouse look. Others prefer the precision of a professional loaf. Experiment with both to see which aesthetic fits your kitchen philosophy. Always ensure your scoring blade is sharp; a dull blade will drag the dough rather than slice it, which can cause the loaf to deflate during the loading process.
Cooling and Resting
The mistake most beginners make is cutting into the bread too soon. This is a culinary cardinal sin. As bread cools, the interior starches are still setting, and the residual moisture is redistributing itself throughout the crumb. If you cut into a loaf straight from the oven, you are essentially releasing the steam and moisture that keeps the bread soft, which leads to a "gummy" or "doughy" texture.
* Cool for at least 2 hours.
* Place the loaf on a wire rack to allow air circulation on all sides.
* Do not wrap the bread while it is still warm, as this will result in a soggy, leathery crust.
* For the best flavor, wait until the next day; the acids and enzymes in the sourdough have more time to mature and settle.
Troubleshooting Common Failures
The Flat Loaf Phenomenon
If your bread comes out flat, start by checking your starter health. Is it peaking consistently within 4-6 hours? If your starter is sluggish, your dough will not have the fermentation power to lift itself, regardless of the vessel. Secondly, evaluate your bulk fermentation. Many home bakers cut this phase short. Your dough should increase in volume by 30-50% during bulk, and it should feel airy and alive to the touch before you shape it.
If you are using a Dutch oven, ensure you aren't leaving the lid on for too long or too short a time. Removing the lid too early will set the crust before the oven spring is finished, causing the loaf to collapse. Removing it too late, or not at all, will result in a pale, soft crust. Aim for that 20-minute mark as your baseline, then adjust based on your oven’s specific performance.
Burnt Bottoms
This is a classic issue with the Dutch oven. Because cast iron conducts heat so efficiently, the bottom of your loaf can scorch before the rest of the bread is finished. To mitigate this, place a baking sheet on the rack below your Dutch oven to deflect the direct heat. You can also place a layer of cornmeal or parchment paper at the bottom of the Dutch oven to create a small air gap between the dough and the hot iron.
With loaf pans, ensure you are not using dark, non-stick coatings if you find your loaves are browning too fast. Shiny, light-colored aluminum pans reflect heat better and bake more gently. If your pan is dark, drop your oven temperature by 25°F (15°C) to compensate for the rapid heat absorption. Mastering these small adjustments will turn your "problem" loaves into professional-grade results.
Expanding Your Repertoire
Beyond the Basic Loaf
Once you have mastered both the Dutch oven boule and the loaf pan sandwich bread, it is time to experiment with inclusions and shaping. Seeds like sunflower, flax, and sesame add a delightful crunch, while dried fruits or herbs can turn your daily bread into a gourmet experience. Remember, heavier inclusions can weigh down your dough, so you may need to increase your levain (the fermented starter component) slightly to ensure a strong rise.
Try using your loaf pan for enriched doughs as well. Sourdough brioche or milk bread, when baked in a pan, benefits from the structure provided by the walls, allowing for an incredibly soft, pull-apart crumb that simply isn't possible with an artisan boule. By alternating between your vessels, you expand your culinary toolkit and ensure that your baking remains exciting and dynamic.
Scaling Up Your Production
For those who wish to bake in batches, the loaf pan is far superior to the Dutch oven. You can easily fit two, three, or even four loaf pans into a standard oven simultaneously, whereas you are usually limited to one, perhaps two, Dutch ovens depending on the size of your oven cavity. If you are baking for a household, this efficiency cannot be ignored. The goal of a home baker is to integrate bread-making into a lifestyle, and if that means baking four loaves at once to freeze for the week, the loaf pan becomes the clear tactical winner.
Final Thoughts
The debate between the bread loaf pan and the Dutch oven is ultimately one of intent. Do you seek the rugged, blistered, high-hydration masterpiece that looks like it belongs in a French boulangerie? Then reach for your Dutch oven. Do you prioritize the perfect slice for a Reuben sandwich, or are you looking to optimize your weekly production for the whole family? The loaf pan is your champion. Both methods require the same dedication to starter health, fermentation timing, and temperature control, proving that the tool is merely an extension of the baker’s knowledge.
Do not fear the learning curve. Every baker has had their share of flat loaves, burnt crusts, and dense crumbs. The beauty of sourdough lies in its iterative nature; each bake teaches you something new about the relationship between your ingredients and your equipment. Whether you choose the cast-iron enclosure or the structural support of a tin, remember that your bread is a reflection of your patience and your care.
Now, take that knowledge, fire up your oven, and start your next bake with confidence. The difference between a good loaf and a great one is rarely found in the price of your tools, but in the precision of your process. Blame the chef, maybe, but only for being the one to pursue mastery in the art of the loaf. Whether you are aiming for that rustic, crunchy, beautiful boule or the perfect, golden-brown sandwich slice, the journey you take from flour and water to a finished, fragrant loaf is one of the most rewarding experiences in the culinary world. Enjoy the process, respect the fermentation, and always keep your starter fed. Happy baking.
As you continue to refine your craft, remember that the most important ingredient is your intuition. Over time, you will begin to "hear" the dough. You will know, just by the feel of it during the stretch-and-fold process, whether it has enough strength to hold up in a Dutch oven or if it needs the support of a loaf pan. You will learn to recognize that subtle, sweet smell of a perfectly fermented bulk rise. These are the markers of a true baker. Do not get discouraged by the complexities of hydration percentages or thermal mass. Instead, view them as levers you can pull to change the outcome of your bread.
Every successful baker eventually finds their own rhythm. Perhaps you find that you prefer the process of a Dutch oven on weekends when you have the time to really focus on the scoring and the artistic flair of the boule. During the work week, maybe you gravitate toward the predictability and reliability of a loaf pan. There is no right or wrong answer here, only the path that leads you to the bread you love to eat. Keep notes, keep practicing, and most importantly, keep enjoying the process of creating something sustenance-driven and nourishing with your own two hands.
The sourdough journey is a long one, and you have only scratched the surface. As you master these two methods, you will find that you can translate your skills to even more complex bakes like baguettes, ciabatta, and focaccia. The principles remain the same: patience, observation, and a deep respect for the biology of your starter. When you embrace these, your bread will transform, and the "Blame The Chef" philosophy of continuous improvement will become your natural way of life in the kitchen.
We hope this guide has provided you with the clarity needed to choose your path or, perhaps, encouraged you to master both. There is immense satisfaction in being able to pull a perfect, steaming boule from a Dutch oven, just as there is in slicing into a perfectly squared-off loaf of homemade sandwich bread. Both are expressions of culinary artistry. Keep your oven hot, your starter active, and your passion for baking alive. There is always another loaf to bake, another experiment to run, and another delicious outcome to share with those you love. May your crusts always crackle and your crumb always be perfectly aerated.
We invite you to share your results with the community. When you have successfully baked a loaf that meets your expectations, take a photo, analyze the crumb, and think about what you learned. Was the fermentation just right? Did the vessel provide enough support? Each bake is a data point. Use it to inform the next one. The goal is never to stop learning, because in the kitchen, there is always something new to discover, even in the simplest of loaves.
Finally, remember that baking is as much about the community as it is about the food. Share your loaves with neighbors, friends, and family. The joy of a fresh loaf is magnified when it is shared. Teach others what you have learned about the Dutch oven and the loaf pan. Spread the sourdough love, and continue to elevate your skills one bake at a time. Thank you for choosing to hone your craft with us here at our culinary blog. We are thrilled to be part of your baking journey, and we cannot wait to see what you produce next. Keep rising, keep baking, and stay curious.
If you find yourself hitting a plateau, don't hesitate to return to the basics. Check your flour's protein content, verify your oven temperature with an external thermometer, and revisit your starter's feeding schedule. Sometimes, the most complex problems have the simplest solutions. Baking is a game of patience, and those who are willing to slow down and observe the details are the ones who ultimately produce the most consistent results. You have all the tools you need—now go out there and make some exceptional bread.
Remember, the goal isn't perfection; the goal is progression. Each loaf represents a step forward in your understanding of the sourdough process. Treat every bake as a success, regardless of the aesthetic outcome, because every loaf teaches you something about the variables you are manipulating. Embrace the flour, embrace the time, and embrace the crust. Happy baking to everyone, and may your loaves always bring warmth and happiness to your home table. You are well on your way to becoming a master of your own oven, and we are proud to have helped you navigate this fundamental choice in your baking evolution.
As you look forward to your next bake, consider experimenting with a long, cold proof in the refrigerator. This technique, often called a "retard," does wonders for both the Dutch oven boule and the loaf pan bread. It deepens the flavor profiles, making that characteristic sourdough tang more pronounced, and it makes the dough easier to score and handle. Try placing your shaped loaves in the fridge for 12 to 24 hours before baking. You might be surprised at how much this simple change improves both the flavor and the final structure of your bread. It is a professional chef's secret that is entirely accessible to the home baker.
There is truly no limit to what you can achieve once you understand how your vessels interact with your dough. By mastering these two primary tools, you have unlocked the potential to bake whatever your heart desires. From artisan boules to sandwich loaves, the skills you have developed here serve as the foundation for a lifetime of wonderful baking. Continue to experiment, continue to push your boundaries, and never stop being a student of the craft. Your kitchen is your laboratory, your oven is your kiln, and the possibilities are as endless as the flour in your pantry. We hope you enjoy the journey as much as the end result.
Final advice: stay consistent. Pick a recipe, pick a vessel, and repeat it until you can bake it with your eyes closed. Only then should you start changing variables. This is the surest way to build the instinctual knowledge that separates a casual baker from a true artisan. Master the foundation, and you will eventually find that you don't need a recipe at all—just a bowl, some flour, some water, and your own expert hands. We are excited to see you master the art of the loaf. Farewell for now, and may your kitchen always be filled with the intoxicating scent of freshly baked sourdough. You are ready to tackle anything the oven throws at you. The path is clear, and the bread is waiting. Good luck!



Get the Next Recipe
Weekly recipes, techniques, and gear picks — straight to your inbox.
