Decoding Mexican Mole: A Home Cook’s Guide to Mastering Complex Chili and Chocolate Bases
The art of Mexican mole is often shrouded in a layer of culinary mysticism that intimidates even the most seasoned home cooks. It is frequently categorized as a "special occasion" dish, relegated to the dusty pages of complex cookbooks or reserved for the labor-intensive traditions of family matriarchs in Oaxaca and Puebla. Yet, at its core, mole is not a single recipe but a philosophy of balance—a bridge between the sharp, earthy heat of dried chilies and the grounding, bittersweet richness of cacao. When you break down the process into its fundamental elements, you realize that the intimidation factor is simply a result of the sheer number of ingredients involved. Mastering this sauce is not about perfection on the first try; it is about learning how to manipulate flavors through roasting, frying, and slow-simmering until they harmonize into something far greater than the sum of their parts.
In this guide, we aim to demystify the process for the modern kitchen, providing you with the tools to tackle one of the world’s most sophisticated culinary inventions. We will look past the common misconception that a "real" mole requires a three-day commitment involving twenty-seven separate steps. While authenticity is deeply rooted in patience, modern techniques allow us to streamline the labor without sacrificing the integrity of the final flavor profile. By focusing on the Mise en Place—the careful organization and preparation of your components—you can turn a daunting project into a therapeutic afternoon of deep, aromatic exploration. You will learn how to select the right chilies, how to toast spices without burning the delicate volatile oils, and how to emulsify a sauce that possesses the perfect, velvet-like consistency.
We invite you to step into the kitchen with an open mind and a willingness to embrace the nuance of slow cooking. Preparing mole is a sensory experience; it is a lesson in how heat levels change as ingredients toast and how the acidity of a tomato or the sweetness of a plantain can pivot a sauce from aggressive to sophisticated. As we navigate the different textures and flavor profiles, remember that the "Blame The Chef" philosophy is built on the belief that anyone can replicate these professional-grade results with the right guidance. Whether you are aiming for a classic Mole Negro or a slightly more approachable Mole Poblano, the techniques remain consistent. Let us peel back the layers of this culinary icon, ensuring your kitchen becomes a workshop for innovation rather than a source of stress.
The Chemistry of the Chili: Selecting Your Foundation
The success of your mole begins long before you touch a pot. The chili selection is the single most critical decision you will make, as it provides the primary structural backbone for the sauce. In traditional Mexican cooking, a blend of dried chilies is used to achieve a three-dimensional flavor profile: one chili provides the base heat, another contributes a sweet, raisin-like undertone, and a third offers a bright, acidic edge. You should never rely on just one variety; the complexity of mole is found in the interplay between these different dried fruits.
Understanding the Flavor Profiles
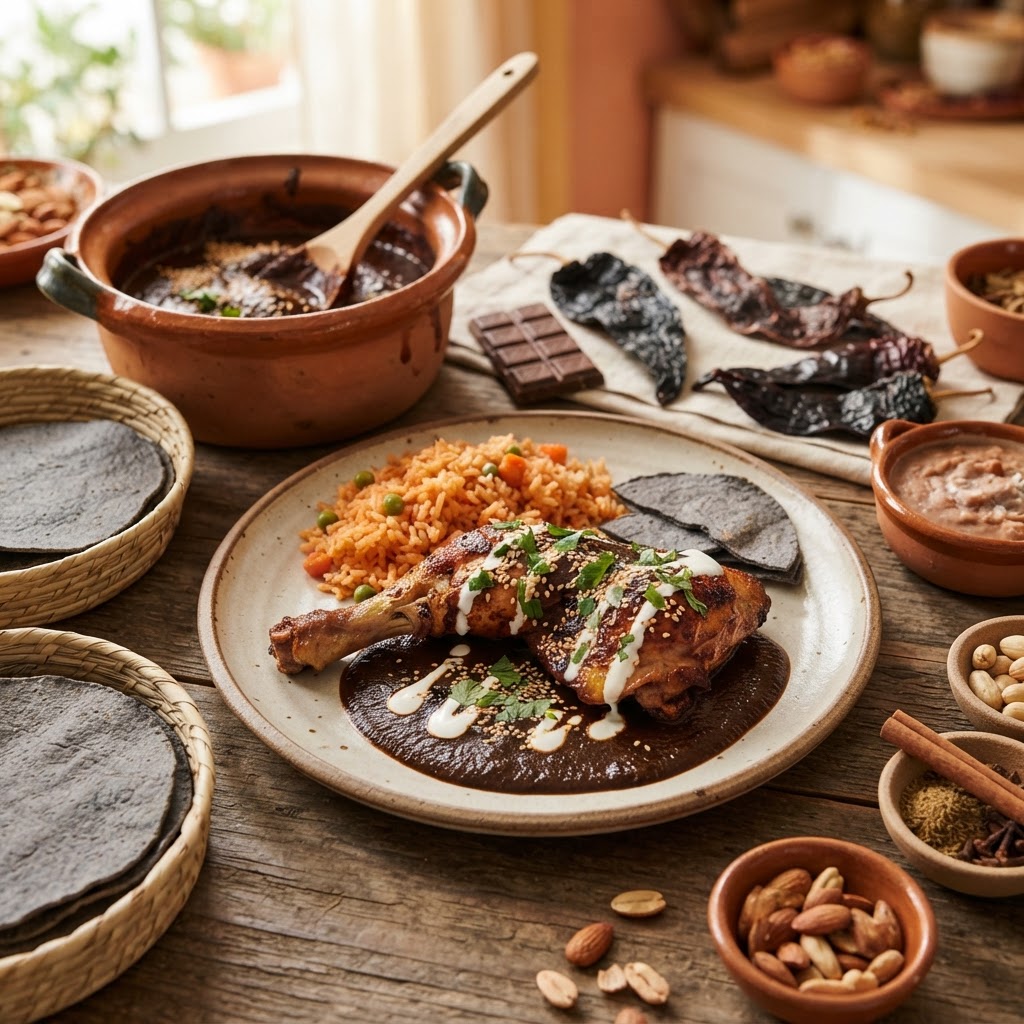
To create a balanced base, you must understand the specific properties of the most common varieties used in moles. The Ancho chili, which is a dried Poblano, is the workhorse of the mole world; it is sweet, low-heat, and provides a deep, fruity body. The Mulato chili is darker, almost black, and offers notes of chocolate, licorice, and tobacco, making it essential for richer sauces. For the heat, the Pasilla chili brings a woodsy, complex flavor that lacks the sharp "bite" of fresh chilies, allowing for a slower, more creeping burn.
Ancho*: Sweet, moderate, essential for body.
Mulato*: Dark, earthy, notes of cocoa and dried cherry.
Pasilla*: Tangy, woody, provides a long, slow heat.
Chipotle*: Smoked, intense, used sparingly for depth.
Proper Preparation Techniques
Once your chilies are selected, the preparation is a two-step process: seeding and toasting. First, remove the stems and the majority of the seeds. While some traditionalists leave a few seeds for heat, removing most of them prevents your sauce from becoming bitter or overly aggressive. After seeding, you must lightly toast the skins in a dry pan until they become fragrant—but do not let them smoke. If they smoke, they turn acrid, and there is no way to rescue the sauce once those bitter oils are released.
"The magic of mole lies in the transformation of the chili. You aren't just heating them; you are awakening the essential oils that define the soul of the dish. Respect the heat of your pan, and the chili will reward you with a depth of flavor that is truly unparalleled in world cuisine."
The Balancing Act: Nuts, Seeds, and Thickeners
Once the chili base is established, the texture and density of your mole rely on the thickeners. This is where the culinary science gets interesting. The use of nuts and seeds—such as almonds, peanuts, sesame seeds, and pumpkin seeds—serves two purposes. First, they act as a natural thickening agent, providing a viscous, velvety mouthfeel. Second, they provide the fatty components required to mellow the harsh heat of the chilies. Without this fat, the sauce would be thin and the heat would be abrasive; the lipids coat the palate and allow the complex flavor notes to linger rather than disappearing in a flash of spice.
The Role of Toasting and Frying
You must treat these thickeners with the same care as the chilies. Almonds and sesame seeds are high in fat and can burn in a matter of seconds. I recommend a low-and-slow approach. Fry your nuts in a small amount of neutral oil (like grapeseed or avocado) until they are golden brown, then remove them immediately. If you have any residue left in the pan, use it as the base for the next step of your recipe. This "seasoned oil" is liquid gold—every ingredient cooked in it builds a library of flavor that creates the signature depth of character found in high-end restaurant moles.
Managing the Starch
Beyond nuts, many traditional recipes use bread, crackers, or corn tortillas to add body to the sauce. This is not filler; it is a functional ingredient. The starches in these items help emulsify the fats and liquids, ensuring that the sauce clings to the protein—usually turkey or chicken—rather than sliding off. If you are aiming for a gluten-free version, toasted corn tortillas or even finely ground toasted corn masa can work as a substitute, but be aware that they will slightly alter the final color and flavor profile compared to a rustic sourdough or a simple water cracker.
The Cacao Connection: Why It Is Not Just Dessert
There is a common misconception that mole is a "chocolate sauce." This is inaccurate. Cacao, or Mexican chocolate, is used as a balancing agent, not a primary flavor. Think of cacao in mole the same way a pastry chef uses a pinch of salt in caramel—it is there to enhance the surrounding flavors, not to overpower them. High-quality Mexican drinking chocolate is often already seasoned with cinnamon, almond, and sugar, which makes it easier to balance, but if you are using high-percentage baking chocolate or pure cocoa solids, you will need to adjust your sugar levels accordingly.
Incorporating the Chocolate
Add your chocolate at the very end of the cooking process. If you add it too early, the sugars can burn or scorch, creating a metallic, burnt flavor that is impossible to hide. Furthermore, the heat-sensitive aromatic compounds in cocoa are delicate. By stirring in finely chopped chocolate only once the sauce has reached its final simmer, you preserve the subtle floral and earthy notes of the bean. Always taste as you go. Start with less than you think you need; you can always add more, but you cannot subtract the sweetness once it is emulsified into the sauce.
Beyond the Cocoa Bean
If you find yourself without traditional Mexican chocolate, you can improvise with a mixture of dark cocoa powder, a pinch of Ceylon cinnamon, and a touch of brown sugar. This combination mimics the profile of the spiced chocolate discs found in Mexican markets. Remember that the goal is balance. The mole should taste earthy, savory, and only slightly sweet. If it tastes like a dessert sauce, you have added too much chocolate or sugar. The bitterness of the dark chocolate should act as a bridge between the savory chilies and the proteins.
"A well-made mole is like a symphony; the chilies are the percussion, the spices are the strings, and the chocolate is the conductor that brings everyone into alignment. If the conductor is too loud, the melody is lost."
The Art of the Sear and Simmer
Before the sauce is finished, we must discuss the protein. While modern versions of mole can be served over roasted vegetables or tofu, the traditional pairing is poultry. The key here is to sear the protein well before introducing it to the sauce. You are not trying to cook the meat all the way through at this stage; you are developing a Maillard reaction on the surface of the skin or muscle. This crust adds a savory, roasted element that the sauce will absorb during the long simmering process.
Timing and Temperature
After the sear, incorporate the protein into the sauce and lower the heat to a very gentle simmer. A rapid boil will break the emulsion of your sauce, causing the fats to separate and the solids to sink to the bottom. You want the sauce to be "lazy"—barely bubbling. The ideal temperature for this is around 180°F to 190°F. Maintain this for at least 45 minutes to an hour. This time allows the flavors of the chili, fruit, spices, and chocolate to permeate the protein, making the meat incredibly tender.
Tips for Professional Texture
If you find that your mole is too thin after simmering, do not panic. Avoid the temptation to add more flour or cornstarch, as this will mute the delicate spice profile. Instead, use a reduction technique. Remove the meat from the pot and let the sauce continue to simmer until it reaches the desired consistency. Alternatively, if you have a high-powered blender, you can take a small portion of the vegetables and aromatics from the sauce, blend them into a fine puree, and stir that back into the pot to increase the body without adding unnecessary fillers.
Refining Your Flavor Profile: The Acid and Heat Balance
Even after the long simmer, a mole can sometimes feel "flat." This is usually a sign that you are missing an acidic element to cut through the richness of the fats and the density of the chilies. In professional kitchens, we keep a selection of finishing agents on hand to tweak the sauce right before plating. A dash of apple cider vinegar or even a squeeze of fresh lime juice can do wonders for a sauce that feels too heavy or "muddy."
The Acidic Edge
Acidity acts as a palate cleanser. In a complex, fatty dish like mole, acid provides the necessary contrast to make the flavors "pop." Do not add this acid early in the cooking process, as it will lose its brightness during the simmer. Add it at the final tasting stage. Start with just a half-teaspoon and adjust. You aren't looking for a tangy sauce; you are looking for a sauce that has a "bright" finish that makes you want to take the next bite immediately.
Heat Calibration
If the mole is too spicy, the best way to temper it is with fats or a touch of natural sweetness. A spoonful of peanut butter or a small amount of heavy cream can work effectively to neutralize aggressive chili heat. If the mole is not spicy enough, do not simply throw in cayenne or chili flakes. Instead, infuse some oil with high-heat dried chilies (like Arbol or Pequin) and whisk that in. This keeps the texture of the mole smooth while escalating the heat profile in a controlled, elegant manner.
Scaling Up: Batch Cooking and Preservation
One of the great joys of making mole is that it is the ultimate batch-cooking dish. Because the flavors continue to develop and settle over time, a mole often tastes better on the second or third day. This makes it an ideal project for a weekend afternoon, as you can prepare a large quantity and store it for future meals. In fact, many professional chefs believe that mole should sit for 24 hours before being served, allowing the chemical compounds in the various ingredients to fully bond.
Proper Storage Techniques
When storing mole, ensure it is completely cooled before covering. If you put it in the refrigerator while it is steaming, you risk condensation, which can lead to spoilage. Use glass containers, as the high oil and chili content can stain or absorb odors from plastic containers. A well-made mole will keep in the refrigerator for up to five days. If you are not planning on eating it within that time frame, it freezes exceptionally well. Leave an inch of headspace at the top of your container, as the sauce will expand slightly during the freezing process.
Reheating for Success
When reheating, avoid the microwave, which can create hot spots and break your emulsion. Reheat the sauce slowly on the stove in a heavy-bottomed pot. If it looks a little thick or separated after being frozen, a splash of chicken or vegetable stock whisked in vigorously over medium-low heat will bring it back to its original, silky consistency. Never use water to thin the sauce, as this will dilute the hard-won flavor depth; always use a high-quality, flavorful stock.
Final Thoughts
Mastering Mexican mole is a rite of passage for the dedicated home cook, but it is also a gateway to a deeper understanding of flavor chemistry. By viewing the process through the lens of balance—weighting your fats against your acids, your sweetness against your heat—you stop following a rigid recipe and start practicing a craft. You will learn that the "rules" of mole are actually flexible guidelines designed to keep you from losing your way in the complexity of the ingredients.
Do not be discouraged if your first batch feels slightly off; even professional chefs adjust their ratios every time they prepare this dish. The quality of your ingredients, the season of your chilies, and even the type of pan you use will change the final outcome. Embrace these variations as part of the unique story of your cooking. When you finally plate that perfectly coated piece of chicken, sprinkled with toasted sesame seeds and perhaps a sliver of fresh radish for crunch, you will understand why this dish is the pride of Mexican gastronomy.
Take your time, toast your spices with care, and remember that the kitchen is a space for constant growth. The process of making mole is as much about the focus required to stir the pot as it is about the end result on the plate. Now that you have the knowledge to decode the complex, layering, and timing of these ingredients, go forth and experiment. Your guests—and your palate—will thank you for the extra effort spent mastering this most magnificent of sauces. Cooking is a journey, and with a pot of homemade mole on the stove, you are well on your way to becoming a master of your own culinary world. Happy cooking, and remember: if it’s good, take the credit, but if it’s not, well, just blame the chef!
Get the Next Recipe
Weekly recipes, techniques, and gear picks — straight to your inbox.
