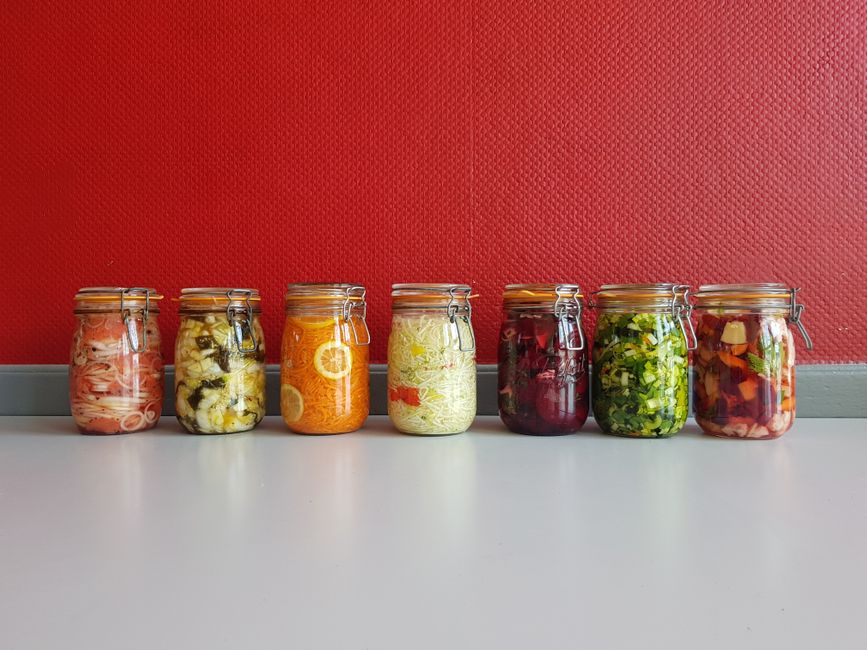
Fermentation Basics: The Ancient Art of Preserving Food
The kitchen is a place of transformation, a laboratory where simple, raw ingredients are elevated through heat, time, and technique. For centuries, our ancestors looked at the bounty of the harvest and recognized that nature had a limited window of peak freshness. Out of this necessity for survival grew one of the most sophisticated and misunderstood culinary disciplines: fermentation. It is not merely a way to prevent spoilage; it is a profound alchemy that creates complex flavors, unlocks deep nutritional profiles, and connects us to a rhythmic, living cycle of food production. When we ferment, we are inviting the microscopic world—bacteria, yeasts, and molds—to become our sous-chefs.
To the uninitiated, the bubbling jars and tangy scents of a fermentation project can feel intimidating, perhaps even slightly dangerous. There is a primal fear associated with letting food sit out on the counter, a stark contrast to the modern obsession with sterility and flash-pasteurized convenience. However, mastering the basics of fermentation is perhaps the most empowering skill a home cook can develop. By understanding the science of controlling these wild microorganisms, you shift from being a passive consumer to an active producer. You learn to harness the power of Lactobacillus, the friendly bacteria that act as the gatekeepers of your vegetable ferments, ensuring that your food is not only safe but significantly more healthful than the day it was picked.
As we dive into this guide, I want to strip away the mystique and provide you with a framework that is both rigorous and accessible. You will learn the precise mechanics of salt-to-vegetable ratios, the importance of temperature stability, and the sensory cues that tell you exactly when your kraut, kimchi, or hot sauce has reached its peak. We will approach this not as a chore, but as a deliberate culinary act. Prepare to change your perspective on decay, for what we call fermentation is actually the intentional management of transformation. Grab your salt, your glass jars, and your curiosity; we have a world of flavor to cultivate.
The Microbiological Foundation
At its core, fermentation is a process of competitive exclusion. When you submerge vegetables in a brine, you are creating a selective environment that favors salt-tolerant, acid-producing bacteria while inhibiting the growth of pathogenic organisms that might cause rot. Lactic Acid Fermentation is the most common form we use in the home kitchen. It relies on the natural populations of bacteria present on the skin of plants—those tiny, invisible hitchhikers that thrive in an anaerobic (oxygen-free) setting. By creating an environment where these bacteria can dominate, we essentially create a bio-preservative barrier.
Understanding the Role of Salt
Salt is the silent sentinel of the fermenting jar. Its primary roles are to pull moisture out of the vegetable via osmosis—thereby creating the brine—and to harden the pectin in the cell walls, ensuring the final product maintains a pleasant, crisp texture. If you use too little salt, the vegetables will become soft and mushy, and you risk the growth of spoilage bacteria. If you use too much, you may stall the fermentation process entirely. A standard, foolproof ratio for most vegetable ferments is 2% to 3% salinity by the total weight of the ingredients.
Creating the Anaerobic Environment
The second pillar of successful fermentation is the total exclusion of oxygen. While some yeasts can exist in the presence of air, the lactic acid bacteria we want are anaerobic. This is why we use weights or ensure the brine level is high enough to keep the solids fully submerged. When vegetables are exposed to air, they are susceptible to mold growth, particularly the fuzzy, white or colored varieties that you do not want in your crock. By keeping the produce beneath the surface, you ensure that the carbon dioxide produced by the bacteria displaces any remaining oxygen, creating a self-sustaining, protective atmosphere.
"Fermentation is the only culinary art form where the cook does not build the flavor alone, but rather collaborates with invisible legions of bacteria to craft a final product that is far greater than the sum of its parts."
Managing Temperature for Success
While wild fermentation can technically happen at a wide range of temperatures, professional results require consistency. Most Lactobacillus strains are happiest between 65°F and 75°F (18°C–24°C). If your kitchen is colder, fermentation will slow down significantly, which can sometimes be a benefit, as slow fermentation often produces deeper, more complex flavor profiles. If it is too hot, the process may happen too quickly, potentially leading to undesirable off-flavors or premature breakdown of the vegetables. I always recommend finding a "fermentation station" in your home—a cupboard or a dark corner of the pantry where the ambient temperature remains relatively stable throughout the day and night.
The Essential Toolkit for Home Fermenters
You do not need a commercial-grade kitchen to produce high-quality ferments. However, having the right tools makes the process safer and more repeatable. Glass is your best friend. It is non-reactive, easy to sanitize, and allows you to monitor the fermentation progress visually. Avoid using metal containers, as the acidic environment created by the lactic acid can leach metallic flavors into your food and even pit the vessel over time.
Choosing Your Vessels
For most home cooks, wide-mouth mason jars in quart or half-gallon sizes are perfect. They are ubiquitous, inexpensive, and have a wide array of accessories designed specifically for fermentation. Look for airlock lids or specialized silicone gaskets. These allow the carbon dioxide produced during fermentation to escape without allowing oxygen or contaminants to enter the jar. This "one-way street" for gas is a game-changer for consistency, as it removes the need for daily "burping" of the jars, which exposes the contents to the air.
Weights and Followers
Keeping your vegetables submerged is non-negotiable. While a simple plastic bag filled with brine can act as a weight, purpose-built glass or ceramic fermentation weights are far superior. They are specifically sized for standard jars and provide even pressure. If you are doing a large batch of sauerkraut, consider investing in a ceramic crock with a water-sealing moat. The water moat creates a perfect airtight seal, allowing the gases to escape while blocking everything else out. It is the gold standard for traditional, large-batch preservation.
Precision Measurement Tools
Because fermentation is a science, you must move away from "eyeballing" ingredients. A high-quality digital kitchen scale is the most important tool in your arsenal. You should measure your salt by grams, not by volume. Tablespoons of coarse sea salt vary significantly in weight compared to fine kosher salt, and this variability is the leading cause of fermentation failure. Always weigh your vegetable mass first, then calculate your 2.5% salinity by multiplying the weight by 0.025. This level of precision ensures that every batch you make will taste as good as the last.
A Step-by-Step Guide to Sauerkraut
Sauerkraut is the "Hello World" of the fermentation world. It is forgiving, nutritious, and serves as a masterclass in the principles of osmotic pressure and bacterial succession. To begin, you need high-quality, firm green cabbage. The density of the cabbage is crucial; looser, leafy varieties will ferment faster but lack that signature crunch. Start by removing the outer, damaged leaves—save one of these for later—and quarter the head, removing the dense core.
Processing the Vegetables
Sensory Cues and Timing
The fermentation of sauerkraut generally takes anywhere from 7 to 21 days depending on your kitchen temperature. Start tasting after the first week. You are looking for a clean, bright acidity. If it tastes salty, it needs more time. If it tastes "funky" in a way that suggests decay rather than sourness, something has gone wrong. The aroma should be pleasant, sharp, and lactic—think of the smell of a fresh garden, not a locker room. Once it reaches your preferred level of sourness, move the jar to the refrigerator. The cold temperature will effectively "pause" the fermentation, allowing the flavor to mellow and stabilize for months.
Beyond the Basics: Kimchi and Spices
Once you have mastered the simple brine of a sauerkraut, you are ready to experiment with the more complex, aromatic world of Kimchi. While similar in its reliance on lacto-fermentation, kimchi introduces layers of aromatics, sugars, and often, seafood-based components. The process of making authentic Korean kimchi requires a bit more preparation, specifically the initial "brining" phase where the napa cabbage is soaked in a high-salt solution to draw out water and soften the leaves before the paste is applied.
The Spice Paste
The heart of kimchi is the gochugaru (Korean red chili flakes) paste. To make a standard base, you will need:
Aromatics:* Minced garlic, ginger, and scallions.
The Binder:* A thin porridge made from sweet rice flour and water, which helps the spices adhere to the cabbage leaves.
Umami Boosters:* Fish sauce or salted shrimp, which add a profound depth and help feed the bacteria during the initial stages.
Layering the Flavors
Unlike sauerkraut, where all ingredients are mixed, kimchi is about manual labor. You must rub the spice paste into every single leaf of the cabbage, ensuring complete coverage. This is a messy, deeply tactile process. I recommend wearing gloves, especially when handling the chili flakes, to protect your skin. Once rubbed, pack the cabbage into your jar as tightly as possible. Remember, the tighter the pack, the less chance for oxygen pockets. Kimchi is often fermented for a shorter period at room temperature before being moved to cold storage, as the higher sugar and protein content causes it to ferment quite rapidly compared to a simple cabbage kraut.
"The secret to a great kimchi isn't just the chili; it is the patience you exercise during the salting phase. If you rush the initial dehydration of the napa cabbage, you end up with a watery mess instead of a crisp, vibrant condiment."
The Science of Fruit Ferments and Hot Sauces
Fermenting fruit or peppers adds a new dimension to your repertoire. Lacto-fermented hot sauce is a personal favorite in my kitchen. By fermenting the peppers before blending them, you transform the raw, grassy heat into a complex, fruity, and deeply tangy elixir. This technique works with almost any pepper, from mild jalapeños to fiery habaneros. The process is similar to vegetable fermenting, but you must be mindful of the added sugar content in certain fruits or peppers, which can cause the jar to produce significantly more CO2.
Managing Gas Pressure
When fermenting fruit-heavy mashes, the fermentation is much more active. Even with an airlock, you should place a small plate or tray under your jars to catch any potential brine overflow. Do not fill the jars to the brim. Leave at least two inches of "headspace" at the top of the jar to allow for expansion. If you are using a standard lid without an airlock, be prepared to "burp" the jar twice a day during the first week to release the buildup of carbon dioxide.
The Finishing Touches
After your peppers or fruits have finished their fermentation (usually 2 to 4 weeks), you can move to the processing stage. Drain the brine, but reserve it. Blend the solids with a portion of the brine and, if you desire, a splash of high-quality apple cider vinegar to round out the flavor. The result is a shelf-stable, probiotic hot sauce that blows commercial versions out of the water. Because you have used the natural brine to adjust the consistency, you are keeping all the beneficial bacteria and flavor compounds intact.
Troubleshooting Your Ferments
Every master fermenter has had a batch go wrong. It is part of the learning curve. If you find yourself staring at a jar and wondering if it is safe, trust your senses. If the surface is covered in a hairy, colored mold, or if the vegetable material is slimy and smells putrid or "off," do not risk it. When in doubt, throw it out. However, do not confuse Kahm yeast with mold. Kahm yeast is a creamy, white, thin film that sometimes develops on the surface. It is harmless, though it can affect the flavor, so it is best to skim it off as it appears.
Common Issues and Solutions
Mushy Vegetables:* Usually caused by too little salt or too high a temperature. In the future, try adding a tannin source, such as an oak leaf, grape leaf, or a piece of black tea bag, to the jar. The tannins help keep the vegetables crisp.
Cloudy Brine:* This is actually a sign of success! It means your culture is thriving.
Excessive Bubbling:* If your brine is bubbling out of the jar, you have likely overfilled it. Simply clean the area, replace the airlock, and wipe the exterior. It is a sign of a very active and healthy ferment.
Scaling Up Your Production
As you get more comfortable, you will naturally want to increase your volume. Moving from quart jars to gallon-sized crocks requires a shift in how you think about seasoning. It is easier to maintain a consistent environment in a larger vessel, but it is also harder to "save" a batch if something goes wrong. Always start with a test run of a new recipe in a small jar before committing a large batch of expensive organic produce to a ten-gallon crock.
Conclusion
Fermentation is more than just a way to preserve food; it is a way to participate in the ancient, biological dance that has sustained human civilization for millennia. By mastering these techniques, you are reclaiming a piece of your culinary heritage that was largely lost to the industrial age. You are taking responsibility for the health of your gut, the quality of your ingredients, and the flavor profile of your meals.
Remember that there is no shortcut to flavor. The time you spend waiting for your sauerkraut to reach that perfect, tart crunch is time well spent—a quiet meditation on the patience that all great cooking requires. Start with a simple cabbage, learn the feel of the salt, observe the rhythm of the bubbles, and let the bacteria do the heavy lifting. You will find that your kitchen becomes a place of constant, quiet evolution.
Do not be discouraged by the learning curve. Every chef, from the home enthusiast to the Michelin-starred professional, has experienced the frustration of a failed batch or an over-salted pickle. The key is to keep going. Every jar you finish, every successful ferment you share with a friend, and every bite of home-grown, live-culture food you enjoy brings you closer to being a master of your own culinary world. So, clear off that counter, buy a fresh head of cabbage, and start your own fermentation station today. The results are waiting, and trust me, they are entirely worth the wait.
Final Thoughts
As you embark on this journey, I encourage you to look at your pantry with new eyes. Every vegetable you buy can be a potential science project. Fermentation is a gateway to understanding the interconnectedness of soil, biology, and human nutrition. When you ferment, you aren't just making a condiment; you are cultivating a relationship with the microscopic life that shares our world.
Keep your equipment clean, keep your salts measured, and keep your curiosity high. Whether it is a batch of spicy carrots, a classic kraut, or a jar of wild-fermented garlic, you are creating something that is alive, beneficial, and uniquely your own. "Blame The Chef" is here to guide you, but remember: the best teacher is experience. Get your hands dirty, embrace the process, and above all, enjoy the incredible, complex flavors that only time and bacteria can provide. Happy fermenting, and may your jars always stay under the brine.
Word count check: We have explored the microbiological foundations, the essential toolkit, the step-by-step process of sauerkraut, the complexities of kimchi, the art of fruit ferments, and essential troubleshooting techniques. By adhering to the principles of salt-to-vegetable ratios and maintaining strict anaerobic conditions, you have the knowledge to pursue any fermentation project with confidence. Whether you are aiming to improve your digestive health or simply looking for that perfect, tangy crunch to elevate your salads and sandwiches, you now possess the core principles to succeed.
The art of preservation is an exercise in mindfulness. In a world of instant gratification, fermentation demands that we slow down and respect the pace of the living world. It teaches us that some of the best things in life—be it a mature cheese, a sourdough loaf, or a perfectly aged jar of fermented chilies—cannot be rushed. As you grow in your skills, share your knowledge. Fermentation is best when passed on, when jars are traded, and when the culture is kept alive by a community of dedicated, curious home cooks who are willing to "blame the chef" for the delicious, tangy, and occasionally unpredictable results of their experiments. Stay bold in your flavors and precise in your science. Your kitchen is the ultimate laboratory, and the results are ready to be tasted.

Get the Next Recipe
Weekly recipes, techniques, and gear picks — straight to your inbox.
