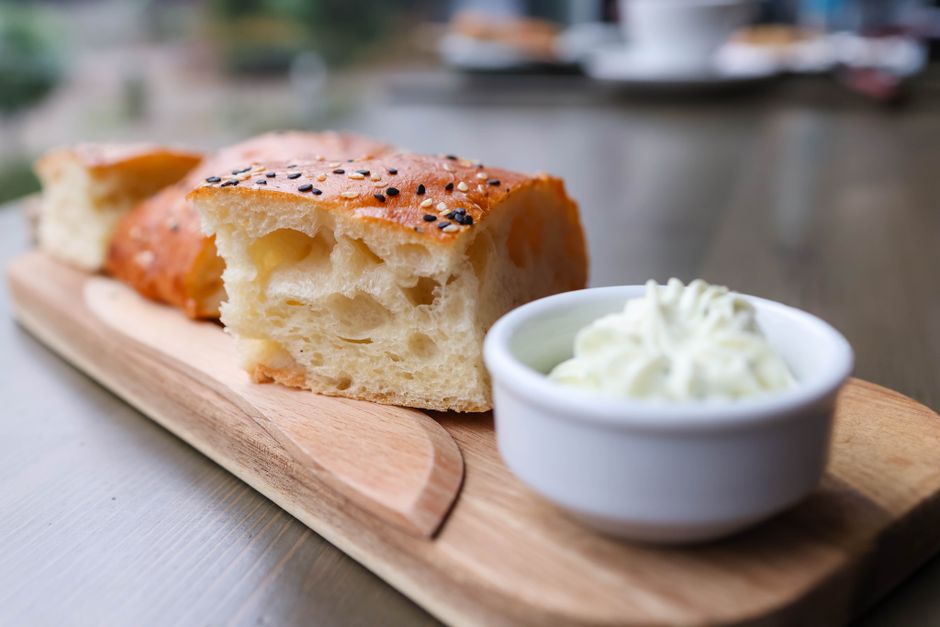
Focaccia Reconsidered: The High-Hydration Dimpled Bread That Forgives Beginners
There is a specific kind of magic that occurs when flour, water, salt, and yeast meet in a bowl, transforming into something far greater than the sum of their parts. For many home bakers, the journey into bread making starts with a sense of trepidation, fueled by the myths of temperamental sourdough starters and the fear of a flat, leaden loaf. Focaccia, however, stands as the great equalizer of the baking world, a bread that doesn’t demand the structural precision of a baguette or the constant supervision of a croissant. It is a rustic, dimpled canvas that invites your fingers to play, rewarding your lack of experience with a golden, olive-oil-drenched crumb that feels like it was pulled straight from a Tuscan trattoria. When we talk about focaccia, we aren't just discussing a recipe; we are discussing an entry point into the fundamental science of hydration and fermentation.
The secret to this specific bread lies in the high-hydration dough, a mixture that feels alien to those used to kneading stiff, manageable loaves. By maintaining a hydration level above 80 percent, you are creating an environment where the gluten strands can stretch thin and wide, eventually trapping air in an open, airy structure that is the hallmark of professional-grade bread. Many beginners are frightened by the "sticky mess" of a wet dough, often reaching for extra flour that inadvertently creates a dense, bready sponge rather than a light, crisp focaccia. Learning to embrace the stickiness is the first step toward mastering artisanal baking, as that moisture is exactly what will evaporate into steam, creating the cavernous holes and the signature crackling crust. Once you trust the dough, the process becomes less of a technical chore and more of a sensory exercise in patience and tactile feedback.
In this guide, we will dismantle the barriers that keep home cooks from achieving bakery-quality results in their own kitchens. We will look at the importance of long, cold fermentation, the role of high-quality extra virgin olive oil, and the specific mechanics of the dimpling process that gives focaccia its iconic appearance. Whether you are using a standard home oven or a high-heat stone deck, the principles remain the same: high heat, adequate fat, and a respect for the natural behavior of yeast. By the end of this deep dive, you will understand why focaccia is arguably the most forgiving bread to master, and why it should become a permanent fixture in your weekly baking rotation. We aren't just making a side dish here; we are building the foundation of your confidence as a baker.
The Chemistry of High Hydration
The most common mistake amateur bakers make is the "fear of the flop," which leads them to add too much flour to their dough. In professional kitchens, we measure hydration as a percentage of the total flour weight. For a classic focaccia, we aim for at least 80 to 85 percent hydration. This means for every 500 grams of flour, you are adding at least 400 to 425 grams of water. This high ratio ensures that the yeast remains active and that the internal structure of the bread stays moist, preventing that dry, chalky texture that plagues many commercial or store-bought versions of this Italian staple.
Understanding Gluten Development
Gluten is the structural protein matrix that holds your bread together. In a dry, low-hydration dough, you would need to physically knead the mixture to align these proteins. However, in our high-hydration focaccia, we use the stretch and fold technique. By stretching the dough every 30 minutes over a three-hour window, you gently build the strength of the dough without the need for aggressive manipulation. This approach protects the delicate air bubbles forming from the yeast, ensuring that your final product is light, airy, and full of character.
Why Flour Choice Matters
Not all flours are created equal when it comes to hydration. For the best focaccia, you should look for a bread flour with a protein content of at least 12 to 13 percent. The higher protein count creates a more resilient gluten network, which is necessary to trap the gas bubbles produced during the long fermentation. If you use an all-purpose flour with low protein, the dough may struggle to hold its shape during the final rise, resulting in a bread that feels more like a heavy flatbread rather than a light, airy cushion.
"The dough is a living entity, and it will tell you exactly what it needs if you listen through your fingertips rather than your eyes."
Mastering the Fermentation Process
Fermentation is where the flavor profile of your bread is developed. While it is tempting to rush this process using warm water and a heavy dose of yeast, the real depth of flavor comes from time. By using a small amount of instant dry yeast and a cold-fermentation period in the refrigerator, you allow the enzymes in the flour to break down complex carbohydrates into simple sugars. This not only makes the bread easier to digest but also imparts a complex, nutty flavor that you simply cannot get from a fast-rise recipe.
The Role of Cold Fermentation
After your initial bulk fermentation, place your dough in an airtight container and store it in the refrigerator for 12 to 24 hours. During this time, the yeast activity slows down, but the bacterial activity continues to create organic acids. This process, known as cold retarding, is the professional secret to a deep, complex, and professional-grade crumb. When you finally pull the dough out of the fridge to proof at room temperature, it will be much easier to handle and will produce a much more flavorful crust.
Signs of Optimal Proofing
Knowing when your dough is ready for the oven is one of the most vital skills a baker can acquire. You are looking for a dough that has increased in volume by about 50 to 75 percent and looks "bubbly" on the surface. When you poke the dough, it should leave a small indentation that bounces back slowly. If it bounces back immediately, it is under-proofed; if it doesn't bounce back at all and feels like a deflated balloon, it has over-proofed. Aim for that perfect, slow-rebound "goldilocks" stage.
The Art of the Dimple
The dimpling stage is arguably the most satisfying part of the entire process. It is a moment of tactile joy where you physically press your personality into the dough. Beyond the aesthetics, the dimples serve a critical culinary function. By pressing your oiled fingers into the dough, you are creating reservoirs for extra virgin olive oil and salt. These deep wells allow the oil to soak into the dough, frying the base slightly while keeping the interior pillowy soft.
Technique for Perfect Dimples
Start by oiling your hands liberally; this prevents the dough from sticking to your fingers. With your fingertips spread wide, press firmly down into the dough until you feel the bottom of the baking pan. Do not be afraid to be aggressive—you want to reach the base, as this helps create the varying thickness in the loaf. If the dough snaps back too aggressively, let it rest for another 10 minutes and try again. This rest period relaxes the gluten and allows for those deep, beautiful craters.
Adding Aromatics
This is the stage where your focaccia transforms from a simple bread into a gourmet experience. Before you place the tray into the oven, top it with high-quality coarse sea salt (like Maldon) and your choice of aromatics. Fresh rosemary, thinly sliced red onion, or even cherry tomatoes are classic pairings. Pro tip: finely mince your rosemary and mix it with the olive oil before applying it to the dough. This prevents the needles from burning in the high heat of the oven and infuses the oil with a potent, herbal fragrance.
"Focaccia is the only bread that begs you to play with it; treat every dimple as a chance to create a new texture for the final bake."
The Science of the Bake
The oven is the final crucible for your dough. To achieve that signature golden-brown, crispy bottom, you need intense, consistent heat. Most home ovens are calibrated for standard baking, but for bread, you need to be a bit more aggressive. Preheat your oven to 450 degrees Fahrenheit (230 degrees Celsius) for at least 30 minutes before baking. The high heat shocks the yeast, causing a "spring" that expands the gas bubbles rapidly before the crust sets.
The Importance of the Pan
The vessel you use makes a significant difference. A heavy-duty, light-colored aluminum baking sheet or a cast-iron pan is ideal. Avoid dark-coated non-stick pans if possible, as they tend to absorb heat too quickly and can scorch the bottom of your focaccia before the top is properly caramelized. If you have a pizza stone, place the baking sheet on top of it to mimic the direct heat of a brick oven. This creates a superior bottom crust that shatters when you bite into it.
Monitoring the Color
Color is the best indicator of doneness. You are looking for a deep, dark golden brown. Do not be afraid to bake it longer than you think you need to. A pale focaccia is a soft, soggy focaccia. The caramelization of the starches on the surface is essential for the flavor profile. If the top is getting dark too quickly but the bottom feels soft, move the pan to the lower rack for the final five minutes of the bake.
Troubleshooting Common Issues
Even with the best instructions, baking is a practice of trial and error. If your focaccia turns out dense, the most likely culprit is either under-proofing or too much flour. If the dough was too stiff to handle, you likely didn't use enough water. Remember that high hydration is not your enemy—it is the secret ingredient. If your dough feels impossible to manage, use the "bench rest" method: let the dough sit for 15 minutes after initial mixing to allow the flour to fully hydrate and the gluten to relax.
The "Soggy Bottom" Dilemma
If your bread ends up with a soggy or oily base, it is often due to an improper oil ratio or a lack of heat. While we want a lot of oil, we need the oven temperature to be high enough to actually "fry" the dough in that oil rather than having the dough simply absorb it. Ensure your oven is fully preheated and consider using a piece of parchment paper to prevent the dough from sticking, which also helps in transferring heat more evenly across the bottom surface.
Storing and Reheating
Focaccia is best eaten fresh, but it stores surprisingly well. To keep it fresh, wrap it in a clean kitchen towel at room temperature for up to two days. If you need to keep it longer, store it in an airtight bag, but expect to sacrifice some of the crust's crunch. To revive a day-old piece of focaccia, a quick three-minute toast in a 400-degree oven will bring back that glorious, crispy exterior and pillowy, warm interior.
Elevating Your Focaccia Game
Once you have mastered the basic recipe, the sky is the limit. You can use your focaccia base to create everything from elaborate appetizers to sandwich bread. Consider incorporating different flavor profiles like roasted garlic cloves, sun-dried tomatoes, or even a sprinkle of Aleppo pepper for a subtle heat. The structure of the dough is robust enough to hold a variety of toppings, provided they are not so heavy that they inhibit the final rise.
Infusing the Dough
Instead of just topping your dough with olive oil, try infusing your oil with aromatics like lemon zest, chili flakes, or fresh thyme. By letting these ingredients sit in the oil for a few hours before baking, you create a complex, flavored oil that penetrates the bread at every level. This elevates the humble focaccia into a centerpiece that can stand alone as a snack or accompany a sophisticated dinner party menu.
Turning Focaccia into a Sandwich
Because of its sturdy yet airy crumb, focaccia is the perfect vehicle for sandwiches. Split it horizontally and stuff it with fresh mozzarella, heirloom tomatoes, basil, and a drizzle of balsamic reduction. Unlike traditional bread, the oil-rich crumb of a good focaccia doesn't go soggy when faced with fresh produce, making it the superior choice for outdoor picnics or lunch box meals that need to hold up for a few hours.
Ingredient Ratios and Proportions
To standardize your success, let’s look at the foundational percentages. A baker’s percentage is based on the weight of the flour being 100 percent. For our ideal focaccia, the formula looks like this:
Bread Flour:* 100% (e.g., 500 grams)
Water:* 82% (e.g., 410 grams)
Salt:* 2% (e.g., 10 grams)
Instant Yeast:* 0.5% (e.g., 2.5 grams)
Olive Oil:* 5-10% in the dough, plus extra for the pan
Why These Ratios Work
The 2 percent salt ratio is crucial not just for flavor, but for controlling the fermentation rate and tightening the gluten structure. Too little salt and the bread will have no character; too much and you will inhibit the yeast activity. The small amount of yeast (0.5 percent) is intentional—it encourages a slower fermentation, which as we discussed, is the key to a better-tasting, more digestible loaf.
Adjusting for Altitude and Humidity
If you live at high altitude or in an area with extreme humidity, you may need to tweak these ratios slightly. High-altitude bakers may find that the dough rises too quickly, potentially leading to a collapse. In these cases, reducing the yeast by an additional 10 to 20 percent can help. In very humid environments, you might find you need slightly less water. Always keep a journal of your bakes to see how your specific environment affects your outcomes.
Professional Tips for the Home Kitchen
Every professional chef has a set of "shortcuts" that aren't really shortcuts at all—they are just ways to be more efficient with time and labor. For example, using a digital scale is non-negotiable. Measuring flour by volume is inaccurate and leads to inconsistent results. One cup of flour can vary by 20 to 30 grams depending on how it's packed, which is enough to ruin your hydration percentage.
Mise En Place
Before you start, gather all your ingredients and tools. Have your flour, water, salt, oil, and yeast weighed out. Ensure your pan is ready and your surface is clear. This organized approach reduces the stress of bread making, allowing you to focus on the sensory experience of the dough. Bread making should be a meditative, relaxing process, not a frantic rush to find ingredients.
The Power of Patience
If you take away only one lesson from this guide, let it be the value of patience. Focaccia is not a bread you make when you are in a hurry. It requires waiting for the dough to proof, waiting for the cold fermentation, and waiting for the final rise before dimpling. Each of these waiting periods is a vital step in the transformation of raw ingredients into a culinary masterpiece. Trust the process, trust the flour, and most importantly, trust yourself.
Final Thoughts
The journey of baking a perfect loaf of focaccia is much like any creative endeavor: it begins with imitation, moves through repetition, and eventually results in intuition. You start by following a recipe to the gram, then you begin to understand why the water feels the way it does, and eventually, you stop looking at the clock and start looking at the dough. This is the moment where you transition from a person following instructions to a baker who understands their craft.
Focaccia is the perfect companion for this evolution. It is hardy enough to handle your early mistakes and delicious enough to reward your successes. When you pull that tray from the oven, the house filled with the intoxicating aroma of roasted rosemary and toasted olive oil, you realize that you haven't just made bread—you've cultivated a piece of living history. The dimples aren't just for oil; they are proof that you put your own hands to work, transforming simple, humble ingredients into something worthy of a feast.
Remember that there is no such thing as a "perfect" loaf in the eyes of a master; there is only the next loaf. Use this experience as your baseline, take notes on your hydration levels, and don't be afraid to experiment with new flours or longer fermentation times. The world of bread is vast, and you have only just scratched the surface. So, the next time you find yourself with an afternoon to spare, clear your counter, grab your flour, and give your dough the attention it deserves. Your kitchen is the laboratory, and you are the lead scientist of your own delicious success.
As you continue to refine your technique, consider sharing your loaves with friends and family. Bread, after all, is meant to be shared. There is a specific joy in watching someone pull a warm piece of your focaccia apart, the steam rising, the oil glistening, and the crust crackling beneath their fingers. It is a reminder that we aren't just making food; we are crafting connection. Keep baking, keep experimenting, and always remember that the best way to improve is to get your hands back in the dough. You have the tools, you have the knowledge, and now you have the recipe. Go forth and dimple with confidence, and let the results speak for themselves. The art of the focaccia is a lifelong pursuit, and I am thrilled that you have chosen to take this first step. Happy baking, and may your oven always stay hot and your crumb remain ever-open.
The beauty of this craft is that it demands nothing from you but your presence. When the world feels loud, the kitchen—specifically the act of working a high-hydration dough—provides a necessary silence. There is a rhythm to the stretch and fold, a cadence to the dimpling, and a anticipation in the final bake that resets the mind. Do not underestimate the power of these quiet, domestic rituals. They are what ground us, and they are what provide us with the sustenance needed to face another day. Whether it is a Tuesday evening meal or a Sunday brunch centerpiece, your focaccia is a testament to the fact that you took the time to create something beautiful, something nourishing, and something honest.
So, take your time with it. Let the dough rest. Allow the yeast to do its work. And when you finally sit down to break that bread, take a moment to appreciate the journey it took to get to your table. From the humble field of wheat to your warm, oven-kissed kitchen, it is a process that has been refined by generations, and now, it is yours to carry forward. Keep your pans oiled, your heat high, and your heart open to the beautiful, imperfect, and utterly delicious world of home-baked bread. You have already won the battle by starting; now, simply enjoy the fruits of your labor. The culinary world is better for your contribution, and your kitchen will certainly smell a whole lot better for it. Happy baking to all the aspiring chefs out there—you have all the tools you need to succeed, so go ahead and make something truly magnificent.




Get the Next Recipe
Weekly recipes, techniques, and gear picks — straight to your inbox.
