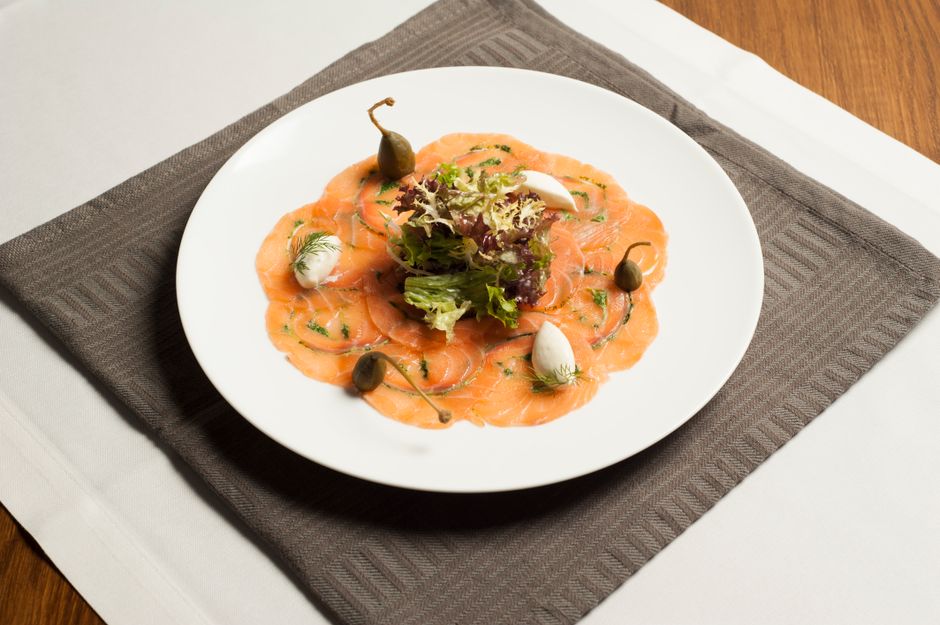
Gravlax at Home: Curing Salmon the Nordic Way with Salt, Sugar, Dill, and Time
There is a certain magic that occurs when the raw, transient nature of fresh fish meets the patient alchemy of curing. Gravlax, the quintessential Nordic delicacy, is far more than just "cured salmon"—it is a testament to the culinary philosophy that time, simple ingredients, and a bit of respect for the raw product can yield results far superior to anything found behind a commercial deli counter. Historically, the name originates from the medieval Swedish gravlax, literally meaning "grave salmon," referring to the practice of burying the fish in the sand above the high-tide mark to ferment. Today, we have thankfully moved away from the burial ground, opting instead for the controlled, refrigerated environment of our own kitchens, where we can harness the same transformative power of osmosis.
When you decide to take on the project of curing your own salmon, you are stepping into a centuries-old tradition that values simplicity above all else. Unlike smoked salmon, which requires specialized equipment and a delicate hand with temperature control, gravlax relies on a dry cure—a precise ratio of kosher salt and granulated sugar that draws out moisture while infusing the flesh with aromatic herbs and spices. The process is remarkably forgiving for the home cook, provided you are meticulous about your starting point: sourcing the freshest fish possible is not a suggestion, it is a non-negotiable rule. By mastering this technique, you gain an entry point into the world of charcuterie and preservation, elevating your brunch game to a level that feels professional, sophisticated, and deeply rooted in heritage.
As you embark on this culinary journey, do not be intimidated by the terminology or the perceived complexity of "curing." In reality, curing is simply the process of creating an environment where flavor is concentrated and texture is fundamentally altered. By allowing the salt to pull liquid from the salmon, the proteins denature, creating a silky, translucent, and firm texture that slices beautifully into translucent ribbons. You are not just making an appetizer; you are practicing an ancient art form that turns a humble fillet into the centerpiece of your table. So, sharpen your fillet knife, clear some space in your refrigerator, and prepare to discover why the best chef in the kitchen is often the one who understands how to step back and let time do the heavy lifting.
The Foundation: Sourcing and Preparation
The success of your gravlax begins long before you reach for the salt or the sugar. It begins at the fish counter. When selecting your salmon, you must prioritize quality above all else. Look for a sashimi-grade or high-quality Atlantic salmon fillet, ideally with the skin on. The skin acts as a protective barrier during the curing process, providing structure and holding the delicate oils inside the fish. Avoid anything that has a fishy odor, dull scales, or visible bruising. A good rule of thumb is to look for bright, vibrant orange or pink hues and a firm, elastic flesh that springs back when pressed.
Essential Tools for the Home Curer
You do not need a commercial kitchen to produce professional-grade gravlax. However, having the right tools makes the process much more streamlined. You will need a sharp, flexible fillet knife for skinning and slicing, a non-reactive glass or ceramic baking dish, and plenty of plastic wrap. Because you are dealing with raw fish, sanitation is paramount. Ensure your cutting boards are thoroughly cleaned and disinfected before and after contact with the raw protein. Having a weight—such as a heavy can or a cast-iron skillet—is also necessary to apply the constant pressure required to distribute the cure evenly across the surface of the fish.
Preparing the Fillet
Before you begin the curing process, it is vital to check for pin bones. Even high-quality fillets often contain stray bones that can ruin the experience of a thin, elegant slice. Run your fingers against the grain of the fish; if you feel a needle-like bone, use a pair of clean fish tweezers to gently pull it out in the direction it wants to come out. Once the fish is pin-bone free, you are ready to rinse it briefly in cold water and pat it absolutely dry with paper towels. Excess moisture is the enemy of a clean cure, as it can dilute your spice blend and interfere with the osmosis process.
"The beauty of gravlax lies in its minimalism. By stripping away unnecessary additives and focusing on the purity of the fish, the salt, and the aromatic profile of the dill, you create a dish that is inherently timeless and universally loved."
The Science of the Cure: Salt, Sugar, and Spice
At its core, the gravlax cure is a balancing act between dehydration and preservation. The salt acts as the primary dehydrator, drawing out moisture from the fish, while the sugar serves as a buffer, preventing the fish from becoming overly salty or tough. A standard ratio for a successful cure is a 1:1 mixture of kosher salt to granulated sugar. This ratio ensures that the texture remains buttery and tender rather than rubbery. Do not use table salt, as the anti-caking agents and iodine can impart a metallic, unpleasant flavor to the delicate fish.
Customizing Your Aromatic Profile
While the salt-and-sugar base remains the foundation, the true personality of your gravlax comes from the aromatics you introduce. Fresh dill is the undisputed king of gravlax, but you should not be afraid to experiment with other additions. Cracked black peppercorns add a subtle, earthy bite, while crushed juniper berries provide a bright, gin-like complexity. For a citrusy finish, you can incorporate lemon or orange zest directly into the cure, which cuts through the richness of the salmon's natural oils. The key is to distribute these spices evenly so that every part of the fillet is exposed to the infusion.
Creating the "Bed"
Before you lay your salmon into the curing dish, create a "bed" of fresh dill and a portion of your cure mixture at the bottom of the container. This ensures that the bottom of the fillet is seasoning just as efficiently as the top. Once the fish is placed skin-side down, rub the remaining salt-sugar-spice mixture generously over the flesh side, massaging it into the thickest parts of the fillet. Do not worry about over-seasoning; you will be rinsing the cure off later, so you want to ensure total coverage.
The Waiting Game: Curing Time and Technique
Once the fish is covered and the aromatics are nestled in, the waiting begins. This is not a process you can rush. Cover the dish tightly with plastic wrap and apply a light weight on top. The weight is essential because it encourages the salt to penetrate deeply and helps expel air pockets, creating a uniform, dense texture. Place the dish in the coldest part of your refrigerator—the back, away from the door—and let the cold air and the cure work their magic.
Determining the Duration
The duration of the cure depends entirely on the thickness of your salmon fillet and your personal preference for texture. For a light cure that keeps the fish quite moist and tender, 24 to 36 hours is often sufficient. If you prefer a firmer, more "cured" texture that slices into paper-thin sheets with ease, you should extend the time to 48 or even 72 hours. Checking the fish is part of the process; after 24 hours, you may notice a significant amount of liquid in the dish. This is perfectly normal and a sign that the osmosis is working correctly.
Flipping for Evenness
To ensure the cure is perfectly balanced throughout the fillet, it is highly recommended to flip the fish every 12 to 24 hours. When you flip the salmon, baste it with the liquid that has accumulated in the dish—this is essentially a concentrated brine of the aromatics you’ve added. Flipping ensures that the sides and the top of the fillet are evenly exposed to the brine, preventing one half from becoming too salty while the other remains too loose. Remember to re-apply the weight after each flip to maintain constant, gentle pressure.
"Time is the secret ingredient in the Nordic kitchen. When you cure salmon, you are learning to respect the tempo of nature, allowing the proteins to firm and the flavors to deepen in a way that mechanical preservation simply cannot replicate."
The Final Reveal: Rinsing and Drying
After your chosen time has elapsed, the transformation will be obvious. The flesh of the salmon will be significantly firmer to the touch, and the color will have deepened to a rich, translucent coral. Remove the fillet from the curing dish and discard the liquid. You will notice that the aromatics have softened and the texture has shifted from raw to a silky, almost velvet-like state. It is now time to finalize the product before it hits the cutting board.
The Rinse
Take the fillet to the sink and gently rinse away the excess salt, sugar, and wilted dill under a cold, slow-running stream of water. Do not be too vigorous—you want to remove the debris, but you don't want to damage the delicate surface of the fish. Once rinsed, pat the fish completely dry with fresh paper towels. Any residual moisture on the surface of the fish will lead to a slimy texture and a less appetizing appearance, so take your time with this step to ensure the surface is tacky but dry.
The Final Touch: Fresh Herbs
If you want your presentation to be truly professional, you can add a fresh layer of finely chopped dill to the surface of the cured salmon after it has been dried. This not only adds a beautiful, vibrant pop of green against the orange flesh but also adds a fresh, herbaceous aroma that hits the nose before the fish hits the tongue. At this stage, the gravlax is ready to be stored or served. It will keep in the refrigerator, wrapped tightly in plastic, for up to five days, though it is usually at its absolute best within the first two or three.
The Art of the Slice
If the curing process is the science of gravlax, the slicing is the art. To get those beautiful, thin, translucent slices that characterize top-tier gravlax, you need a long, sharp, flexible knife—a dedicated slicing knife or a long, thin fillet knife works best. You want to cut at a very shallow angle, almost parallel to the cutting board, starting at the tail end of the fish and moving toward the thickest part.
Slicing Technique
Presentation Tips
For a classic Nordic presentation, serve your gravlax alongside a honey-mustard dill sauce (known as hovmästarsås), thin slices of dark rye bread, and perhaps some pickled red onions or capers. The acidity of the pickles and the bite of the mustard serve as the perfect counterpoint to the buttery richness of the salmon. Don't crowd the plate; thin, overlapping slices look the most elegant.
Common Pitfalls and How to Avoid Them
Even with the best intentions, mistakes can happen. The most common error in gravlax production is rushing the process. If you pull the fish out too early, it will be mushy and under-cured. If you leave it too long, it will be excessively salty. Always keep a log or a note on your phone regarding when you started the cure so you can accurately track the timing. If you find your first batch is too salty, reduce the amount of salt in your ratio by 10 percent for the next attempt, or rinse the fillet more thoroughly.
Troubleshooting the Cure
Storage and Safety
Because gravlax is a raw, cured product, it is susceptible to bacterial growth if not handled correctly. Always work with clean hands, sanitized tools, and a cold refrigerator. Gravlax should never be left out at room temperature for more than an hour. If you are serving it at a party, place the serving platter on a bed of crushed ice to maintain its temperature and texture. When stored properly in the back of your fridge, you can enjoy your homemade gravlax for several days, but trust your senses—if the aroma changes or the texture becomes overly sticky, discard it immediately.
"A well-executed gravlax is an invitation to slow down. It demands patience during the cure, precision during the slicing, and a sense of occasion during the serving. It is a dish that rewards the cook who pays attention to the small details."
Elevating Your Skills: Advanced Variations
Once you have mastered the classic salt, sugar, and dill cure, you can start experimenting with more complex flavor profiles to really show off your culinary creativity. The basic science remains the same, but the aromatics open up a world of possibilities. For a festive or seasonal twist, consider adding aquavit or gin to the cure. Simply splash a tablespoon of the alcohol over the fillet before applying the salt and sugar; the alcohol helps penetrate the flesh and adds a subtle, floral complexity that pairs beautifully with the richness of the salmon.
Infusing Flavors
You can also experiment with different spice blends. Fennel seeds are a fantastic addition, adding a slight licorice note that works surprisingly well with salmon. Alternatively, for a more modern, global approach, try adding crushed Sichuan peppercorns and a touch of ginger to the cure. This creates a slightly numbing, spicy profile that feels very contemporary. Whatever you choose, keep the base ratio of 1:1 salt and sugar consistent, and limit your additions to 1–2 tablespoons to ensure they don't overpower the fish itself.
Pairing Your Gravlax
The pairing possibilities for gravlax are nearly endless. While rye bread is the traditional choice, you can get creative with blinis, potato pancakes (latkes), or even crisp cucumber rounds for a lighter, gluten-free option. A dollop of sour cream or crème fraîche adds a welcome creamy element that balances the saltiness of the cure. For a modern finish, a quick pickle of radishes or shaved fennel provides a crisp, refreshing crunch that elevates the entire plate to restaurant quality.
Troubleshooting the "Soggy" Cure
Occasionally, you might find that the fish releases more liquid than you anticipated. This is common with thicker, oilier fillets. If the liquid threatens to submerge the fish entirely, you can either drain it off halfway through the curing process or place the fish on a rack inside the container so it doesn't sit in its own juices. Both methods are acceptable, but the key is to ensure that the contact between the cure and the fish remains constant. Don't panic if you see a lot of liquid; it is a natural part of the dehydration process.
The Role of Temperature
The ambient temperature of your refrigerator is a critical factor. If your fridge is running too warm, the curing process will accelerate, which can lead to an uneven texture or even spoilage. Aim for a temperature between 35°F and 38°F (2°C–3°C). A small refrigerator thermometer is an inexpensive tool that can provide peace of mind and ensure your fish is curing in the optimal environment.
Final Thoughts on Technique
Gravlax is a dish that truly reflects the efforts of the cook. It is simple enough that there is nowhere to hide poor technique, yet forgiving enough that once you understand the rhythm of the salt, the sugar, and the time, you will find yourself wanting to make it again and again. Each time you prepare it, you will likely find small ways to adjust the flavor or the texture to better suit your preferences, which is exactly how a technique becomes a signature dish.
Conclusion
Mastering the art of gravlax is a transformative experience for any home cook. It shifts your perspective from being a consumer of food to being a creator of it, teaching you that some of the most luxurious and sophisticated dishes are born from the simplest of ingredients and the most patient of methods. You have taken a piece of raw salmon and, through the careful application of salt, sugar, and aromatics, turned it into something that reflects your own culinary touch. Whether you serve it at a quiet Sunday brunch with friends or keep a stash in the fridge for a quick, elegant weekday snack, you can take pride in the fact that you did it yourself—from scratch, with intent, and with excellence.
Remember that the process is just as important as the final product. The time spent sourcing the fish, the care taken in de-boning, the meticulous attention to the cure, and the steady hand required for the final slice are all part of the craft. Do not be afraid to fail, and certainly do not be afraid to experiment. Each batch you produce will teach you something new about the behavior of proteins, the impact of seasoning, and the crucial role of environment in food preservation. This is the foundation of becoming a better chef, and it is a journey that never truly ends.
As you move forward, keep your tools sharp and your standards high. The "Blame The Chef" philosophy is built on the belief that anyone can achieve professional results if they are willing to put in the time to learn the techniques. Gravlax is the perfect starting point for that mission. So, invite your friends, slice that salmon thin, pair it with something bright and acidic, and enjoy the fruits of your labor. You have successfully navigated the Nordic tradition of curing, and in doing so, you have elevated your kitchen skills to a new, exciting level. The best chef in the room is the one who understands how to turn a simple process into an unforgettable experience. Enjoy your masterpiece.

Get the Next Recipe
Weekly recipes, techniques, and gear picks — straight to your inbox.
