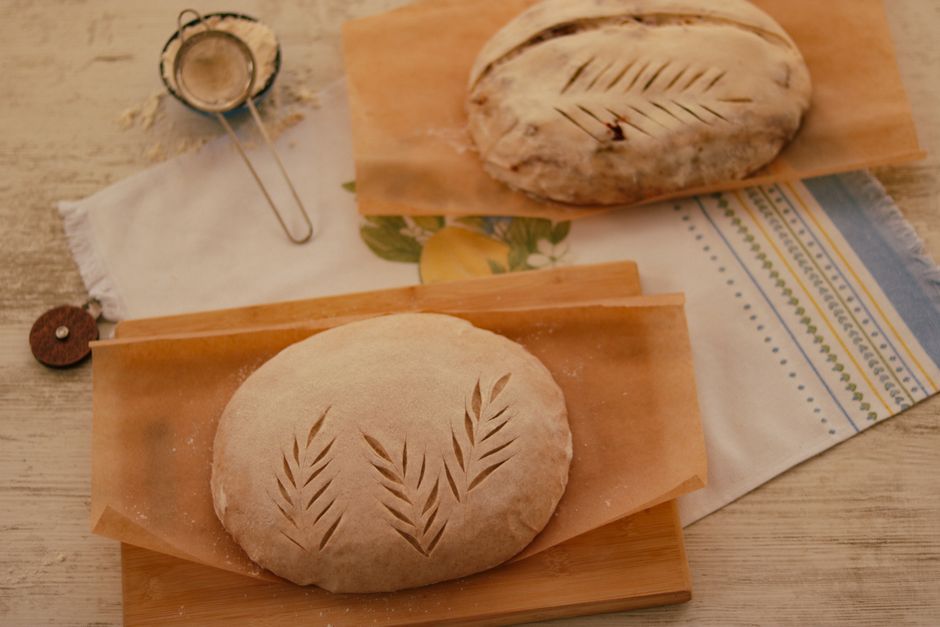
How to Score Sourdough Bread
Baking sourdough bread is often described as a journey, a transformation of humble flour, water, and salt into a crusty, golden masterpiece that commands attention on any kitchen table. For the home baker, the process is shrouded in mystery, filled with variables like ambient temperature, hydration levels, and the volatile nature of wild yeast. You have painstakingly nurtured your starter, mastered the art of the bulk ferment, and shaped your dough with the precision of a surgeon, but there is one final, critical step that stands between you and bakery-quality results: the score. Scoring is not merely a decorative act; it is a fundamental mechanical requirement for professional-grade bread that dictates the expansion, crumb structure, and overall aesthetic appeal of your loaf.
Many beginners treat the act of cutting the dough as an afterthought, a quick flick of the wrist before sliding the boule into the oven, yet this is where the "blame" usually lands when a loaf turns out flat or uneven. If your crust bursts in unsightly, random places or your loaf fails to rise to its full potential, the answer almost always lies in how you handled your blade. Scoring creates a "weak point" on the surface of the dough, giving the internal gases a designated path to expand as the oven spring kicks in. Without this calculated incision, your bread will fight against its own structure, often resulting in dense, tight crumbs or, worse, a collapsed structure that refuses to bloom under the heat.
In this guide, we are going to demystify the art of the blade, exploring the science behind tension, the geometry of your cuts, and the specific tools that professional bakers rely on to achieve those iconic, high-contrast ears. We will walk through the logic of depth, angle, and timing, ensuring that you stop guessing and start executing with purpose. Whether you are a fan of the dramatic "sourdough ear" or prefer the intricate, lace-like patterns of artisanal wheat stalks, understanding the mechanics of scoring will permanently elevate your baking. It is time to stop apologizing for your flat loaves and start engineering the rise you deserve.
The Science of Expansion and Oven Spring
At its core, oven spring is the final, rapid burst of fermentation and gas expansion that occurs during the first ten minutes of the baking process. As the loaf hits the intense heat of your Dutch oven or baking stone, the yeast works overtime before it is deactivated by the heat, and the gases trapped within the gluten network expand exponentially. If the crust begins to set before this expansion is complete, the pressure will inevitably force the weakest part of the dough to tear. Scoring is the art of controlling that tear, turning an unpredictable failure into a beautiful, intentional structural feature known as the venting point.
Why Surface Tension Matters
Before you ever pick up a razor, you must consider the surface tension created during the shaping process. A loaf that has been properly tensioned acts like a balloon; it holds the air inside firmly, and when you cut into it, the skin retracts slightly, revealing the soft interior. If your dough is slack or over-proofed, the skin will lack the tension required to snap back, making it difficult to achieve a clean cut. You are aiming for a taught, smooth surface that invites the blade to slice through with minimal resistance, ensuring that your expansion is directed upward rather than outward.
The Role of Crust Setting
The speed at which your crust forms is a direct result of your baking vessel and steam management. In a professional deck oven, steam is injected at the start to keep the surface supple and flexible for as long as possible. As a home baker, using a Dutch oven allows you to trap the moisture evaporating from the bread itself, creating a humid environment that delays the hardening of the crust. By scoring properly, you provide an escape route for that moisture and steam, preventing the dough from setting too early and allowing the bread to reach its maximum height before the final golden color is locked in.
"Scoring is the difference between a loaf that looks like it came from a factory and one that tells the story of the hands that shaped it. It is where control meets chaos."
Choosing Your Weapon: The Lame and the Razor
In the world of professional baking, the tool you choose is an extension of your own hand. While some hobbyists attempt to score with a serrated kitchen knife, you will find that the serrations drag through the dough, pulling and tearing the delicate gluten structure. To achieve a clean, professional score, you need a lame, a specialized tool that holds a double-edged razor blade at a specific angle. A sharp, high-quality blade is non-negotiable; if your blade is dull, it will snag, and the resulting score will look ragged and uninspired.
Maintenance and Blade Geometry
You should consider your razor blade a consumable item. Even the highest quality stainless steel blades begin to lose their edge after just a few loaves. A dull blade requires more pressure to cut, and in the world of sourdough, pressure is the enemy. You want the blade to glide effortlessly through the dough. Always ensure your blade is clean of dried flour or sticky dough residue, as this buildup creates drag. Many pros use a small drop of mineral oil or water on the blade to ensure a frictionless glide, especially when working with high-hydration doughs that tend to cling to the metal.
Safety First
Because you are working with an exposed razor, safety is paramount. Always store your lame in a safe, labeled container when not in use. When cleaning, wipe from the spine of the blade toward the edge to avoid accidental slips. When scoring, keep your fingers clear of the cutting path and maintain a confident, firm grip. A hesitant hand is far more dangerous than a quick, decisive one; a quick, decisive motion results in a clean cut, whereas a shaky, slow motion will result in uneven, jagged edges that detract from the final look.
Mastering the Angle of Attack
The angle at which you hold your blade dictates the shape of the resulting "ear" or the aesthetic of the opening. Most beginners hold the blade perfectly perpendicular to the surface of the loaf, which results in a standard "split" that spreads wide. However, for that coveted, vertical, shelf-like ear, you must change the physics of your cut. You want to aim for a shallow angle, roughly 30 to 45 degrees, dragging the blade underneath the surface of the dough rather than simply slashing straight down.
The Shallow Cut Technique
By angling the blade, you create a "flap" of dough. As the bread expands, this flap is pushed upward and outward, becoming the crunchy, dark, and visually stunning ear that bakers dream of. This technique requires practice and steady nerves. If the cut is too shallow, the flap will be too thin and may burn; if it is too deep, the ear will be thick and chewy. Aim for a depth of about one-quarter to one-third of an inch. Remember that consistency across the length of the cut is just as important as the angle itself.
Adjusting for Dough Consistency
Not all doughs behave the same way under the blade. A high-hydration dough (80% or higher) will be significantly stickier and more prone to dragging. In these cases, a slightly deeper, more aggressive cut is often required to help the dough open up against its own density. Conversely, a lower hydration dough or one containing heavy inclusions like seeds, nuts, or dried fruit, will provide significant physical resistance. For loaves with seeds, do not be afraid to press firmly to bypass the resistance of the inclusions, or you may end up with a jagged, "stuttering" score.
Patterns and Aesthetics: Beyond the Single Slit
While the single, long score is the classic choice for a sourdough batard, there is an entire world of artistic expression available to you once you have mastered the basics. A cross-hatch pattern or a square score is often used for boule-shaped loaves to help them rise symmetrically. For more advanced bakers, "scoring for decoration" allows you to treat the dough as a canvas. However, always remember that any decorative score should be shallow, while your primary "venting" score must remain deep and purposeful to ensure proper oven spring.
The Functional vs. The Decorative
Always distinguish between your structural cuts and your artistic ones. If you decide to add wheat-stalk patterns or intricate swirls, these should be superficial cuts that do not penetrate deep into the gluten network. If you score too deeply in decorative patterns, you will actually vent too much gas and cause the loaf to lose its structural integrity, leading to a flat bread. Think of the decorative cuts as "skin-deep" and the functional cuts as "muscle-deep."
The Single Slash:* Best for batards; provides high lift and a dramatic ear.
The Cross Score:* Ideal for boules; promotes symmetrical growth.
The Diamond Pattern:* Excellent for rustic-style loaves; provides multiple venting points.
The Wheat Stalk (Sca-loping):* A decorative, shallow pattern that looks beautiful but shouldn't be deep enough to replace a primary vent.
Professional Tips for Flour Dusting
To make your scores pop, contrast is your best friend. Before scoring, lightly dust the surface of your proofed loaf with a fine layer of rice flour or a blend of rye and bread flour. Rice flour is particularly effective because it does not contain gluten and will not brown as quickly as wheat flour, leaving a bright white line against the dark, mahogany crust of your finished loaf. Once you score, the white flour will be pushed aside, highlighting the contrast between the dark crust and the light, open crumb.
"A beautiful loaf is a balance of science and art. When you score, you are not just cutting bread; you are directing the flow of the crust’s transformation in the heat of the oven."
Troubleshooting Common Scoring Errors
Even the most experienced bakers encounter issues with scoring. If your bread is "bursting" at the bottom, it is a clear sign that you haven't scored deeply enough or that the crust set before the loaf had enough time to finish expanding. This is known as "bottom blowout," and it is the most common frustration for home bakers. The bottom of the loaf acts as the path of least resistance when the top is too sealed to allow for expansion. By increasing the depth of your score and ensuring your oven is properly preheated with enough steam, you can easily rectify this.
The Over-Proofed Trap
If your dough feels like a loose, flat puddle that offers no resistance to the blade, it is likely over-proofed. When the gluten has degraded, it lacks the tension to hold a score. If you catch this before the oven, don't try to force a deep, dramatic ear—it won't happen. Instead, use very light, shallow scores to prevent the structure from collapsing entirely under the weight of the cut. Sometimes, the most important lesson in scoring is knowing when to make a very light cut rather than a heavy one.
Dealing with "Dragging"
Dragging occurs when the blade sticks to the dough. This is usually caused by two things: a dull blade or a dough surface that has become too dry or too wet. If your surface is too dry, it forms a "leathery" skin that catches the blade. If it is too wet, the dough creates a suction effect. To combat this, ensure you are storing your proofing baskets properly and covering your dough with a light cloth or plastic cover to keep the surface humidity consistent. If you are using a banneton, ensure your dusting of flour is even, preventing the dough from sticking to the basket when you invert it onto your peel.
Advanced Techniques and Professional Workflow
Once you have mastered the basics, you can start incorporating professional workflows to improve your consistency. Professionals use a specific "pre-score" technique where they might make a very light pass with the blade first to map out their cuts, followed by a deeper, confident pass. This is especially helpful if you are doing complex, multi-part patterns. It reduces the need for "corrective" cuts, which almost always result in an unsightly scar.
The "Sourdough Ear" Checklist
If your goal is that perfect, paper-thin, towering ear, follow these steps precisely every time you bake:
Practice on the Unseen
If you are nervous about your technique, practice your cuts on a piece of parchment paper or an old, practice loaf. You can even use a store-bought, plain white loaf to practice the "feeling" of the blade moving through the dough. The muscle memory required for a deep, consistent cut is developed through repetition. Don't be discouraged if your first dozen loaves don't look like they belong in a French bakery window; every single one of those loaves, regardless of the scoring, is a lesson in how your specific sourdough starter and flour behave.
The Final Flourish: Post-Bake Observation
After the oven timer goes off and you pull your loaf from the heat, the cooling phase is not just about waiting to eat; it is the final step in the scoring process. As the bread cools, the moisture within the crumb migrates, and the structure settles. You will often notice that your score "opens up" even further during the cooling process. This is the moment to analyze your work. Did the ear lift as expected? Was the crumb even throughout the loaf? Did the score bloom into a beautiful, jagged landscape?
Documenting Your Results
Professional chefs keep meticulous logs. I strongly recommend keeping a small notebook next to your oven. Note the hydration percentage, the ambient temperature, the type of flour used, and—most importantly—the scoring technique. If a particular angle or depth resulted in an exceptional rise, replicate it. If a specific pattern caused the bread to flatten, adjust your depth for the next attempt. This analytical approach is what separates a casual home baker from a master artisan.
Learning from Failure
Never throw away an "ugly" loaf. Even a loaf with a botched score, a massive blowout, or a flattened top will taste delicious if the fermentation was done correctly. Use these loaves as your primary learning tools. Analyze the crumb near the score—is it denser than the center? That indicates your score didn't go deep enough to help the loaf expand properly. Use these physical clues to recalibrate your next bake. Remember, you can always blame the chef, but you can only improve the baker by being honest with your failures.
Conclusion
Scoring sourdough is the bridge between a simple fermentation experiment and a true culinary achievement. It is a practice of patience, precision, and profound respect for the ingredients. While it may seem intimidating to take a razor to your perfectly proofed dough, you must remember that the dough is waiting for your signal to expand. By mastering the angle, the depth, and the speed of your blade, you take control of the chaos, turning a potential disaster into a beautiful work of art.
As you continue your journey, remember that each loaf is an opportunity to refine your hand. The flour, water, and salt remain the same, but your mastery over the blade is a skill that will grow with every bake. Do not be afraid to push your limits, experiment with new patterns, and most importantly, enjoy the process of turning simple sustenance into something extraordinary. When that golden-brown loaf emerges from your oven, revealing a perfectly bloomed ear and an intricate pattern, you will know that the effort was worth every second of practice.
Keep your blades sharp, your dough cool, and your confidence high. The next time you slide that boule into the oven, do so with the knowledge that you are not just baking bread—you are crafting a masterpiece. Welcome to the elite tier of home bakers, where every score is a signature, and every loaf is a testament to your growing expertise. Keep pushing, keep baking, and keep blaming the chef until the only thing left to do is share your perfect sourdough with the world.
Final Thoughts
The path to baking perfect sourdough is not a straight line, but rather a series of intentional choices made throughout the entire process. From the hydration level of your dough to the temperature of your kitchen, every variable plays a part, but none is more visible than the score. As you move forward, keep a focus on the tactile feedback your blade provides. You will eventually reach a point where you don't even have to look at the blade to know exactly how deep it is cutting or how the dough will react.
Until that day, stay focused on the fundamentals: a sharp, clean razor, a shallow, confident angle, and a deep, purposeful motion. Don't let a bad loaf discourage you—even the best chefs in the world have had days where the oven spring was less than stellar. The beauty of sourdough is that there is always another loaf, another opportunity to perfect your technique, and another chance to master the blade. So, sharpen your lame, dust your workspace, and get back to the oven. Your perfect loaf is waiting to be shaped, scored, and savored.




Get the Next Recipe
Weekly recipes, techniques, and gear picks — straight to your inbox.
