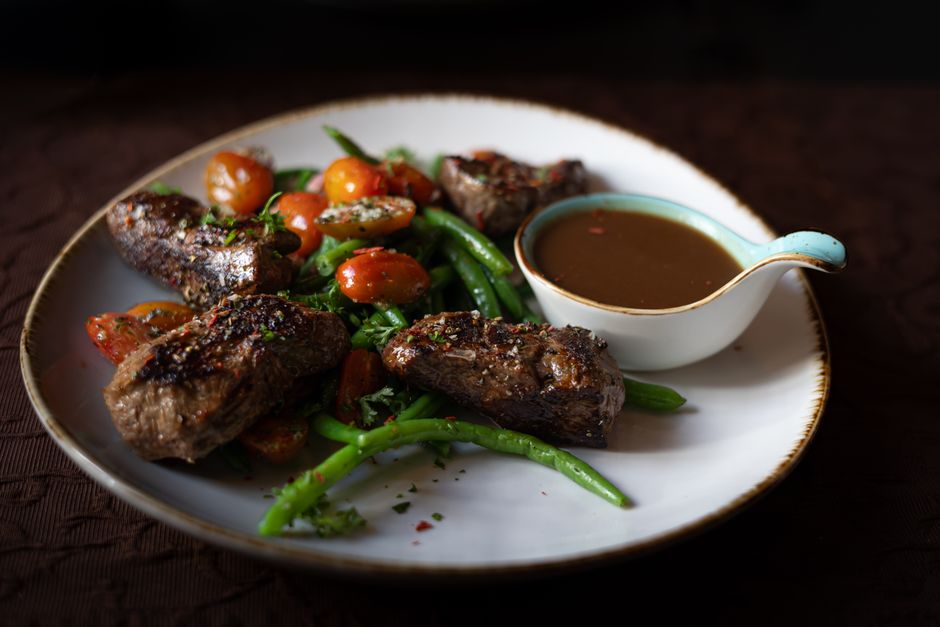
How to Use a Fat Separator for Gravy
The art of crafting the perfect gravy is often shrouded in mystery, yet it remains one of the most critical components of any holiday feast or Sunday roast. Many home cooks approach the task with a sense of trepidation, fearing a greasy, lackluster sauce that fails to cling to the meat or mashed potatoes. The secret to achieving that restaurant-quality, velvety consistency lies in understanding the science of emulsification and the mechanical advantage provided by a fat separator. By learning to isolate the golden drippings from the rendered lipids, you move beyond the "spoon-and-skim" method, which is not only labor-intensive but often inefficient. Mastery of this humble tool is a rite of passage for any cook who values precision and depth of flavor in their kitchen.
When we speak of pan drippings, we are talking about liquid gold—the concentrated essence of the roasting process. When meat is roasted at high heat, the fat renders down, carrying with it caramelized protein particles known as the fond. The challenge is that once the roasting is complete, that delicious fond is trapped beneath a layer of liquefied fat. If you were to incorporate all of that fat into your gravy, the result would be a broken, greasy emulsion that coats the palate unpleasantly. A fat separator allows you to harvest the flavor-rich stock while leaving the excess saturated fat behind, ensuring that your base liquid is pure, flavorful, and ready to be transformed into a masterpiece.
Choosing to use a tool rather than relying on guesswork is the hallmark of a cook who respects their ingredients. In this guide, we will explore the nuances of the fat separator, moving through the chemistry of stocks, the proper thickening techniques with roux, and the final seasoning adjustments that bring everything into balance. Whether you are working with a Thanksgiving turkey, a standing rib roast, or a simple braised chicken, the principles remain the same. By the time you reach the end of this post, you will possess the confidence to tackle any gravy with professional-grade skill, turning those precious pan drippings into a silky, savory reduction that will be the centerpiece of your dining table.
The Anatomy and Selection of a Fat Separator
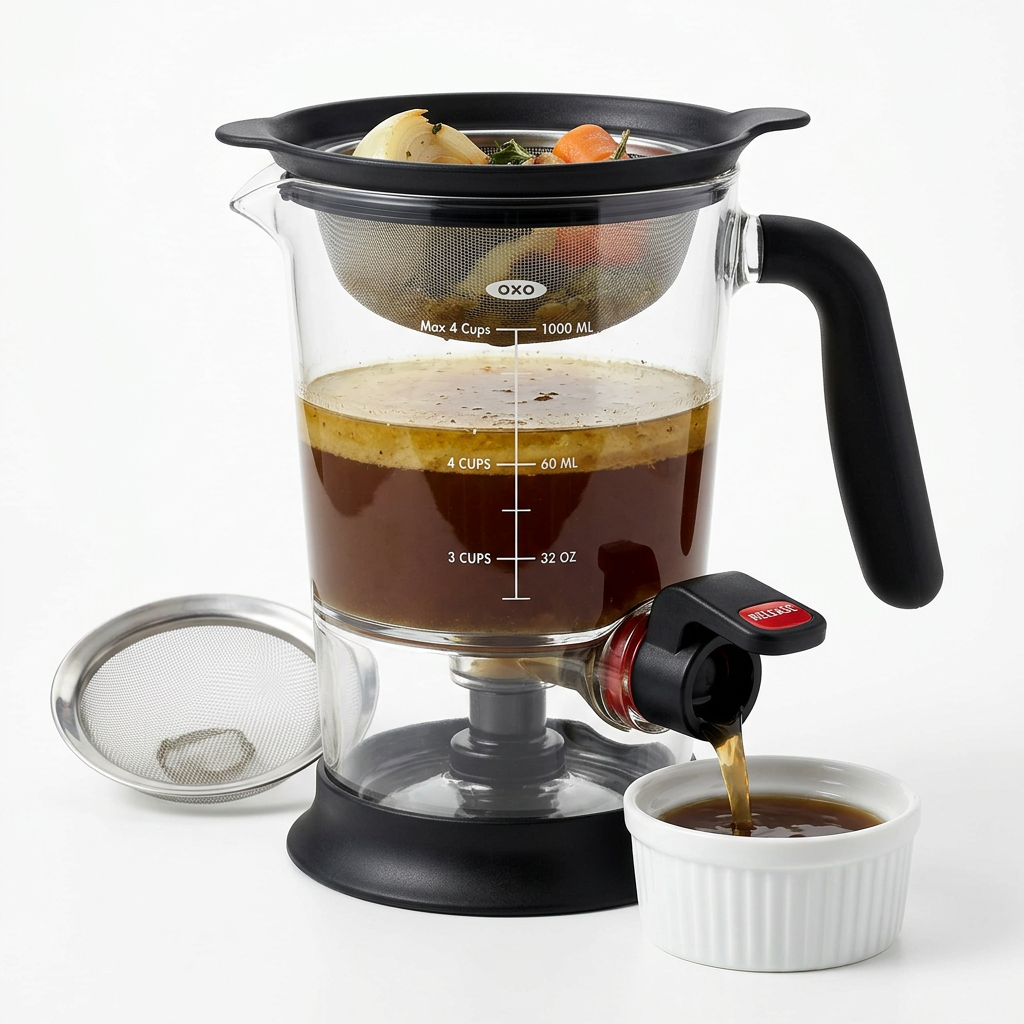
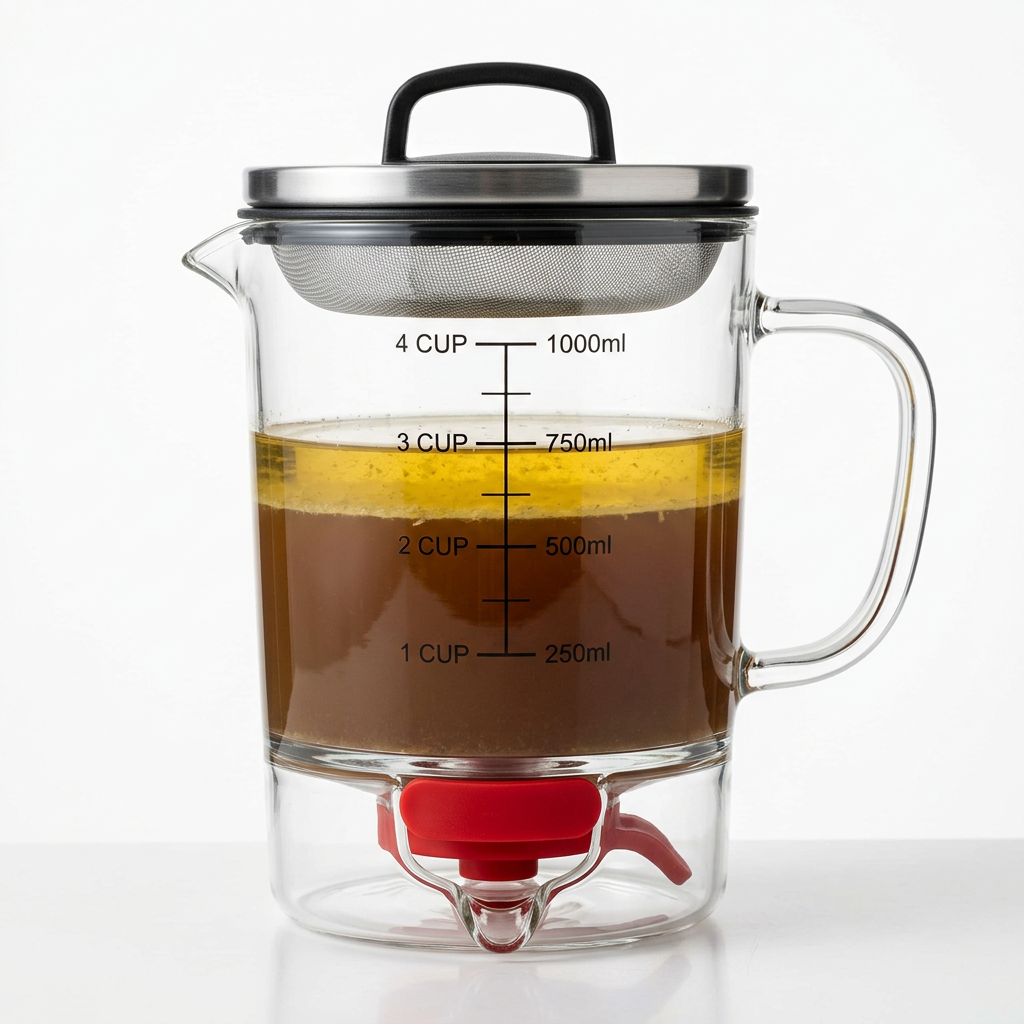
A fat separator is remarkably simple in its design, yet it is a precision instrument for the gravymaker. Most models feature a heat-resistant pitcher with a spout that originates at the very bottom of the vessel. Because fat is less dense than water, it naturally rises to the top when the liquid is allowed to settle. By pouring your pan juices into the separator and waiting a few moments, the liquid layers clearly. When you pour from the spout, only the clear, flavorful stock exits, while the fat layer remains safely trapped in the upper portion of the container, leaving you with the perfect foundation for your culinary creation.
When shopping for this tool, look for high-quality, BPA-free materials that can withstand boiling temperatures. Heat resistance is paramount, as you are often pouring hot liquid directly from the roasting pan. Additionally, look for a model that includes a built-in strainer lid. This is an essential feature because it catches the large bits of meat, herbs, and aromatics that might clog the spout or interfere with the texture of your final gravy. A good strainer ensures that your base liquid is smooth before you even begin the thickening process, saving you the trouble of having to run your finished gravy through a fine-mesh chinois later on.
"A fat separator is not merely a kitchen gadget; it is the fundamental filter through which your gravy transitions from an oily afterthought to a luxurious, cohesive sauce that defines the soul of your meal."
Materials and Capacity Considerations
The capacity of your separator matters more than you might think. If you are roasting a massive bird, a small 2-cup separator will require multiple rounds of pouring and settling, which allows the temperature of the drippings to drop significantly. You want your stock to remain hot so that when it meets your roux, the thickening process happens immediately and efficiently. Always aim for a separator that can hold at least 4 cups of liquid. Glass or high-grade thermal plastic are the preferred materials, as they are durable and dishwasher safe, though glass offers the advantage of being completely non-porous and resistant to staining from dark-colored juices.
Maintenance and Cleaning
Because you are dealing with rendered animal fats, cleaning your separator properly is vital to prevent rancidity and lingering odors. Always wash it with hot, soapy water immediately after use to break down the grease film. If your model has a detachable spout or plug, make sure to disassemble it periodically to ensure no stubborn grease buildup occurs inside the narrow passage. A small bottle brush is an invaluable tool for reaching inside the spout, ensuring that every cleaning cycle keeps your equipment sanitary and ready for your next culinary adventure.
Preparing Your Pan Drippings for Separation
The process begins long before you touch the separator. After your roast has reached its internal temperature—for instance, 165°F for poultry or 135°F for medium-rare beef—you must transfer the meat to a cutting board to rest for at least 20 to 30 minutes. While the meat rests, the juices in the pan have time to settle. Use a sturdy spatula to gently scrape the bottom of the roasting pan, dislodging the fond. These browned bits of protein are where the flavor lives, and they must be incorporated into your liquid to provide the savory backbone of the gravy.
Add a small amount of hot stock or wine to the roasting pan to deglaze it. This helps loosen the stubborn bits and creates a more homogenous liquid for the separator. Be careful not to add too much liquid, as you want to maintain a concentrated flavor profile. Once you have deglazed, carefully pour the entire contents—juices, fat, and fond—into the fat separator. Do not rush this step. Allow the liquid to rest undisturbed for at least five minutes. You will see a distinct separation line form; the clear, dark stock will settle at the bottom, and the pale, translucent fat will float to the top.
The Importance of Temperature
Temperature control is the secret to a fast separation. If the liquid cools too much, the fat may begin to solidify, making it harder to distinguish the layers. Keep your separator near the stove or in a warm area of the kitchen. If the separation process is taking too long, or if you are in a rush, a brief pop in the microwave or a warm water bath for the pitcher can help keep the lipids in a fluid state, allowing them to rise more quickly and cleanly to the surface.
Filtering the Solids
While the strainer lid on your separator will catch the largest pieces, you may want to refine your stock even further. If you prefer a perfectly smooth, refined sauce, you can use a small mesh sieve to catch any tiny particles that might have bypassed the main strainer. Remember that while texture is important, some of the darker bits from the pan provide essential flavor. Don’t be too aggressive in your straining; you want to keep as much of that roasted essence as possible, as it provides the depth that store-bought stocks simply cannot replicate.
Crafting the Perfect Roux
With your separated stock ready, you are prepared to build the base of your gravy: the roux. A roux is a mixture of equal parts fat and flour, cooked together to eliminate the raw starch taste. For your fat source, you can use some of the rendered fat you just separated, or a high-quality butter. Using a portion of the rendered fat is a "chef's secret" because it carries the flavor of the roast directly into the gravy. Heat your chosen fat in a heavy-bottomed saucepan over medium heat until it is melted and bubbling.
Whisk in an equal amount of all-purpose flour—a 1:1 ratio is standard. For a typical gravy, 2 tablespoons of fat and 2 tablespoons of flour will thicken about 2 cups of stock. As you whisk, the mixture will form a paste. Continue cooking this paste for 2 to 3 minutes, stirring constantly. You are looking for a light golden color and a subtle nutty aroma. If you cook it for too long, it will become a dark roux, which is excellent for gumbo but perhaps too assertive for a delicate poultry gravy. Keep the heat controlled to avoid scorching the flour, as burnt flour will introduce a bitter, unpleasant flavor that cannot be fixed once added to the broth.
"The roux is the architect of your gravy’s consistency. It provides the structure that holds the fats and liquids in a state of suspended, silky delight, transforming simple drippings into a coating-quality masterpiece."
Adjusting Your Ratios
If you find your gravy is too thin, do not simply add more flour directly, as this will lead to clumpy, raw-tasting lumps. Instead, create a beurre manié—a mixture of equal parts softened butter and flour kneaded together—and whisk it into the simmering gravy. This technique allows you to thicken the sauce gradually until you reach the desired consistency, which should be thin enough to pour but thick enough to cling to the back of a spoon.
Managing Heat During Incorporation
When it is time to combine the hot stock with the roux, do so gradually. Start by whisking in about a quarter of your stock, stirring vigorously until the mixture is smooth. Adding too much liquid at once is a common mistake that leads to lumping. Once you have a smooth, thick paste, slowly stream in the rest of the liquid while continuing to whisk. This gradual process ensures that the starches in the flour are evenly distributed and hydrated, resulting in a perfectly smooth, velvety final product.
Incorporating Aromatics and Seasoning
Now that you have your base, it is time to layer in the flavors. While the stock and drippings provide the savory profile, the complexity comes from the finishing touches. Fresh herbs such as thyme, sage, or rosemary can be added to the simmering gravy. If you are using dried herbs, add them earlier in the process so they have time to rehydrate and release their essential oils. If you are using fresh herbs, a sprig added toward the end is usually sufficient to infuse the sauce without overpowering it.
Seasoning is a delicate balance. Remember that your pan drippings may already contain salt, especially if you seasoned your meat generously before roasting. Always taste your gravy before adding any additional salt. A splash of dry white wine, vermouth, or even a teaspoon of Worcestershire sauce can add a much-needed acidic "brightness" that cuts through the richness of the fat. This balance of fat, salt, and acid is what separates a mediocre gravy from an unforgettable one. Continue to simmer for at least 5 to 10 minutes to allow the flavors to meld and the gravy to reduce to your preferred intensity.
The Role of Acid
Acid is the unsung hero of gravy. If your gravy tastes "heavy" or one-dimensional, it is likely lacking acidity. A few drops of lemon juice or a dash of apple cider vinegar can instantly lift the flavor, making the sauce feel lighter and more vibrant on the palate. Do not overdo it; you are looking for a subtle enhancement, not a distinct citrus or vinegar flavor. A tiny splash is usually enough to wake up the palate and make the roasted flavors pop.
Balancing Richness with Cream
For those who prefer an extra-rich gravy, you can finish the sauce with a tablespoon of heavy cream or a small knob of cold butter whisked in at the very end. This technique, known as monter au beurre, adds a glossy shine and a luxurious mouthfeel that is characteristic of high-end bistro cooking. Ensure the gravy is off the heat when you add the butter to prevent the emulsion from breaking, which can cause the fat to separate and create a greasy appearance.
Troubleshooting Common Gravy Mistakes
Even the most experienced chefs run into challenges when making gravy. If your gravy breaks—meaning the fat separates from the liquid and creates an oily slick on top—do not panic. You can often fix this by adding a teaspoon of cold water or a small amount of heavy cream and whisking vigorously over low heat. The addition of the cold liquid can help re-emulsify the mixture, pulling the fat back into the sauce. If it remains broken, you can try transferring it to a blender and pulsing it for a few seconds to force the emulsification.
Lumps are another common frustration. If you end up with lumps of flour in your gravy, don't throw it out. The simplest solution is to pour the gravy through a fine-mesh sieve into a clean saucepan, using the back of a spoon to press the lumps through the mesh. If the lumps are too large, just discard them and continue simmering the strained liquid. To prevent future lumps, always ensure your roux is thoroughly cooked and that you are adding the liquid in a steady, slow stream while whisking constantly.
"A kitchen mistake is only a failure if you don't learn from it. Gravy is forgiving; with the right tools and a little patience, almost any inconsistency can be whisked back into harmony."
Too Thin or Too Thick?
If your gravy is too thin even after simmering, you can reduce it further, but be careful of the salt level. As the water evaporates, the salt concentration increases. A safer bet is to use a slurry of cornstarch and cold water. Mix one teaspoon of cornstarch with two teaspoons of cold water to create a smooth paste, then whisk this into the simmering gravy. It will thicken almost instantly. If the gravy is too thick, simply thin it out with a little extra stock, broth, or even water, adjusting the seasoning as needed afterward.
Managing Burnt Fond
If you notice that the bits on the bottom of your roasting pan are burnt—black rather than deep brown—do not use them. Burnt bits will impart a harsh, acrid taste to your gravy that cannot be masked. If your pan drippings contain burnt fond, discard the drippings and use a high-quality store-bought stock or base instead. It is better to have a clean, neutral gravy than one tainted by the bitter taste of scorched protein. Quality starts with the integrity of your raw materials.
The Professional Touch: Refining and Finishing
To truly elevate your gravy, think about the final presentation. Professional chefs often strain their gravy through a fine-mesh sieve or a chinois even if they think it is smooth. This removes any tiny sediment or herbs, resulting in a sauce that is glass-like in its appearance and silky on the tongue. Pour the finished gravy into a warmed gravy boat to ensure it stays at the optimal serving temperature for the duration of the meal. A cold gravy boat will sap the heat from your sauce, ruining that velvety texture you worked so hard to achieve.
Another professional tip is to adjust the color of your gravy. If you desire a deeper, richer color, you can add a few drops of kitchen bouquet or a teaspoon of high-quality soy sauce. The soy sauce adds a deep, umami-rich saltiness that enhances the meatiness of the gravy without imparting an obvious "soy" flavor. These small, calculated adjustments are what give your cooking a sophisticated, restaurant-quality edge that your guests will surely notice.
Timing the Gravy
Plan to make your gravy last. While the roast is resting, you have the perfect window to deglaze the pan, separate the fat, and whip up the roux. Having the gravy as the final task ensures it is served at the correct temperature and consistency. If you finish it too early, keep it warm over a very low flame, perhaps in a double boiler, and whisk in a splash of hot stock before serving to loosen it up. Never let the gravy boil aggressively once it has reached the desired consistency, as this can break the emulsion.
Final Seasoning Check
The last step before taking the gravy off the heat should always be the seasoning check. Take a small spoonful, let it cool slightly (so you don't burn your tongue), and taste for balance. Does it need a tiny pinch more salt? A bit more black pepper? Is the texture right? By taking these final few seconds to calibrate the flavor, you ensure that every bite of your roast, potatoes, and vegetables is enhanced by the perfect sauce. This attention to detail is what defines a master of the culinary craft.
Conclusion
Mastering the use of a fat separator is a transformative skill for any home cook. It moves you away from the clumsy, inefficient methods of the past and into a world of precision and culinary excellence. By isolating the fat, you gain complete control over the richness of your gravy, allowing you to build a base that is perfectly balanced and undeniably professional. Remember that the journey from pan drippings to a silken, savory sauce is about understanding the interactions between fat, flour, and liquid—a delicate dance of chemistry and technique.
Do not be discouraged if your first attempt requires a bit of patience. The process of deglazing, separating, and emulsifying is a rhythm that you will soon master with practice. As you grow more comfortable with these steps, you will find yourself experimenting with different stocks, herbs, and aromatics, tailoring your gravy to suit the specific dish you are serving. Your guests will notice the difference, and you will take pride in knowing that you have elevated a humble kitchen task into a genuine culinary achievement.
Take these techniques into your next kitchen session with confidence. Whether it is a grand holiday feast or a cozy Sunday dinner, your gravy will now stand as a testament to your commitment to quality. The fat separator is a tool that rewards the thoughtful cook, turning the byproduct of a roast into the star of the show. Keep your pan juices, keep your techniques sharp, and keep creating beautiful, delicious food. After all, when the meal is this good, the only thing you have to blame is the chef’s own pursuit of perfection. Happy cooking, and may your gravy always be the talk of the table.
As you continue to refine your skills, remember that cooking is a constant process of learning and adaptation. Each time you use your separator, you are sharpening your understanding of the ingredients. Pay attention to how the fat rises, how the fond contributes to the depth of color, and how the roux reacts to the temperature of your stock. These are the sensory details that elevate a home cook to the level of a true culinary artist. Do not settle for anything less than excellence, and always remember that the best kitchen tools are the ones that allow you to express your creativity with precision and grace.
The final result of all this effort is a meal that brings people together. A well-made gravy does more than just add flavor; it serves as a bridge between the various components of your plate, tying the roast and the starch together in a unified, comforting embrace. It is a labor of love that speaks volumes about your dedication to the craft of cooking. Thank you for following along with this guide, and I look forward to hearing about your future successes in the kitchen. Keep practicing, keep tasting, and above all, keep enjoying the process of creating something truly spectacular from the simplest of ingredients.
The goal of this guide was to demystify a tool that often sits forgotten in the back of a kitchen drawer. By incorporating it into your routine, you are making a conscious choice to favor technique over convenience, and the results will speak for themselves in every velvety, flavorful drop. Never underestimate the impact of a properly prepared sauce; it is the hallmark of a cook who understands that flavor is found in the details. Go forth and cook with boldness, precision, and the knowledge that you now possess the key to the perfect gravy. Your table, and your guests, will thank you for it.
As we look toward your next culinary challenge, remember that the principles of cooking are universal. Whether you are deglazing a pan for a gravy, balancing the acidity in a vinaigrette, or mastering the perfect sear on a steak, the key is always to remain present and engaged with your ingredients. The fat separator is just one tool in a vast repertoire of culinary devices designed to help you succeed. Embrace these tools, master their functions, and let them serve you as you continue to explore the endless possibilities of flavor and texture in your own kitchen. There is always more to learn, more to taste, and more to share, so let this be the beginning of your journey toward mastering the art of the perfect sauce.
Final piece of advice: don't let the process intimidate you. Cooking should be an act of joy. When you pour those golden drippings into your separator and watch them divide, you are participating in a process that has been used by chefs for generations. It is a classic technique, updated for the modern kitchen, and it is entirely within your grasp. Stay curious, stay hungry, and enjoy every moment you spend crafting those delicious memories around your dining table. The kitchen is your laboratory, and the gravy is your masterpiece. Good luck, and happy roasting to all.
One final note on the importance of patience. Do not try to rush the separation process. Letting the juices settle naturally is the only way to ensure the cleanest results. When you give the liquid time to settle, you are showing respect for the ingredients. That patience is rewarded with a superior product that looks and tastes better. It is a small investment of time that yields a high return in quality. Take your time, focus on the details, and trust the process. You are doing great work in your kitchen, and every bit of effort you put into the foundation of your gravy will be evident in the finished result.
As I wrap up this guide, I want to emphasize once more that the best gravy is the one made with care and intention. Using a fat separator is an easy, effective way to ensure your gravy reaches that level of intention. It is a simple step, but one that makes a world of difference. Keep this guide handy, refer back to these steps whenever you need a refresher, and never hesitate to reach out if you have questions about your process. I am always here to support your culinary journey and help you become the best chef you can be in your own home. Until next time, enjoy the incredible flavors you are creating and the wonderful meals you are sharing with those you love.
In summary, the key components to your gravy success are simple: high-quality pan drippings, a clean separation of fat and stock, a perfectly cooked roux, and a balanced seasoning profile. When you put these four pillars together, you create a sauce that is truly exceptional. By avoiding common mistakes like rushing the separation or adding too much flour at once, you maintain the integrity of your gravy from start to finish. It is a systematic approach that guarantees consistent, delicious results every single time you roast. You now have the knowledge and the technique—all that remains is the act of cooking. So go ahead, fire up the oven, and prepare to impress everyone at the table with the best gravy they have ever tasted. You’ve got this, and I am proud of the progress you are making as a home chef. Stay culinary!
Get the Next Recipe
Weekly recipes, techniques, and gear picks — straight to your inbox.
