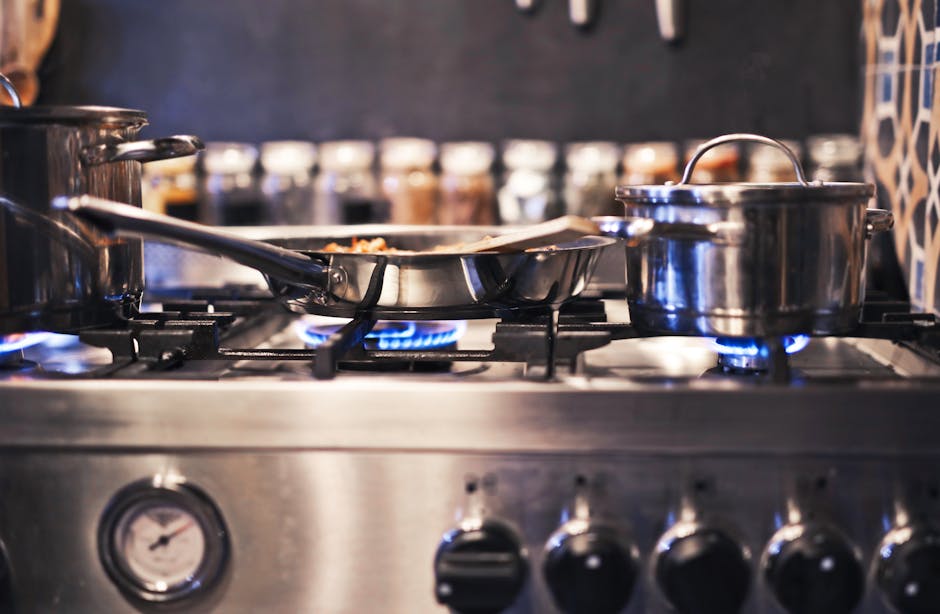
Stop Food Sticking to Stainless Steel Pans
There is a specific kind of heartbreak that every home cook experiences at least once in their culinary journey. You have spent minutes prepping the perfect salmon fillet, patting it dry with meticulous care, and seasoning it until it looks like a masterpiece. You preheat your kitchen, you bring the pan to what you believe is the right temperature, and you slide the protein into the gleaming stainless steel. But the moment you reach for your spatula to give it a gentle nudge, you are met with immovable resistance. What should have been a beautiful, golden-brown sear has turned into a mangled, stuck-on mess, leaving you frustrated and staring at a pan that will require an hour of scrubbing.
We have all been there, and I am here to tell you that it is rarely the fault of the pan itself. While non-stick cookware has its place in the kitchen for delicate tasks like folding an omelet, stainless steel is the undisputed workhorse for developing deep, complex flavors. The primary reason food sticks to this material is not because the pan is "bad," but because of a misunderstanding of how metal interacts with protein at the molecular level. When a pan is too cold, the microscopic pores of the metal remain open, allowing the protein to bond directly with the surface. Once you understand the science of thermal expansion and the Leidenfrost effect, you can turn your stainless steel set into the most reliable tool in your arsenal.
"Blame The Chef" is built on the philosophy that culinary skill is not a talent you are born with, but a collection of techniques you learn through repetition and insight. You do not need to replace your pans or switch to expensive coatings to achieve professional results. You simply need to master the art of heat management and surface preparation. In the following guide, we will break down exactly how to preheat your pan, how to test for the perfect temperature, and why patience is actually an ingredient in every recipe you cook. Once you adopt these professional habits, the days of scrubbing burnt-on crusts will be a distant memory, replaced by the satisfying sound of a perfect sear.
The Science of Metal and Heat Management
To stop food from sticking, you have to think like a scientist. Stainless steel is not perfectly smooth; under a microscope, the surface is filled with tiny hills and valleys. When you place food into a cold or lukewarm pan, the heat causes the proteins in your meat or vegetables to melt into these microscopic imperfections. As the food cooks, it physically interlocks with the metal, creating a mechanical bond that makes flipping nearly impossible without leaving half of your meal behind.
Thermal Expansion and Surface Tension
When you heat a stainless steel pan, the metal undergoes thermal expansion. The molecules in the steel expand, which effectively closes those microscopic pores and creates a much smoother, non-porous surface. This is why preheating is non-negotiable. If you add your fat to a cold pan and start cooking immediately, you are essentially asking your food to "marry" the metal. By allowing the pan to reach its optimal thermal capacity before the ingredients ever touch it, you are creating an environment where the food can float on a layer of oil rather than gripping the steel.
The Leidenfrost Effect
You might have heard chefs talk about the Leidenfrost effect, but it is often misunderstood. This phenomenon occurs when a liquid comes into contact with a surface that is significantly hotter than the liquid's boiling point. This creates a thin layer of vapor between the surface and the droplet, allowing the liquid to glide across the pan without touching it. While you don't necessarily want your steak floating on a cushion of vapor in a violent display of steam, understanding this principle helps you realize that the correct temperature creates a barrier that prevents sticking.
"A stainless steel pan is a tool that demands respect; if you give it the proper time to heat, it will repay you with the best sear you have ever achieved."
The Essential Water Drop Test
You do not need a laser thermometer to know if your pan is ready to perform. While digital tools are great, the water drop test is the most reliable, time-tested method in the professional culinary world. It relies on the physics of surface tension and temperature. By dropping a tiny amount of water into your empty, preheated pan, you get an immediate visual indicator of the pan's thermal state.
How to Execute the Test
Start by placing your dry stainless steel pan over medium heat for about three to five minutes. Do not rush this; stainless steel needs time to distribute heat evenly across its base. Once you suspect it is hot, take a few droplets of water from your fingertips and flick them into the center of the pan. If the water sizzles and evaporates immediately, your pan is not ready. If the water beads up and dances around the pan like a mercury ball, you have reached the magic zone.
Understanding the Results
If the water droplets split into many tiny beads and skate across the surface, that is your signal. This movement signifies that the Leidenfrost effect is in full swing. At this point, the metal has expanded sufficiently, and the pan is ready for the addition of your fat. Once you achieve this, remove the pan from the heat briefly to wipe it dry with a paper towel—you don't want water in your oil—and add your cooking fat immediately. If you wait too long, the pan will lose that critical heat, and you will be back to square one.
The Importance of Fat Selection
Choosing the right fat is just as important as the heat of the pan. You need a fat that can handle high temperatures without burning, and one that provides enough lubrication to create that physical barrier between the protein and the metal. When working with stainless steel, I always recommend using a fat with a high smoke point, such as avocado oil, grapeseed oil, or ghee.
Creating the Oil Film
Once your pan passes the water drop test, add your oil and let it heat for another 30 to 60 seconds. You are looking for the oil to shimmer—this is the sign that it has reached the ideal viscosity to coat the pan uniformly. You want the oil to move like water, sliding easily when you tilt the pan. If you see the oil starting to smoke, you have gone too far; remove it from the heat immediately, as that indicates the chemical breakdown of the fat, which will lead to a bitter, burnt flavor.
The Role of Butter and Finishing
Many cooks love the flavor of butter, but butter contains milk solids that burn quickly at high temperatures. If you want the flavor of butter, add it at the very end of the cooking process for basting. For the initial sear, stick to neutral, high-heat oils. This technique is often called butter basting, and it is the secret behind the golden-crust, restaurant-quality steaks you see in glossy magazines. By keeping your high-heat oil as the foundation and adding butter for flavor in the last two minutes, you ensure a perfect, non-stick sear without the burnt residue.
Mastering Ingredient Preparation
Even with the perfect pan and the perfect oil, failure is inevitable if the food itself is working against you. Moisture is the enemy of a good sear. When food is cold or wet, it drops the temperature of the pan instantly upon contact, which causes the protein to release juices that then get trapped under the meat. This leads to steaming rather than searing, and that is a direct path to stuck-on food.
The Drying Ritual
Always pat your proteins, especially fish and steak, completely dry with a paper towel before they go into the pan. Even surface moisture must be evaporated before the crust can begin to form. If you are searing chicken thighs or fillets, ensure they are not fresh out of the refrigerator; letting them sit at room temperature for 15 to 20 minutes before cooking prevents the dramatic temperature drop that usually leads to sticking.
The Seasoning Strategy
Salt is a miracle worker, but it must be used strategically. If you salt your meat right before it hits the pan, the salt will draw moisture out of the muscle fibers, effectively creating a "wet" surface that prevents the sear. I recommend seasoning your protein either well in advance—at least 40 minutes—so the salt has time to be reabsorbed into the meat, or immediately before it hits the oil. By creating this dry, well-seasoned surface, you ensure that the protein hits the pan ready to undergo the Maillard reaction, the chemical process that creates flavor and color.
"If your meat is wet, it is going to stick. There is no way around the physics of steam, so always prioritize the dryness of your protein before it touches the heat."
The Art of Patience: Let the Pan Do the Work
Perhaps the most common mistake made by home cooks is the urge to poke, nudge, or flip the food too early. There is a psychological barrier we must overcome: the feeling that if we don't move the food, it must be burning. In reality, the protein will naturally release from the pan once the Maillard reaction has created a sufficient crust. If you try to flip a steak and it feels stuck, do not force it. That resistance is the pan telling you it needs another 30 to 60 seconds.
The "Nudge" Technique
When you place your protein in the pan, give it a light, gentle press to ensure even contact. After about two minutes, try to give the item a small nudge with your spatula. If it moves easily, it is ready to be flipped or moved. If it feels like it is glued down, leave it alone. The chemical transformation that occurs during searing will naturally release the food from the surface of the stainless steel once the crust has developed. Forcing it early only results in tearing the meat and ruining the texture.
Why It Works
When you sear a protein, the heat causes the sugars and amino acids to rearrange into complex compounds that provide that savory, umami flavor we crave. This reaction requires time and a steady, uninterrupted heat source. By constantly moving the meat, you are preventing this reaction from occurring properly and effectively cooling down the surface of your pan. Trust your technique, trust the timing, and give the pan the space it needs to do its job.
Troubleshooting Common Errors
Even the most seasoned chefs occasionally deal with sticking. When this happens, it is often due to a subtle shift in variables: the burner might be fluctuating, the pan might have been crowded, or the ingredients might have been too cold. It is important to troubleshoot these issues calmly rather than panicking and cranking the heat, which usually only makes the sticking worse.
Don't Crowd the Pan
When you put too much food in the pan at once, the cumulative temperature drops significantly. This causes the pan to "cool down," and instead of searing, your ingredients will start to boil in their own juices. Always work in batches, leaving plenty of room between items for the heat to circulate. This simple rule of thumb—giving your ingredients space—will drastically improve the quality of your cooking and keep your stainless steel looking brand new.
Managing Pan Residue
If you do encounter a bit of sticking, don't worry about the pan. The brown bits left on the bottom, known as the fond, are actually a culinary treasure. You can deglaze the pan with wine, stock, or even water to pull those flavors up and create a delicious pan sauce. Not only does this save your dinner, but it also makes cleaning the pan significantly easier. By deglazing, you are essentially cleaning the pan as you cook, turning a potential disaster into a flavorful component of your meal.
Cleaning and Maintenance for Success
The final piece of the puzzle is how you care for your stainless steel. If your pan is scratched, pitted, or has layers of burnt-on oil from previous sessions, it will be much harder to achieve a non-stick surface in the future. A well-maintained pan has a smooth, consistent surface that allows for even heat distribution and easier release of food.
The Power of Bar Keepers Friend
Every home cook who owns stainless steel should own a can of Bar Keepers Friend. This acidic cleaner is the gold standard for removing stubborn stains and restoring the finish of stainless steel pans. Regular use ensures that your pan remains as slick as it was the day you bought it. Avoid using harsh steel wool pads that create deep scratches; instead, use a soft sponge and a gentle abrasive cleaner to maintain the integrity of the cooking surface.
The "Cold Pan" Trap
Never shock a hot stainless steel pan with cold water. This can cause thermal shock, leading the metal to warp or become uneven. An uneven pan will never perform well, as it will create hot and cold spots across the surface. Let your pan cool down naturally on the stove before moving it to the sink. By treating your equipment with care, you are setting yourself up for long-term culinary success and avoiding the frustration of uneven heat distribution.
"A kitchen is not a battlefield, but a workshop. If your tools are treated with the same respect as your ingredients, the results will always be superior."
Building Your Culinary Confidence
Mastering stainless steel is a rite of passage. It signals that you are moving past the crutch of non-stick pans and are ready to engage with the actual science of cooking. It might take a few tries to get the preheating rhythm down perfectly, and you might have a few "learning experiences" along the way, but every mistake is simply a lesson in thermal management. You are now equipped with the knowledge of how heat interacts with metal, the importance of dryness, and the patience required for a perfect sear.
The Path Forward
Start by practicing with simple items. Sear a piece of chicken thigh or a pork chop, focusing entirely on the preheating process. Do not worry about the side dish for a moment; just concentrate on the pan and the protein. Once you see that beautiful, deep-brown crust emerge without a struggle, the confidence will build itself. You will find that you are no longer cooking by following a set of strict, rigid rules, but by sensing the temperature and the behavior of the ingredients in the pan.
A New Standard in Your Kitchen
Once you stop blaming the pan and start understanding the physics, your cooking will change. You will find yourself reaching for the stainless steel instead of the non-stick, because the flavors you can build—the depth of the fond, the quality of the sear—simply cannot be replicated on inferior surfaces. You are now the master of your stainless steel, and with these techniques, every meal will be an opportunity to demonstrate your refined control and elevated skill level.
Final Thoughts
The journey to becoming a better cook is paved with small, deliberate improvements in technique. By focusing on the fundamentals—preheating, heat management, and ingredient preparation—you have effectively removed the barrier between you and your ingredients. "Blame The Chef" is about taking responsibility for the process, and when you do, you realize that the control was in your hands all along. Stainless steel is a generous partner in the kitchen, but it requires you to meet it on its own terms.
As you continue to refine your skills, remember that the most important ingredient is your own patience. Whether you are searing a delicate piece of fish or a thick-cut ribeye, the rules of thermal expansion and surface tension remain the same. The next time you find yourself standing over the stove, take a breath, check your heat, and observe the way your ingredients respond to the pan. You are no longer just heating food; you are conducting a chemical process with precision and care.
Finally, do not be discouraged by the learning curve. Even professional chefs have had to learn these lessons the hard way, usually through trial and error. The techniques outlined here are designed to give you a head start, but the true mastery comes with repetition. Go back to these steps, practice the water drop test until it becomes second nature, and soon, you won't even think about it—you will just do it, and the results will speak for themselves. Happy cooking, and may every meal you prepare be a testament to your growing expertise.

Get the Next Recipe
Weekly recipes, techniques, and gear picks — straight to your inbox.
