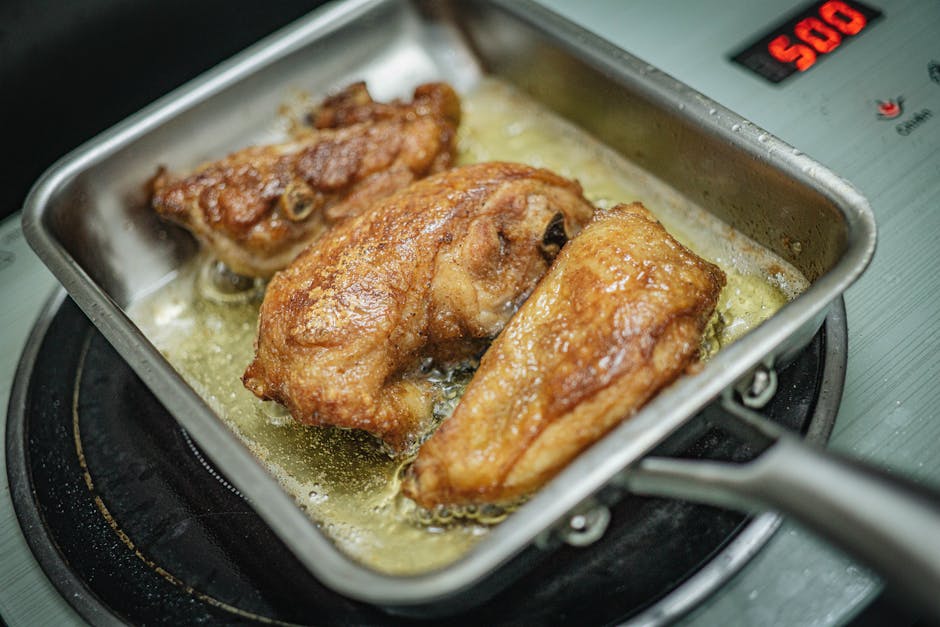
How to Stop Food Sticking to a Stainless Steel Pan
The transition from non-stick cookware to professional-grade stainless steel is the ultimate rite of passage for any serious home cook. Many people make the initial investment in a high-quality stainless steel skillet, only to find themselves scrubbing burnt egg remnants off the bottom five minutes later, leading them to quickly regret the purchase. This frustration is universal, but it is almost always the result of a misunderstanding of how metal reacts to heat rather than a flaw in the pan itself. When you learn to master the surface, you open up a world of searing, deglazing, and sauce-making that non-stick surfaces simply cannot achieve. By understanding the physics of your cookware, you can stop blaming the equipment and start taking control of your kitchen results.
The key to stainless steel success lies in the concept of the Leidenfrost effect, a phenomenon where a liquid in contact with a surface significantly hotter than its boiling point produces an insulating vapor layer. When you properly heat a stainless steel pan, you are essentially creating a temporary non-stick barrier between the metal and the food. If you add your ingredients before the pan is ready, the food will bond with the microscopic pores of the steel, creating a stubborn mess that feels impossible to clean. Mastering this thermal threshold is not just about technique; it is about developing a sensory relationship with your stovetop. With a little practice, you will no longer fear the stick, but rather welcome the golden-brown crust that only stainless steel can deliver.
In this guide, we will break down the precise mechanics of cooking with stainless steel, moving far beyond the simple "add oil and heat" advice found in generic cookbooks. We will explore the critical importance of pan temperature, the role of fat management, and the science of protein coagulation. Whether you are searing a thick ribeye, sautéing delicate vegetables, or attempting a perfect omelet, these techniques will transform your relationship with your pans forever. You are about to graduate from a hesitant cook to a confident kitchen technician, equipped with the knowledge to handle any ingredient with the precision of a professional chef. Let’s stop the sticking and start the searing.
The Science of Surface Temperature and Preheating
The most common mistake home cooks make is adding food to a cold or lukewarm pan. Stainless steel is a porous metal at the microscopic level; when it is cold, these pores are open, and as food proteins hit the surface, they expand and lock into those pores like a key in a lock. To prevent this, you must heat the pan until the metal expands and the surface becomes effectively smooth. This process, often called dry preheating, is the most fundamental step in your journey toward a stick-free kitchen experience.
The Water Drop Test
The most reliable way to check if your pan is ready is the water drop test. Place your pan over medium heat for about three to five minutes. Once you think it is hot enough, flick a few drops of water onto the surface. If the water evaporates immediately, the pan is too cool. If the water sizzles and breaks into smaller droplets, it is getting there. However, if the water beads up into a single, shimmering sphere that skitters across the pan like a hockey puck, you have reached the Leidenfrost point. At this precise temperature, the vapor layer is formed, and your pan is ready for fat and food.
The secret to professional cooking isn't a secret ingredient; it's the mastery of thermal dynamics. When your pan talks to you through the behavior of a single drop of water, you are finally in command.
Once you see the beads dancing, remove the pan from the heat for a brief moment to stabilize the temperature, wipe out any remaining water droplets with a paper towel, and then add your high-smoke point oil. It is vital to let the oil heat up until it begins to shimmer, but not smoke. If the oil smokes, you have exceeded the heat capacity of the fat, which will lead to a bitter flavor and an uneven surface. By controlling these two variables—the heat of the metal and the temperature of the oil—you establish a perfect foundation for everything that follows.
Fat Management and Coating Techniques
Not all fats are created equal when it comes to stainless steel. Understanding the smoke point of your cooking medium is essential for preventing sticking. Butter, while delicious, contains milk solids that burn quickly at high temperatures. If you want to use butter, it is best to combine it with a high-smoke point oil like avocado or grapeseed oil. This "composite fat" allows you to achieve the rich flavor of butter while maintaining the heat stability required for a professional sear.
The Importance of Coating
Once your pan has reached the Leidenfrost point and you have added your oil, it is imperative to coat the bottom of the pan evenly. You do not need to drown the pan in oil; a thin, consistent layer is all that is required. Use a silicone brush or simply tilt the pan in a circular motion to ensure the oil reaches the edges. If you have "dry spots" where the oil hasn't reached, your food will inevitably grab onto those areas and stick.
If you are cooking a large batch, never overcrowd the pan. Overcrowding causes the temperature of the pan to drop rapidly, which collapses that crucial vapor barrier and leads to steaming rather than searing. When you steam your food instead of searing it, the juices released from the protein will pool in the pan, creating a sticky, gelatinous sludge that binds the meat to the surface. Always cook in batches if necessary, and give each piece of protein enough "personal space" to achieve that perfect golden crust.
Understanding Protein Coagulation
The interaction between protein and heat is often misunderstood. When a protein hits a hot surface, the molecules begin to denature and coagulate. If the temperature is too low, the proteins will bond directly with the metal. However, if the heat is applied correctly, the Maillard reaction occurs—a chemical reaction between amino acids and reducing sugars that gives browned food its distinctive flavor and color. When this reaction is complete, the proteins actually "release" themselves from the pan.
The Patience Factor
The biggest mistake you can make is trying to flip your food too early. Many home cooks suffer from "fidgety spatula syndrome," constantly nudging the food to see if it is sticking. If you pull at a piece of chicken or fish before the Maillard reaction has finished, you will tear the protein and leave a layer of crust behind. If you feel resistance when you try to lift the food, that is the pan telling you, "I am not finished yet."
Never fight your food. If the protein is sticking, it is simply telling you it hasn't developed the necessary sear to release itself. Be patient, lower the heat slightly, and wait for the natural release.
Once the crust is fully formed, the protein will naturally lift off the surface with almost no effort. This is the moment of truth. If you wait until the meat develops a deep, mahogany-colored crust, it will slide across the pan like it is on ice. This applies to everything from chicken breasts and steaks to scallops and tofu. Learning to trust the process and allowing the chemistry to do the work for you is the hallmark of an expert cook.
Dealing with Delicate Ingredients
Some ingredients, such as eggs or fish, require a more delicate touch. While the high-heat searing method works perfectly for steak, eggs require a more nuanced approach. For eggs, you should use a slightly lower temperature than you would for a heavy sear. The goal with eggs is to cook them through the residual heat and the non-stick properties of the fat, rather than searing them.
The "Omelet Technique"
If you are struggling with eggs sticking, try the low-and-slow method. Heat the pan to a medium-low setting. Add a generous pat of butter. Once the butter has melted and is foaming (but not browned), add your eggs. The goal is to create a cushion of fat that prevents the proteins in the egg from ever coming into direct contact with the stainless steel. If you are making a delicate fish fillet, ensure the skin is completely dry before placing it in the pan. Moisture is the enemy of a crisp crust; use a paper towel to pat your fish dry before seasoning.
Pat your ingredients dry:* Surface moisture causes steam and prevents the crust from forming.
Room temperature protein:* Bringing meat to room temperature before cooking ensures even heat distribution.
Seasoning timing:* Salt your protein just before it hits the pan to prevent the salt from drawing out too much moisture prematurely.
By treating delicate proteins with respect and adjusting your heat settings accordingly, you can use a stainless steel pan for everything in your kitchen. There is no need to keep a non-stick pan around once you have mastered the temperature control required for these sensitive items.
Troubleshooting Common Errors
Even the best chefs have days where things don't go according to plan. If you find yourself with a sticky mess, don't panic. The beauty of stainless steel is its durability. Unlike non-stick pans, which have a limited lifespan and can release toxic fumes if overheated, stainless steel is virtually indestructible. If your food sticks, it is a learning opportunity to calibrate your technique.
The "Pan Recovery" Protocol
If you have accidentally scorched food onto your pan, do not reach for the steel wool immediately. Instead, use the deglazing technique. Add a small amount of water, wine, or broth to the hot pan once you have removed the food. The liquid will loosen the caramelized bits (the fond) from the bottom of the pan. Not only does this make cleaning up a breeze, but these bits are the base for the most incredible pan sauces you will ever taste.
If the pan is truly stubborn, fill it with a mixture of water and a splash of white vinegar, bring it to a boil for a few minutes, and let it sit. The acidity will break down the carbonized proteins, allowing you to wipe the pan clean with a simple sponge. Investing in a bit of Bar Keepers Friend is also a professional chef’s best friend. This mild abrasive cleaner works wonders on stainless steel, restoring the luster and removing any stubborn discolorations that accumulate over time.
Advanced Maintenance and Cleaning
Your stainless steel pan is a long-term investment. To keep it in peak condition, you need to treat it with care. Avoid putting hot pans directly into cold water; this causes thermal shock, which can warp the base of the pan and make it wobble on your stovetop. Always let your pans cool down naturally before cleaning them.
Restoring the Shine
Over time, you may notice rainbow-colored streaks or white spots on your pan. These are usually mineral deposits from hard water or heat-induced oxidation. They are purely cosmetic and do not affect the performance of the pan, but they can be easily removed. A paste of baking soda and water, or a simple wipe with white vinegar, will return your pan to a mirror-like finish.
Remember that stainless steel does not need to be babied, but it does need to be respected. By keeping the surface clean and free of burnt-on carbon, you ensure that the next time you go to cook, the pan is ready to perform. A well-maintained pan is a reliable partner in the kitchen that will last for decades, becoming a heirloom piece that carries the memory of every meal you have ever prepared.
The Art of the Pan Sauce
One of the greatest benefits of learning to use a stainless steel pan is the ability to create restaurant-quality pan sauces. Because stainless steel promotes the development of fond—that flavorful, browned residue at the bottom of the pan—you have a shortcut to complexity that is impossible with non-stick cookware. Once your meat is done, remove it and let it rest. Lower the heat, add some finely diced shallots or garlic to the remaining fat, and let them soften.
Building the Flavor Profile
Deglaze the pan with a splash of wine, vermouth, or high-quality stock. Use a wooden spoon to scrape up every bit of that flavorful fond. Reduce the liquid until it is syrupy, then whisk in a cold knob of butter to emulsify and create a silky, rich sauce. This process, known as monter au beurre, is what separates home cooking from culinary craft. Your pan is not just a cooking surface; it is the laboratory where your dinner’s final flavor profile is built.
A stainless steel pan is the canvas upon which the chef paints. If you aren't deglazing your pan, you are leaving the best part of the meal behind.
Mastering this technique effectively turns every meal into an event. You aren't just frying a piece of chicken; you are creating a dynamic, layered experience. When you finally reach this stage of your culinary journey, you will realize that the "sticking" issues of the past were simply stepping stones to your current expertise. You have moved beyond the fear of the pan and into the role of the creator.
Conclusion
Transitioning to stainless steel is more than just a change in equipment; it is a fundamental shift in how you approach the act of cooking. By embracing the science of heat, respecting the importance of oil and surface temperature, and learning the rhythms of protein development, you have unlocked a new level of culinary freedom. The frustration of sticking is now a relic of the past, replaced by the satisfying sizzle of a perfect sear and the rich, complex flavors of a well-executed pan sauce.
Do not be discouraged if you don't get it perfect on your first attempt. Even professional chefs have had to calibrate their timing to the specific heat output of their burners. Take your time, listen to the pan, and watch the behavior of your food. Every meal you cook is a chance to refine your intuition. Stainless steel is a robust, honest, and high-performing material that rewards the effort you put into it. Keep your pans clean, keep your heat under control, and most importantly, keep cooking with confidence. You are the architect of your own kitchen success, and with these techniques, you have all the tools necessary to produce meals that are truly worth the effort. Now, turn on that burner, feel the heat, and start cooking something magnificent.
Final Thoughts
As you continue to use your stainless steel pans, you will find that you reach for them instinctively. There is a weight and a stability to professional-grade steel that provides a sense of control no other material can offer. Remember that the journey of a home cook is never truly finished; there is always a new technique to refine, a new ingredient to explore, and a new flavor profile to perfect.
If you ever find yourself struggling again, come back to these basics. Check your preheat, monitor your fat, and ensure your protein is dry. These are the three pillars of stainless steel success. You have the knowledge now, and that knowledge is the difference between a kitchen chore and a culinary passion. Thank you for trusting "Blame The Chef" to guide you through this transition. We look forward to seeing the incredible meals you create. Keep experimenting, keep deglazing, and above all, keep enjoying the process of making something beautiful out of simple, raw ingredients. The world of high-heat cooking is yours to command, and we know you will thrive in it.
Get the Next Recipe
Weekly recipes, techniques, and gear picks — straight to your inbox.
