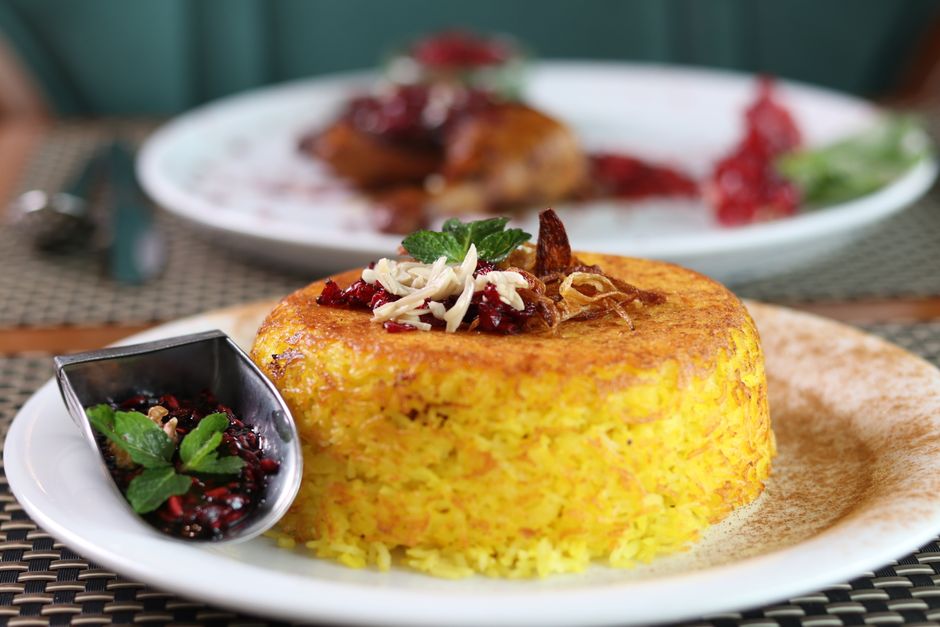
The Art of Persian Tahdig: Mastering the Crispy Rice Crust That Defines a Cuisine
To master the kitchen, one must first learn to respect the humble grain of rice, an ingredient that serves as the foundation for half the world's population yet remains a source of intimidation for even the most seasoned home cooks. In Persian culture, rice is far more than a simple side dish; it is a meticulously crafted centerpiece that demands patience, precision, and an almost intuitive understanding of heat management. The pinnacle of this culinary tradition is Tahdig, the golden, butter-crisped layer of rice that forms at the bottom of the pot, serving as the crown jewel of any Persian feast. To achieve this, you are not merely cooking; you are engaging in a delicate dance between moisture and fire, coaxing starch into a structural masterpiece that shatters with a satisfying crunch upon the first bite.
Many aspiring cooks approach Persian rice with a sense of trepidation, fearing the dreaded mushy texture or a bottom layer that burns into charcoal rather than a deep, caramelized amber. However, the secret lies not in luck but in the chelow method, which involves parboiling, steaming, and the application of controlled, indirect heat. When you commit to making Tahdig, you are committing to a process that celebrates the transformation of basic pantry staples—Basmati rice, saffron, yogurt, and fat—into something transcendent. This blog serves as your guide to demystifying this ancient technique, ensuring that your table is graced with a crust that is as beautiful to behold as it is delicious to consume.
As we delve into the technical nuances of this craft, remember that the "Blame The Chef" philosophy is built on the belief that culinary failure is merely a stepping stone toward expertise. You will likely break your first few attempts, and that is entirely acceptable, as every pot of rice is a lesson in moisture control and pot-bottom geometry. By the time you finish this guide, you will possess the vocabulary, the techniques, and the confidence to replicate this iconic dish in your own home. Prepare your best heavy-bottomed non-stick pot, sharpen your sensory awareness, and let us embark on the rewarding journey of perfecting the art of the golden crust.
The Foundation: Selecting Your Ingredients and Equipment
The quality of your Tahdig is dictated entirely by the caliber of your ingredients, starting with the rice itself. You must source a high-quality, long-grain Basmati rice that has been aged, as older grains are drier and have a lower starch content, which prevents the final product from becoming gummy or clumped. Look for brands that clearly label the origin, ideally from India or Pakistan, and avoid broken grains or budget-friendly "white rice" blends that lack the necessary structure for the parboiling process. The rice is the canvas; if the canvas is flawed, the masterpiece cannot shine.
Your choice of cooking vessel is equally critical when attempting to achieve the perfect golden crust. While professional chefs might use a traditional copper or aluminum deeg (a specialized Persian rice pot), the home cook is best served by a heavy-bottomed non-stick pot. The non-stick coating is your insurance policy; it allows the crust to release cleanly when you invert the pot onto a serving platter. A thin-bottomed pot will create hotspots, resulting in an unevenly browned crust that burns in the center and remains pale at the edges.
The Role of Saffron and Fats
The color and flavor of the crust are derived from a combination of bloomed saffron and a high-quality fat. Saffron is the most expensive spice by weight, and it should be treated with reverence. Always grind your saffron threads with a small pinch of sugar using a mortar and pestle before steeping them in a few tablespoons of boiling water. This infusion process, known as blooming, unlocks the floral, metallic, and deep earth notes that give Persian food its distinct profile.
Regarding fat, traditional recipes call for a blend of clarified butter (or ghee) and neutral vegetable oil. The ghee provides the rich, nutty flavor, while the vegetable oil has a higher smoke point, ensuring that the crust crisps up effectively without the milk solids in the butter burning prematurely. Never skimp on the fat; it is the medium through which the rice grains fry into a crispy, unified layer.
"True culinary mastery is not found in the complexity of the recipe, but in the unwavering patience with which you treat the simplest of ingredients. Rice is the test; Tahdig is the reward."
The Science of Parboiling: The First Phase
The most vital step in the Persian rice process is the parboiling stage, where you soften the grains without fully cooking them through. Start by washing your rice in several changes of cold water until the water runs clear. This step is non-negotiable; removing the excess surface starch is what guarantees that the grains will remain separate and fluffy rather than sticking together in a clump. Once washed, soak the rice in salted water for at least thirty minutes. This hydrate the grains from the inside out, ensuring they cook evenly once they hit the boiling water.
When you are ready to boil, bring a large pot of heavily salted water to a rolling boil—it should taste like the sea. Drop your soaked rice into the water and keep a close eye on the clock. This is the stage where most cooks falter; you are looking for the "al dente" point, where the grain is soft on the outside but still holds a firm, white bite in the center. This usually takes between four to six minutes depending on your elevation and the specific variety of Basmati rice you are using.
Testing for Doneness
To test the grain, pull one out and bite it. If the grain breaks cleanly and feels soft yet resilient, it is ready. If it breaks into mush, you have gone too far. Once the grains have reached this state, drain the rice immediately into a fine-mesh colander and rinse it with cool water to arrest the cooking process. This immediate cooling is a professional chef’s trick that prevents the rice from continuing to cook through carry-over heat, which would lead to a sodden bottom layer.
Preparing the Tahdig Base: The Yogurt and Saffron Connection
There are various styles of Tahdig, ranging from the classic plain rice crust to more elaborate versions utilizing yogurt, egg yolks, or even flatbread and potatoes. For the most foolproof and luxurious crust, I recommend the yogurt-saffron mixture. In a medium bowl, combine about one cup of the parboiled rice with two tablespoons of full-fat Greek yogurt, a generous splash of your bloomed saffron water, and a tablespoon of melted ghee or oil. Mix this until every grain is coated in the vibrant, golden-hued, creamy mixture.
This mixture acts as the "glue" for your crust. By introducing the yogurt, you are providing proteins and sugars that will undergo the Maillard reaction—the chemical process that gives seared food its characteristic browned color and complex flavor. When this mixture hits the hot bottom of the pot, the yogurt sugars caramelize quickly, creating a deep, savory, and perfectly crispy barrier that protects the delicate rice piled above it.
Layering the Pot
Before you add the yogurt mixture, place your pot over medium-low heat and add a generous two tablespoons of oil and one tablespoon of butter. Swirl to ensure the bottom and at least two inches up the sides of the pot are coated. Spread your yogurt-rice mixture in an even, thin layer across the bottom. Use a spatula to press it down gently, ensuring there are no air pockets or gaps. This is the foundation upon which your culinary reputation rests, so take your time to ensure the distribution is uniform.
Once the base is set, gently mound the remaining parboiled rice over the crust in a conical shape. Do not press the remaining rice down; you want it to remain light and airy. Use the handle of a wooden spoon to poke several steam vents—essentially tunnels—from the top of the rice pile down to the bottom of the pot. These vents allow steam to escape from the base, preventing the rice from becoming waterlogged as it finishes the steaming process.
The Steaming Process: Heat Control and Patience
With the rice layered and the vents poked, it is time for the final act of steaming. Drizzle a mixture of melted butter and a little more saffron water over the top of the rice pile to ensure it absorbs flavor and color as it steams. Wrap the lid of your pot in a clean, lint-free kitchen towel; this is the classic "Persian tea towel trick." The cloth absorbs the excess condensation that would otherwise drip back onto the rice and make it mushy, allowing the rice to steam in a dry, hot environment.
Place the lid on the pot, ensuring it is sealed tight. Start the pot on medium-high heat for about five to seven minutes. This initial high-heat blast is necessary to jumpstart the crust formation at the bottom. You are trying to hear a faint sizzle, but do not let it reach a loud, aggressive crackle, which indicates burning. After the initial burst, turn the heat down to the lowest possible setting. In many modern kitchens, a heat diffuser is an essential tool here to ensure the heat is distributed evenly across the bottom of the pot.
Monitoring the Timing
The steaming process will take between 45 to 60 minutes. During this time, the rice is absorbing the ambient moisture and fat, and the crust at the bottom is slowly deepening in color and intensity. Do not be tempted to lift the lid; every time you do, you lose the precious steam that is responsible for the fluffy texture of the upper layers. If you are using a glass-lid pot, you might be able to see the edges of the crust starting to pull away from the wall of the pot—this is a visual indicator that the crust is ready.
"The sound of the pot is your best compass. A subtle, rhythmic popping is the voice of the rice telling you that the crust is perfect, while silence suggests undercooking, and a harsh, sharp crackle warns of an impending disaster."
Troubleshooting Common Tahdig Failures
Every chef, regardless of their experience level, has dealt with a failed crust. The most common issue is the "stuck" crust, where the rice adheres to the bottom of the pot rather than coming away as a unified slab. If this happens, do not panic. Place the bottom of the pot into a bowl of cold water for about two minutes. The rapid contraction of the metal pot caused by the temperature shock will often cause the crust to release from the surface, allowing you to invert it onto a serving platter with success.
Another common issue is uneven browning. This often happens because the burner is too small, or the heat is not distributed effectively across the base of the pot. If your crust is burnt in one spot and pale in another, it usually means your pot is too thin, or you did not move the pot around on the burner during the initial high-heat phase. To correct this for next time, invest in a heavy-duty pot or use a cast-iron heat diffuser to protect the base.
What to Do If the Crust Burns
If you detect the unmistakable smell of burning, lift the lid and taste the very top layer of rice. If the top is cooked, remove it immediately to a separate bowl. Then, check the crust. If it is only slightly dark, you might have a "smoky" crust, which some connoisseurs actually enjoy. However, if it is truly charred, you must accept the loss and proceed by using the top layers of fluffy rice for another dish. Remember: the "Blame The Chef" mantra suggests we analyze the failure and adjust the variables—temperature, time, or moisture—next time.
The Art of the Inversion: The Final Reveal
The inversion is the climax of the entire process. It is a moment of theater that should be performed with confidence. First, ensure that your serving platter is larger than the diameter of your pot. Place the platter upside down over the pot, and with a quick, fluid, and decisive motion, flip the pot over. If you have followed the instructions regarding non-stick surfaces and moisture control, the rice should drop onto the platter with a satisfying thud, revealing the golden, glittering crust on top.
If a few bits of the crust remain in the pot, simply use a spoon to gently lift them out and arrange them on top of the mound of rice. It does not have to be a perfect, solid disc to be delicious. In fact, many households prefer to break the crust into large, shareable shards so that every guest can receive a piece of the crispy goodness. The contrast between the aromatic, saffron-infused steamed rice and the savory, caramelized crunch of the Tahdig is what makes this dish one of the greatest culinary achievements in the world.
Presentation Tips
To elevate the presentation, garnish the mound of rice with a sprinkle of extra-fine saffron threads, a handful of dried barberries (zereshk) that have been sautéed briefly with sugar, or slivered pistachios for a vibrant pop of color. The visual appeal of the gold-and-white rice, studded with bright red berries, is part of the cultural experience. Serve it immediately while the crust is at its absolute peak of crispness; even the best Tahdig will lose its structural integrity if left to sit for too long as the residual steam softens the crunch.
Conclusion: Embracing the Process
Mastering Tahdig is a rite of passage for any cook who values the intersection of technique and tradition. It is a dish that requires you to slow down, to listen to the pot, and to respect the subtle chemistry of starch, fat, and heat. By following the parboiling method, ensuring your crust has the right amount of yogurt and fat, and mastering the gentle steaming phase, you have the tools to create a restaurant-quality Persian meal in your own kitchen. Do not be discouraged by initial imperfections; the beauty of this dish is that even the mistakes—a slightly over-crisped edge or a softer center—are often just as delicious as the intended result.
As you become more comfortable with the basic technique, feel free to experiment with different variations. Try adding thinly sliced potatoes, which create a remarkably sturdy and delicious Tahdig, or experiment with seasonal herbs mixed into the yogurt base. The Persian kitchen is a place of infinite possibility, and the Tahdig is simply your starting point. Continue to practice, continue to refine your intuition, and most importantly, never stop sharing the fruits of your labor with those you love. When you serve that first shatter-crisp piece of crust to a friend or family member, you are sharing more than just food; you are sharing a legacy of patience and care.
Final thoughts: Keep your rice dry, your heat low, and your confidence high. The next time you find yourself standing before the stove, remember that the most complex culinary achievements are usually built upon the simplest foundations. Whether you are aiming for the golden perfection of a classic saffron crust or the hearty crunch of a potato-base Tahdig, you now possess the knowledge to execute it with grace. May your pots always invert perfectly, your saffron always bloom beautifully, and your rice always reach that elusive, buttery crunch that defines the heart of Persian hospitality. Happy cooking, and remember that when things don't go according to plan, you can always just "Blame The Chef" and try again tomorrow.

Get the Next Recipe
Weekly recipes, techniques, and gear picks — straight to your inbox.
