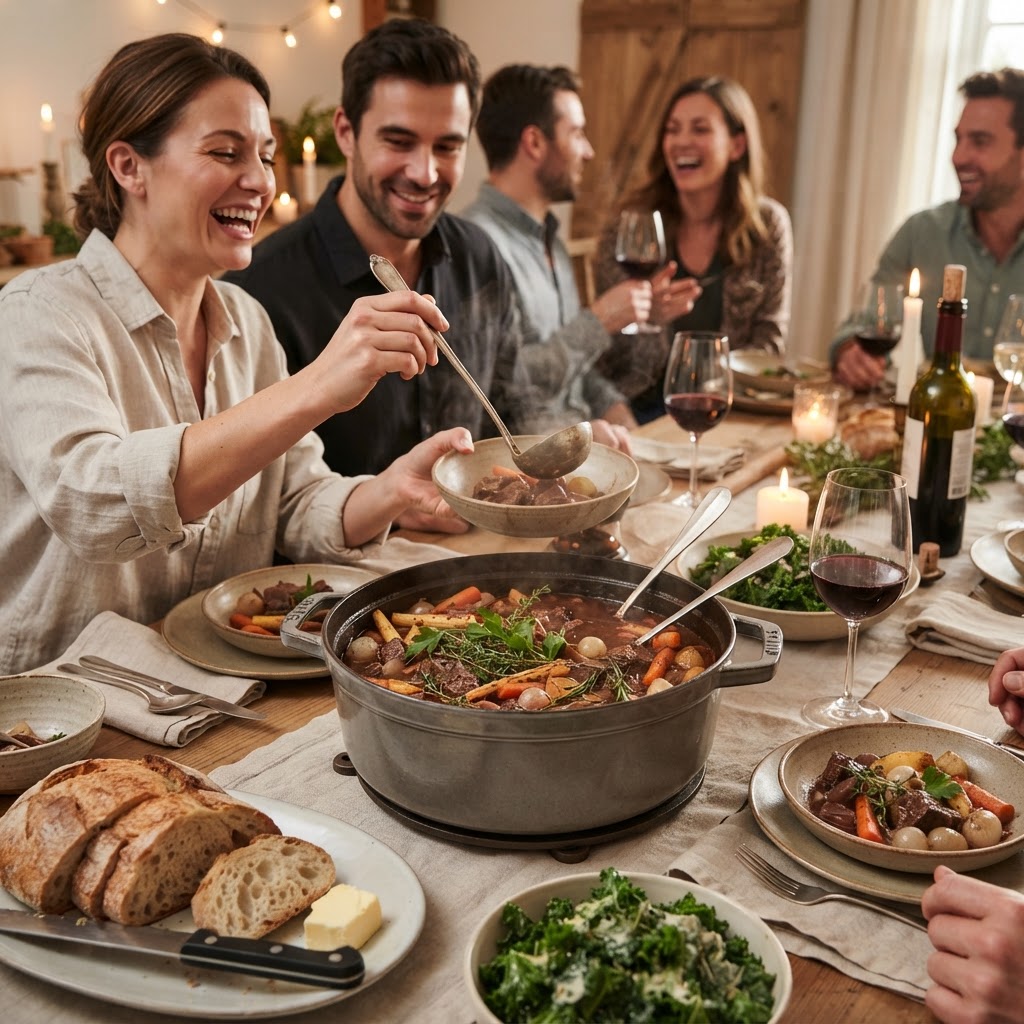
The Art of the "One-Pot" Centerpiece: Mastering Batch-Cooked Braises for Seamless, Large-Group Entertaining
There is a specific kind of panic that sets in when you realize you have invited twelve people over for dinner and the menu you selected requires you to spend four hours standing over a stove while your guests are enjoying their appetizers in the living room. We have all been there, clutching a glass of wine in one hand and a spatula in the other, feeling like a frantic line cook in our own kitchens. The secret to escaping this culinary prison isn't a faster stove or a better set of knives; it is the strategic mastery of the one-pot braise. When you learn to lean into slow-cooking, you transform from a harried host into a conductor, orchestrating a meal that practically cooks itself while you are free to actually enjoy the company of your friends and family.
Braised dishes are the ultimate centerpiece because they are essentially designed to get better with time, often improving in flavor after sitting in the refrigerator for a day or two. By utilizing a heavy-bottomed Dutch oven, you create a controlled, moist-heat environment that breaks down tough, collagen-rich cuts of meat into succulent, fork-tender bites that feel inherently luxurious. This method is incredibly forgiving, allowing for the gentle infusion of aromatics, wine, and stock, creating a sauce that is both deeply complex and velvety. Once you internalize the ratio of liquid to protein and the importance of searing, you will never look at large-group entertaining as a chore again.
The beauty of these meals lies in the fact that the work is front-loaded, leaving the final few minutes of dinner preparation to be little more than a quick garnish or a final adjustment of seasoning. Whether it is a classic red-wine-braised short rib, a Moroccan-inspired lamb tagine, or a rustic chicken fricassee, the one-pot approach is the hallmark of a cook who understands that hospitality is about presence, not just performance. We will dive deep into the science of the Maillard reaction, the nuances of liquid reduction, and the architecture of the perfect braising liquid. By the end of this guide, you will have the confidence to tackle a massive meal without ever feeling like you need to blame the chef for a kitchen catastrophe.
The Architecture of the Perfect Braise
The foundation of any great braise begins with your choice of vessel and your preparation of the primary protein. You want a heavy enameled cast iron Dutch oven because it provides superior thermal mass, ensuring that the temperature of your liquid remains constant throughout the long cooking process. If your vessel is too thin, you risk scorching the bottom or uneven heat distribution, which can ruin the delicate balance of your sauce. Before you even think about liquid, you must master the sear; this is non-negotiable if you want to achieve that deep, mahogany color and intense savory depth that defines restaurant-quality braises.
The Science of Searing
The Maillard reaction is the chemical dance between amino acids and reducing sugars that occurs when food is browned. When you pat your meat dry—and I mean bone-dry—you are ensuring that your protein hits the hot oil with energy rather than wasting time evaporating surface moisture. If your meat is damp, it steams instead of browns, resulting in grey, lackluster pieces that lack the essential depth of flavor provided by a crust. Use a high-smoke-point oil like avocado or grapeseed, and allow the pan to reach a shimmering, almost smoking, temperature before the protein touches the metal.
Choosing Your Cuts
When entertaining, you need cuts that can handle extended periods of heat without drying out. The best candidates for a long, slow braise are cuts with high levels of connective tissue, such as beef chuck, lamb shoulder, pork butt, or bone-in chicken thighs. As these cuts cook, the collagen melts into gelatin, which not only tenderizes the meat but also acts as a natural thickener for your sauce. Always lean toward bone-in options when possible, as the marrow and bone structure add an undeniable layer of richness and body that boneless cuts simply cannot replicate.
The secret to a world-class braise is not just in the ingredients you put in the pot, but in the patience you exhibit while allowing those ingredients to slowly surrender their essence to the sauce.
Building the Foundation: The Aromatics
The flavor profile of your centerpiece is determined by your "soffritto" or "mirepoix." This is the aromatic base that forms the backbone of the entire dish. While you can stick to the traditional onion, carrot, and celery combination, do not be afraid to customize this based on the regional theme of your meal. For a French-style red wine braise, consider adding leeks and a bouquet garni of fresh thyme, bay leaves, and parsley stems. For something with a brighter, more Mediterranean profile, lean heavily into garlic, fennel, and citrus zest.
Techniques for Layering
Do not dump your aromatics into the pot and walk away. You should sweat them in the residual fat left over from searing the meat, adding a pinch of salt to draw out their moisture and sweetness. If you crowd the pot, the vegetables will steam and become soft, whereas giving them space allows them to caramelize, adding another layer of flavor intensity. Once the vegetables have softened, you should always introduce your deglazing liquid. This is the moment where the "fond"—the brown bits stuck to the bottom of the pot—is released back into the liquid, effectively capturing all that concentrated, savory goodness that would otherwise be lost.
The Role of Wine and Acids
Wine, cider, or broth acts as the medium through which all these flavors travel. A common mistake is using wine that you would not be happy to drink. The flavor of the wine concentrates significantly as it reduces, so choose a dry, medium-bodied option that aligns with the meat. If your braise feels too heavy or fatty at the end, a splash of red wine vinegar or fresh lemon juice can act as a bridge, brightening the profile and cutting through the richness of the meat. Remember, a great braise is always a balance of fat, acid, salt, and time.
Mastering the Braising Environment
The actual act of braising is a form of gentle coaxing. You are aiming for a constant, low-level simmer rather than a rolling boil. If the liquid boils too hard, the protein fibers will tighten and become tough, undoing all the work you did to choose a high-quality cut. Your goal is for the liquid to reach a temperature between 200°F and 210°F, where the meat is submerged roughly halfway to two-thirds. This allows the top portion of the meat to cook via steam, while the submerged portion breaks down in the flavorful braising liquid.
Managing the Heat
Many modern cooks favor the oven over the stovetop for the braising phase because the heat envelops the pot from all sides, creating a more consistent and gentle cooking environment. Set your oven to 300°F to 325°F. This lower temperature is ideal for long-cooked dishes because it prevents the liquid from evaporating too quickly. If you are cooking on the stovetop, keep the heat on the lowest setting and use a heat diffuser if your burner is prone to hot spots.
The Importance of the Lid
Your lid is your best friend when it comes to moisture retention. Ensure it is a tight-fitting lid that seals in the steam. If you find that your lid is loose, you can create a parchment paper cartouche—a circle of parchment cut to fit the diameter of the pot—and place it directly on top of the food before putting the lid on. This creates a secondary seal that minimizes evaporation and keeps the surface of the meat moist, preventing it from drying out if it is not fully submerged in liquid.
The Art of the Finish: Sauce and Reduction
A braise is only as good as its sauce. Many amateur cooks serve the meat in a thin, watery liquid, missing out on the best part of the dish. Once your meat is perfectly tender, you need to remove it from the pot and give your sauce the attention it deserves. This is where you can refine the consistency. If the sauce is too thin, you can reduce it on the stovetop over medium-high heat until it coats the back of a spoon—a technique chefs call "nappé." Alternatively, you can whisk in a little bit of cold butter at the very end to give the sauce a glossy, luxurious finish.
Incorporating Thickeners
If your braise requires a more robust structure, you can dust your meat in flour before the initial sear. This flour will naturally thicken the braising liquid as the dish cooks. For a more precise finish, use a beurre manié, which is an equal-part mixture of softened butter and flour kneaded together. Whisk small amounts of this paste into your simmering liquid at the end to achieve the perfect thickness without making the sauce look cloudy or grainy.
The Resting Period
Just like a steak, a braise benefits significantly from a period of rest. Even after the meat is tender, let it sit in the liquid for at least 20 to 30 minutes before serving. This allows the muscle fibers to relax and reabsorb some of the moisture, making it much more tender than if you served it immediately upon pulling it from the oven. If you have the luxury of time, chilling the braise overnight is even better. The fats will solidify on the surface, allowing you to easily skim them off, and the flavors will marry and intensify, resulting in a much more cohesive centerpiece.
When you braise, you are not just cooking meat; you are building an ecosystem of flavor where every ingredient contributes to a greater whole.
Accompaniments: Balancing the Centerpiece
Since your one-pot centerpiece is likely to be rich, savory, and perhaps a bit heavy, your accompaniments should provide a necessary counterpoint. Think about texture, color, and acidity. A creamy starch is the classic choice—think polenta, buttery mashed potatoes, or a silky celery root purée. These provide a blank canvas that absorbs the sauce, ensuring that none of that liquid gold is wasted on the plate.
Adding Crunch and Freshness
To contrast with the soft, melt-in-your-mouth texture of the braised meat, introduce something crisp or bright. A gremolata—a mix of chopped parsley, lemon zest, and raw garlic—is a traditional finish for osso buco, but it works beautifully on almost any braised beef or lamb dish. Alternatively, a shaved fennel and radish salad with a bright vinaigrette will cleanse the palate between bites of rich, fatty meat.
The "No-Stress" Presentation
When hosting, simplicity in presentation is key. Serve your braise directly from the Dutch oven if it is visually appealing, or transfer it to a large, wide serving platter with the sauce spooned over the top. Garnish generously with fresh herbs and perhaps a dusting of flaky sea salt. The goal is to make it look effortless, almost as if you just pulled it out of the oven at the last second, even if it has been resting for hours.
Scaling Up for Large Groups
When you move from cooking for four to cooking for twelve, the physics of your cooking changes. You cannot simply double or triple a recipe without considering the capacity of your equipment. For larger groups, you may need to use two pots or a very large, professional-grade roasting pan that can accommodate the volume without overcrowding. Overcrowding is the enemy of the sear; if you try to brown too much meat at once, you will inevitably end up with boiled, grey protein.
Batching the Process
If you are cooking for a large crowd, perform your searing in batches the day before. You can store the seared meat in the refrigerator and assemble the braise on the day of the party. This technique, often used in professional kitchens, allows you to maintain quality control while freeing up your time during the most critical hours of the event. It also ensures that the meat has enough time to marinate in the aromatics.
Equipment Essentials
Invest in a high-quality, large-capacity braiser or a long roasting pan that fits your oven perfectly. Having the right tools makes the logistics of large-group entertaining significantly easier. If you find yourself frequently cooking for groups, a 13-quart Dutch oven is an investment that will pay for itself in convenience and performance. Always ensure you have a pair of heavy-duty tongs and a long-handled ladle for easy serving.
Essential Tips for the Modern Host
Hospitality is ultimately about the connection you foster with your guests. When you take the stress out of the kitchen, you allow yourself to be present. The following tips will help you maintain your composure and ensure that the "Blame The Chef" attitude is replaced with "Impress The Guest."
Prep the Day Before:* Almost every braise tastes better after a night in the fridge. Do the heavy lifting on Friday and reheat on Saturday.
Don't Rush the Sear:* Take your time browning the meat. It is the most important step for the final flavor profile.
Trust Your Nose:* A braise is done when the meat is falling off the bone and the aroma is deep and savory, not just when the timer goes off.
Warm the Plates:* A simple chef’s trick is to warm your dinner plates in a low oven before serving. This keeps the fat in your sauce from congealing before the first bite.
Keep it Simple:* Focus on one great centerpiece, a single high-quality starch, and a vibrant salad or vegetable side. You don't need five complicated dishes to have a memorable dinner.
Final Thoughts
Mastering the one-pot braise is not just about culinary technique; it is a philosophy of hospitality. It teaches us that the best meals are often those that require the least amount of fuss at the final hour. By focusing on quality ingredients, the right equipment, and a patient approach to cooking, you can create centerpieces that are as nourishing for the soul as they are for the body. You are creating a space where guests feel comfortable, cared for, and truly celebrated.
When you look back at your evening, you won't remember the stress of the prep or the complexity of the recipe. You will remember the laughter, the clinking of glasses, and the way the house smelled when you finally lifted that heavy lid to reveal the masterpiece within. The one-pot method is your secret weapon, a way to reclaim your role as a host rather than a servant to your stove. So, go forth, gather your friends, and enjoy the process of creating something truly meaningful, one delicious pot at a time. Your journey into the art of the braise starts with that first sear, and I can promise you, the results will speak for themselves. Don't worry about the small details; focus on the big picture, and the rest will fall into place. After all, when you serve a dish as thoughtful and perfected as a slow-braised centerpiece, no one is ever going to have a reason to blame the chef.

Get the Next Recipe
Weekly recipes, techniques, and gear picks — straight to your inbox.
