The Art of the "Platter-Style" Salad: Mastering Ingredient Layering and Dressing Timing for Elegant, Effortless Entertaining
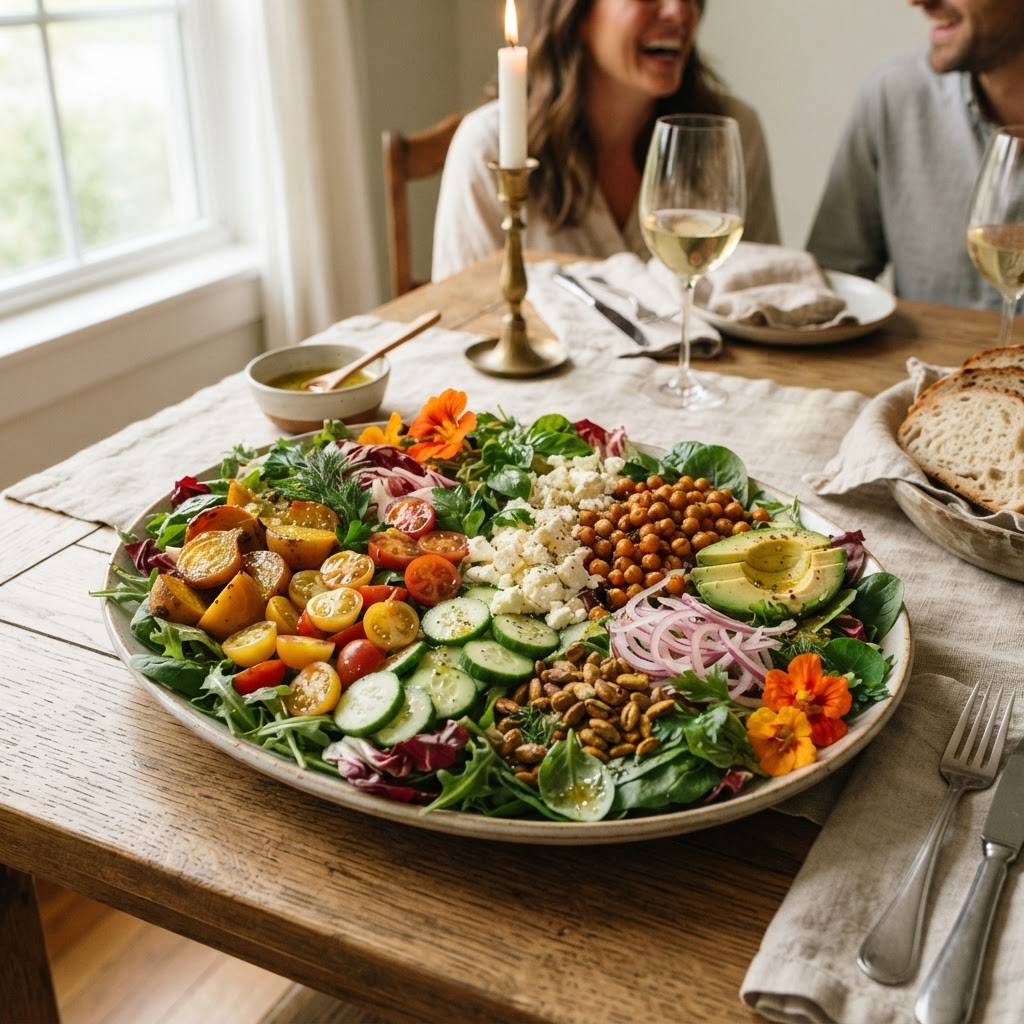
There is a persistent myth in the home kitchen that a salad is merely a utilitarian bowl of greens, a mandatory side dish meant to be finished quickly before the main event arrives. However, the true culinary artist understands that the salad, when presented with intention and architectural grace, serves as the centerpiece of any sophisticated table. When we shift our focus from a deep, crowded mixing bowl to a wide, expansive platter, we unlock an entirely new dimension of visual and sensory delight. This style of preparation is not just about aesthetics; it is about respecting the integrity of each individual ingredient, allowing every texture and flavor profile to be appreciated in its own space. Mastering the art of the platter-style salad is the ultimate secret weapon for the host who wants to appear effortless while delivering a truly professional result.
The core philosophy of the "Blame The Chef" approach to entertaining is that complexity should live in the harmony of flavors, not in the frantic execution during your dinner party. By choosing to layer your ingredients on a large, shallow serving dish, you immediately remove the risk of "mushy" greens that often plague traditional toss-style salads. You create a canvas that invites guests to interact with the food, picking and choosing their favorite combinations while ensuring the structural components—like crunchy nuts or delicate shaved cheeses—remain pristine until the very last bite. This method allows you to emphasize the contrast in temperatures and textures, creating a dynamic experience that feels intentional and luxurious. When you treat the salad as a composed structure rather than a tossed mixture, you elevate it from a humble afterthought to a sophisticated focal point of your menu.
Transitioning to this style of service requires a shift in how you think about your pantry and your prep work. It is a lesson in patience and precise placement, a meditative process that rewards you with a stunning presentation that looks as though it took hours to assemble. While you might worry that this is too difficult for a casual Tuesday evening, the reality is that the platter-style method actually saves you time by allowing you to stage your components hours before your guests arrive. With the right technique, you can ensure that your greens remain crisp, your dressings remain vibrant, and your garnishes maintain their structural integrity throughout the duration of the meal. In the sections that follow, we will deconstruct the anatomy of the perfect platter salad, providing you with the technical foundation to become the host everyone aspires to be.
The Architectural Foundation: Choosing Your Platter and Greens
The success of a platter-style salad begins long before you introduce your first dressing. It starts with the selection of your serving vessel, which acts as the foundation for the entire composition. For this specific style of presentation, reach for wide, low-sided platters rather than deep bowls. A ceramic, marble, or wooden board that measures at least 14 to 16 inches in diameter provides the necessary surface area to spread ingredients thin, ensuring that your greens are not packed down and smothered. You want a surface that provides enough "white space" between ingredients so that the colors pop and the textures remain distinct.
Once the vessel is selected, the choice of your base greens becomes critical. You are looking for stability and resistance. Avoid delicate, watery greens that wilt upon contact with room-temperature air. Instead, lean into robust varieties that can hold their own under the weight of additional toppings. Lacinato kale, radicchio, frisée, and arugula are superior choices because they offer varying degrees of bitterness and structural strength. If you desire a milder profile, combine baby gem lettuce hearts with ribbons of butter lettuce, ensuring they are absolutely dry before placing them on the platter. Moisture is the enemy of a crisp salad; always utilize a high-quality salad spinner to remove every drop of water before the leaves touch your serving board.
Techniques for Spreading and Staging
When you begin to layer your salad, treat it like building a structure. Start by creating a "bed" of your primary greens, but do not simply dump them in the center. Gently fan them out across the entire surface of the platter, building a slight rise in the middle to create visual interest. Think of this as the topography of your salad. You want peaks and valleys, which provide pockets where dressing can pool and where smaller, heavier ingredients can nestle safely.
"A salad on a platter is not just a dish; it is a landscape. If you crowd your ingredients, you lose the story of the textures. Keep the composition open, generous, and deliberate."
By keeping the center higher than the edges, you draw the eye toward the center of the platter, creating a professional look that mimics the way chefs plate in high-end restaurants. Ensure that you have enough volume to cover the platter’s surface area without creating an unmanageable pile that will inevitably tumble off the edges when a guest reaches for a serving.
The Geometry of Flavor: Layering Textures and Temperatures
The hallmark of a great salad is the interplay of opposing forces. You want a dance between soft, crunchy, creamy, and zesty. When working on a platter, you have the advantage of being able to place these elements strategically rather than hiding them in a mass of greens. Start by adding your largest, most stable structural elements first—think wedges of roasted seasonal vegetables, hunks of artisanal cheese, or slices of stone fruit. These act as the "anchors" for your composition and provide a stable base for the more delicate toppings to rest against.
Once your anchors are positioned, move on to the "bridge" ingredients. These are the elements that connect the flavors, such as toasted nuts, seeds, or thinly shaved root vegetables like radishes or fennel. These should be scattered with intention, not just dumped. When you place a toasted walnut or a sliver of pickled shallot, make sure it is visible. The visual appeal of a platter salad is derived from the guest being able to identify the components before they even take a bite. This intentional placement signals quality and care to your guests, setting a tone of elegance that is difficult to achieve with a traditional tossed salad.
Managing Temperature Contrasts
One of the most frequent mistakes in home cooking is serving everything at the same temperature. For a truly professional result, consider the thermal contrast. If you are serving a salad with roasted squash or warm, honey-glazed bacon, do not chill these elements completely. Instead, allow them to come to a "cool room temperature" before placement. When a guest takes a bite, the contrast between the chilled, crisp greens and the warm, roasted element creates an immediate, memorable sensation on the palate.
The Science of the Dressing: Emulsification and Timing
The dressing is the binding agent of your platter, yet it is often the element that destroys the integrity of the greens if handled incorrectly. In a platter-style presentation, the "tossing" is done either by the guest or via a controlled drizzle. You should never dress the entire platter an hour before your guests arrive, as the salt and acid will break down the cell walls of your leaves, turning them into a soggy mess. The timing of the dressing application is the singular most important factor in maintaining the "fresh" factor.
When crafting your dressing, focus on the emulsification. A broken dressing—one where the oil and acid have separated—is unsightly and provides an uneven flavor experience. To achieve a stable, creamy emulsion, utilize an emulsifying agent like Dijon mustard, honey, or even a small amount of tahini or Greek yogurt. The ratio is generally three parts fat (extra virgin olive oil, cold-pressed nut oil) to one part acid (fresh lemon juice, high-quality champagne vinegar, or pomegranate molasses). Whisk your acid, aromatics, and emulsifier together until combined, then slowly stream in your fat while whisking vigorously.
The Drizzle Strategy
How you apply the dressing matters just as much as how it tastes. Instead of splashing it randomly, look for the natural "valleys" in your salad landscape. Use a small, long-handled spoon to drip the dressing into the crevices where it will coat the ingredients without flattening the greens. Alternatively, you can use a fine-tip squeeze bottle to create a clean, artistic drizzle across the top of the platter. This allows guests to see exactly what they are getting and ensures that the dressing doesn't overwhelm the more delicate components like shaved herbs or edible flowers.
"Dressing is an enhancer, not a disguise. If you cannot taste the freshness of your greens through the sauce, you have used too much. Let the individual ingredients shine by keeping the dressing light, bright, and precisely placed."
If you are hosting a larger group, place a small, elegant pitcher of dressing alongside the platter. This gives guests the autonomy to choose how much acid and fat they want, and it protects the integrity of the salad for the duration of the meal. This is the hallmark of thoughtful, confident entertaining.
The Art of the Garnish: Elevating the Visual Experience
The garnish is where you showcase your personality and culinary creativity. While the base greens provide the texture and the dressing provides the flavor, the garnish provides the "wow" factor. This is where you introduce herbs, edible flowers, citrus zests, or high-end crumbles. Never underestimate the power of a fresh herb; a handful of torn mint, basil, or chives can lift a salad from mundane to extraordinary in seconds.
When selecting your garnishes, consider the flavor bridge. If you are using citrusy notes in your dressing, reach for cilantro or Thai basil. If you are leaning into earthy tones with roasted roots or nuts, choose thyme, rosemary, or parsley. The garnish should be the last thing to touch the plate, applied with a light hand to ensure it sits on top of the greens, adding height and color. Think of it as the final brushstroke on a painting.
Professional Tips for High-Impact Garnishing
Zesting:* Always zest your citrus directly over the platter just before serving to release the essential oils.
Microgreens:* Use these for delicate, fine-tuned detail work; they are best used sparingly rather than in large bunches.
Crumbles:* Use high-quality feta, blue cheese, or even shaved aged gouda to add a punch of salt and richness. Use the back of a spoon to create irregular shapes, avoiding perfectly uniform chunks.
Edible Flowers:* Only use organic, food-grade flowers like pansies or nasturtiums for a pop of color that feels truly boutique.
Remember, the goal is not to hide the ingredients beneath a mountain of garnish, but to accentuate them. If you can see the greens and the structural components clearly, you have succeeded. The garnish should simply highlight the beauty that is already there.
Hosting with Ease: Mise en Place for the Stress-Free Host
The "Blame The Chef" philosophy centers on the idea that the host should be present with their guests, not hidden away in the kitchen. To achieve this, your prep work must be flawless. Mise en place is not just a professional kitchen term; it is a lifestyle. By organizing every single component into individual bowls or containers before you begin assembly, you eliminate the frantic searching and chopping that usually occurs right as the doorbell rings.
Start your prep early in the day. Wash and dry your greens, store them in a clean towel-lined container in the refrigerator to keep them crisp. Roast your root vegetables, toast your nuts, and shave your cheeses ahead of time. Store everything separately in the refrigerator, allowing you to simply "build" the platter in less than five minutes when you are ready to serve. This is the secret to appearing effortless; you are simply assembling pre-prepared masterpieces.
The Timeline for Success
By following this timeline, you ensure that you are never flustered. You are simply orchestrating a beautiful result that you have already mentally walked through, allowing you to focus on the conversation and the company rather than the task at hand.
Beyond the Greens: Creative Variations and Seasonal Rotations
Once you have mastered the platter-style foundation, you can adapt this method for every season. The beauty of this technique is its versatility. In the winter, move away from the delicate summer lettuces and embrace sturdy, bitter greens combined with roasted brassicas, pomegranate seeds, and toasted pumpkin seeds. The dressing can be richer, perhaps incorporating maple syrup or a walnut-oil base to complement the heartier profile of the seasonal ingredients.
In the springtime, focus on the brightness of new life. Incorporate radishes, snap peas, and tender herbs alongside a lemon-shallot vinaigrette. Summer is the time for stone fruits, heirloom tomatoes, and berries. Don't be afraid to experiment with fruit in your salads—it adds a natural sweetness that balances the salt and acid of the dressing beautifully. The platter-style method allows you to showcase these seasonal items in a way that truly honors the harvest.
Seasonal Ingredient Pairing Guide
Spring:* Arugula, radish, snap peas, fresh mint, lemon-champagne vinaigrette.
Summer:* Butter lettuce, heirloom tomatoes, peaches, fresh basil, white balsamic reduction.
Autumn:* Lacinato kale, roasted delicata squash, toasted pecans, dried cranberries, apple cider-maple vinaigrette.
Winter:* Radicchio, endive, citrus segments (orange/grapefruit), hazelnuts, pomegranate molasses dressing.
By rotating your ingredients based on what is available at your local market, you keep your menus fresh and exciting. You don't need a massive repertoire of recipes; you simply need a deep understanding of how to balance the components within your platter. Once you possess that understanding, the possibilities are infinite.
Final Thoughts
Mastering the platter-style salad is about more than just rearranging food on a plate; it is about adopting a mindset of intentionality and grace. It is about understanding that when we respect the ingredients and the process, the result is inherently elegant. By focusing on the architecture of the platter, the precision of your timing, and the balance of your textures, you are creating a culinary experience that elevates your hosting and honors your guests.
Remember that the "Blame The Chef" approach encourages you to take risks, to lean into your personal preferences, and to never let the stress of the kitchen dampen your spirit of hospitality. Whether you are serving a simple lunch for friends or a formal dinner, the techniques discussed here will give you the confidence to plate with purpose. The salad is no longer the side dish that waits for the main event; it is the masterpiece that begins the conversation.
As you move forward, keep experimenting. Try new dressings, seek out the best seasonal produce, and most importantly, remember to enjoy the process. The preparation of a meal is a gift to yourself as much as it is to your guests. When you take the time to layer those greens, to drizzle that dressing with a steady hand, and to scatter the final garnish, you are creating art. And there is no greater joy for a host than watching that art be appreciated by those at your table. Go forth, open your cupboards, grab your favorite platter, and start creating something extraordinary. Your guests will thank you, and you will find that the most effortless hosting is the kind that you have truly, deeply prepared for. Enjoy the journey, the flavors, and the company. The kitchen is yours.

Get the Next Recipe
Weekly recipes, techniques, and gear picks — straight to your inbox.
