The Art of the Reduction: Mastering Concentration and Intensity in Pan Sauces
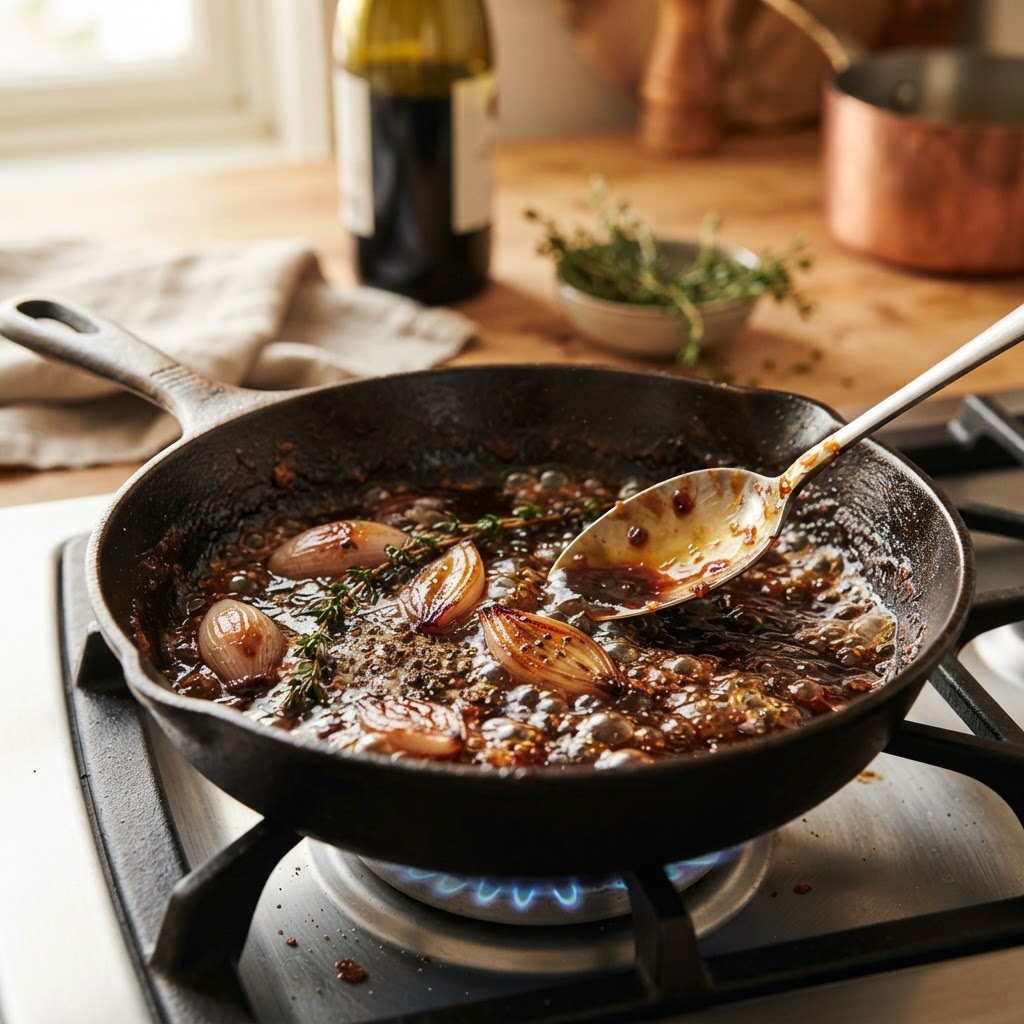
There is a moment in the professional kitchen—usually around the time the dinner rush reaches its crescendo—where the difference between a good dish and a transcendent one becomes painfully apparent. You are standing at the stove, a stainless steel pan in hand, watching a thin, watery jus bubble away as it transforms into a syrupy, mahogany-colored glaze. This is the art of the reduction, a fundamental technique that separates the home cook from the master. It is not merely about boiling away liquid; it is an act of alchemy where volatile aromas are harnessed, sugars are caramelized, and the very essence of your ingredients is magnified until they coat the back of a spoon with velvet-like precision.
Many home cooks find themselves intimidated by the pan sauce, often fearing that the liquid will evaporate too quickly, leaving behind nothing but a scorched pan and a bitter memory. However, reduction is a process that demands patience and a keen eye rather than raw speed or expensive equipment. By understanding the science of evaporation and the role of collagen in our stocks, we can manipulate the texture and flavor profile of any meal. Whether you are deglazing a pan after searing a dry-aged ribeye or finishing a delicate white wine reduction for pan-seared scallops, the principles remain the same. This is where we learn to stop viewing liquid as a vehicle for seasoning and start viewing it as the concentrated soul of the dish.
At Blame The Chef, we believe that technique is the most vital ingredient in your pantry. You can source the finest heritage-breed pork or the freshest garden herbs, but if your sauce lacks the body and depth that only a proper reduction can provide, you are missing the final layer of sophistication. Over the next few thousand words, we are going to break down the mechanics of the pan sauce, from the initial deglazing process to the final, crucial step of mounting with cold butter. We will explore how to manage heat, when to incorporate aromatics, and how to troubleshoot the most common culinary pitfalls. Grab your whisk, sharpen your senses, and let us elevate your kitchen repertoire through the sheer power of concentration.
The Foundation: Understanding the Deglazing Process
The journey to a perfect reduction always begins with the fond. This is that golden-brown, caramelized crust that adheres to the bottom of your pan after searing a protein. Many beginners scrub this away, assuming it is burnt residue, but in reality, the fond is the foundation of your entire sauce. It is packed with proteins and sugars that have undergone the Maillard reaction, providing a deep, umami-rich base that is impossible to replicate with store-bought broth alone. To unlock this, you must treat your pan with respect, choosing high-quality stainless steel or cast iron that encourages this beautiful accumulation of flavor.
When you add your deglazing liquid—be it wine, stock, or vinegar—you are initiating a high-energy transition. As the liquid hits the hot surface, the sudden release of steam helps to lift the fond from the metal, incorporating those concentrated notes directly into your sauce. This is the deglazing stage, and it is the single most important step for building complexity. You want to use a wooden spoon or a heat-resistant silicone spatula to gently scrape the bottom of the pan, ensuring every bit of that flavor is released into your liquid before the reduction process even begins.
"The fond is not burnt debris; it is the liquid gold of the culinary world. Treat it as the starting point of your sauce, and you will never need a gravy packet again."
Choosing Your Deglazing Liquid
The liquid you choose sets the personality of the finished sauce. Acids, such as dry white wine or balsamic vinegar, help to brighten the flavor and cut through the richness of animal fats. Stocks and broths provide the body and the salt foundation. You can even use fruit juices or liqueurs, provided you account for their higher sugar content, which will caramelize much faster during the reduction. The key is to keep the ratio balanced: if your pan is heavily charred, lean toward a liquid with higher acidity to help deglaze quickly.
Managing Temperature and Timing
To successfully lift the fond without scorching it, temperature management is paramount. Remove the pan from the direct flame for a moment before adding your cold liquid, or maintain a medium-high heat that allows for a vigorous simmer but not a violent boil. The goal is a steady reduction where the liquid thickens at a pace you can control. If you lose your nerve and stop too early, the sauce will be thin; if you push it too far, you run the risk of breaking the emulsion or burning the sugars.
The Physics of Concentration: Achieving the Nappe Consistency
The term nappe is thrown around quite often in professional culinary schools, yet it remains one of the most practical benchmarks for a home cook. When you test your sauce by dipping a spoon into it and running your finger across the back, the sauce should hold that line without running back together. This indicates that your reduction has reached the ideal viscosity. Achieving this state is a matter of removing excess water molecules while allowing the natural gelatin in your stock to thicken the liquid naturally, creating a luxurious mouthfeel that coats the palate.
Concentration is not just about reducing volume; it is about building intensity. As the water evaporates, the aromatic compounds in your herbs, shallots, and wine become more pronounced. This is why you must taste as you go. A reduction that is perfect at a three-quarter volume might become overly salty or harsh once it reaches a one-half volume. This process requires a delicate balance of patience and observation, as the final thickening often happens rapidly toward the end of the reduction cycle.
The Role of Gelatin
If you are using high-quality homemade stocks, you are likely working with a significant amount of gelatin, which comes from the connective tissues of bones. This gelatin is the secret to a professional-grade sauce. As the liquid reduces, the gelatin molecules concentrate, providing a glossy finish and a sticky, viscous texture that is unmistakable. If you are using store-bought stock, which often lacks this body, you might find your reduction remains thin regardless of how much you boil it. To remedy this, some chefs add a small amount of gelatin powder or a drop of demi-glace to simulate that high-end restaurant quality.
Troubleshooting Thin Sauces
If you have reduced your liquid to the desired flavor intensity but it still refuses to thicken, don't panic. You can always use a beurre manié—a mixture of equal parts softened butter and flour kneaded together. Whisking small amounts of this into your boiling sauce will provide an instant thickening effect without significantly altering the flavor. However, use this sparingly, as the goal should always be natural reduction through heat.
Aromatics and Flavor Infusion
Once your liquid is reduced, the canvas is set, but the painting is only half-finished. This is the stage where aromatics come into play. Shallots, garlic, herbs like thyme or rosemary, and even cracked peppercorns are added to round out the sharp edges of the wine and the intensity of the reduction. It is vital to consider the timing of these additions. Hard herbs like rosemary can be added during the initial reduction, while delicate herbs like chives or parsley should be folded in at the very last second to preserve their volatile oils and vibrant green color.
Many cooks make the mistake of adding aromatics too early, resulting in a sauce that tastes like boiled vegetation rather than an infused emulsion. By sweating your shallots in the pan immediately after removing the protein—before adding the deglazing liquid—you build a background of savory sweetness. This method ensures that the aromatic base is already cooked and incorporated into the foundation, providing a seamless transition into the concentrated liquid phase.
"A great reduction is like a chord in music: the base note provides the structure, while the aromatics are the melody that lingers on the tongue."
Building Layers of Flavor
The Base:* Shallots or onions, finely minced.
The Acid:* White or red wine, sherry, or balsamic vinegar.
The Herbaceous Note:* Thyme, bay leaf, or fresh cracked pepper.
The Final Touch:* Fresh parsley, tarragon, or chives added post-heat.
Avoiding Over-Seasoning
Because reduction intensifies flavor, it also intensifies saltiness. If you add a generous amount of salt at the beginning of the reduction process, you will likely end up with a sauce that is practically inedible by the time it reaches the nappe consistency. Always under-season your stock or pan liquid and perform your final adjustments at the very end. This "seasoning at the finish" is a hallmark of professional technique and ensures that the balance is perfect once the concentration is complete.
The Art of Mounting: Emulsification with Cold Butter
The technique known as monter au beurre is the final flourish of a master sauce maker. Just before you serve, you remove the pan from the heat and whisk in small cubes of cold, unsalted butter. This process, known as emulsification, changes the sauce from a dark, glossy liquid into a creamy, opaque, and incredibly rich masterpiece. The cold butter emulsifies with the reduction, creating a velvety consistency that clings to the food rather than pooling at the bottom of the plate.
The science behind this is simple but elegant. The cold butter does not immediately melt into a pool of oil; instead, it slowly incorporates into the liquid, and the solid fats within the butter provide the stabilizing force that keeps the sauce creamy. It is crucial to use cold butter specifically—room temperature butter will melt too quickly and potentially break the sauce, resulting in a greasy, separated mess. By whisking constantly, you create a stable, buttery emulsion that brings a professional sheen to the dish.
Step-by-Step Execution of Monter au Beurre
Why Unsalted Butter?
Using unsalted butter is non-negotiable here. Since you have carefully managed the salt levels of your reduction through the evaporation process, you do not want to introduce an unpredictable variable. Salted butter can vary wildly in salinity, which can ruin your carefully balanced reduction in a matter of seconds. Keep the salt control entirely in your hands by using high-fat, unsalted European-style butter, which provides a cleaner, creamier finish.
Managing the Variables: Heat, Time, and Equipment
In any kitchen—be it a professional line or a home hearth—the equipment you use dictates the success of your reduction. A thin, aluminum pan might heat up quickly but can create hot spots that burn your fond. A heavy-bottomed stainless steel pan is the gold standard, as it provides even heat distribution that allows for a uniform reduction. The surface area of the pan is also critical: if you use a pan that is too small, evaporation will be slow; if it is too wide, your liquid may evaporate before the flavors have a chance to properly integrate.
Timing is the final piece of the puzzle. Reductions cannot be rushed, but they can be easily ruined by distraction. Once you have initiated the reduction, do not wander off to set the table or answer the phone. The transition from a perfect sauce to a scorched pan can happen in under sixty seconds. Stand by the stove, keep your whisk handy, and monitor the bubbles. You will notice that as the liquid reduces, the size of the bubbles changes from small and rapid to large, slow, and glistening—this is your signal that you are approaching the finish line.
The Importance of Surface Area
Narrow Sauté Pan:* Ideal for smaller amounts of sauce where you want to retain moisture.
Wide Saucier or Skillet:* Perfect for faster reduction and better control over the consistency.
High-sided Pans:* Use these if you are deglazing with a significant amount of liquid to prevent splatter.
When to Walk Away
While vigilance is key, there is a point where the sauce is finished and must be removed from the heat immediately. If you have finished your sauce, added your cold butter, and it is holding steady, pull it off the burner. If it sits on the residual heat of the stove, the butter may eventually separate. The beauty of a pan sauce is that it is designed to be a "to order" preparation—it is the final, fresh element that brings life to a meal that may have been cooking for hours.
Troubleshooting Common Culinary Pitfalls
Even for seasoned chefs, reductions can go awry. Perhaps the sauce broke, leaving behind a slick of separated oil. Perhaps it became too salty because of a particularly potent stock. Or perhaps it simply failed to develop the depth of flavor you were expecting. Understanding how to rescue a sauce is just as important as knowing how to create one. Often, a "broken" sauce can be salvaged by whisking in a tablespoon of cold liquid (water or stock) to bring the emulsion back together, provided the pan isn't too hot.
If your sauce is overly salty, you can attempt to neutralize it with a small amount of heavy cream or a dash of acid, which can shift the palate away from the saltiness. If the flavor is just "flat," reconsider your aromatics. Did you use fresh shallots, or were they old and dry? Did you use enough acid to wake up the palate? The pan sauce is a living, breathing component of the dish, and it will tell you exactly what it needs if you are listening. Always taste, adjust, and taste again.
"A kitchen mistake is merely a lesson in disguise. If your sauce breaks, learn the temperature at which it happened. If it is too salty, remember to season at the end, not the beginning."
Identifying a Broken Sauce
A broken sauce is one where the fat has separated from the liquid base. You will see a thin layer of oil floating on top, and the sauce will lack that glossy, unified look. This usually happens if the temperature got too high during the mounting phase or if the liquid and fat ratios were imbalanced. To fix it, remove it from the heat, add a splash of cold liquid, and whisk with the fervor of someone trying to create a meringue. It will usually pull back together.
The Salt Trap
The most common mistake, particularly for beginners, is salting the liquid base before it reduces. As the water evaporates, the salt concentration increases linearly. By the time your sauce reaches the desired intensity, it has effectively "concentrated" the saltiness to a level that may be overwhelming. Remember that your protein—especially if it was salted before searing—will already provide a portion of the saltiness to the final dish. Always hold off on the salt until you are one minute away from serving.
Final Thoughts
Mastering the art of the reduction is not about memorizing complex chemical formulas; it is about developing an intuition for how ingredients behave under heat. It is a slow, methodical process that rewards those who take the time to watch, smell, and taste their way to perfection. From the moment the fond begins to form on your stainless steel pan to the final, luxurious whisking in of cold butter, you are participating in a tradition that defines classic French technique while remaining entirely accessible in your own home.
Start by practicing with simple ingredients: a bit of chicken stock, some finely minced shallots, and a splash of dry white wine. Observe how the bubbles change, how the color deepens, and how the texture shifts from thin to napping the spoon. Once you have confidence in these basics, you will find that you are no longer following a recipe; you are cooking. The pan sauce is the ultimate test of a cook’s skill, but it is also the most rewarding element of any plate. By bringing this technique into your repertoire, you move from simply assembling dinner to crafting an experience—one where the chef is in control of every layer of flavor, every drop of concentration, and every note of intensity.
At Blame The Chef, we encourage you to step away from the convenience of bottled sauces and embrace the heat of the pan. You will discover that there is a profound sense of satisfaction in knowing that the velvet-smooth glaze on your dish was created by your own hands, through your own observation, and your own patience. Go forth, sear your proteins, deglaze with confidence, and let your reductions reach their full, glorious potential. Your dinner guests will notice the difference, and more importantly, your palate will never be satisfied with anything less again. Happy cooking, and remember: when the result is this good, you will be more than happy to take all the credit, even if you blame the chef for the mess in the kitchen.

Get the Next Recipe
Weekly recipes, techniques, and gear picks — straight to your inbox.
