The Art of the "Tableside Finish": Mastering Final-Touch Techniques for Dramatic, Restaurant-Style Hosting
The transformation of a standard home dinner into a bona fide culinary event often hinges on the invisible line between preparation and presentation. Many home cooks exhaust their energy in the kitchen, sweating over a stove for hours, only to plate the food in the solitude of the kitchen before bringing it out to the table. By the time the plates reach the guests, the steam has dissipated, the sauces have begun to skin over, and the initial excitement of the cooking process has been relegated to a distant memory. The "tableside finish" is the secret weapon of professional kitchens, a technique designed to bridge the gap between the chef’s labor and the diner’s anticipation. It turns a mundane meal into a piece of theater, ensuring that the final, most crucial aromatics and textures are applied at the precise moment of consumption.
Mastering these techniques does not require a commercial kitchen or a brigade of waiters; it requires a shift in mindset regarding mise en place and a bit of confidence. When you bring a component of the dish to the table—be it a hot salt crust, a fragrant herb-infused oil, or a quick tableside shave of truffle—you are inviting your guests to participate in the final act of creation. This interactive element engages the senses of smell and sight before the first bite is even taken, which fundamentally alters how the flavor is perceived. It creates an aura of expertise that is less about the complexity of the cooking and more about the precision of the timing. By choosing to finish your dish in front of your audience, you are making a bold statement: you trust your technique, you value your ingredients, and you respect the experience of your guests.
For the home host, the challenge lies in logistics and preparation. The beauty of the tableside finish is that it keeps the kitchen clean while keeping the host at the center of the conversation. Instead of disappearing for twenty minutes to construct delicate garnishes, you bring the mise en place to the sideboard. The goal is to minimize the time spent away from the table while maximizing the perceived effort. Whether you are pouring a clarified consommé over a carefully arranged plate of fresh crab and chives or torching a meringue just seconds before service, the focus is on the spectacle of fresh completion. As we dive into the nuances of these techniques, keep in mind that the most important ingredient is the confidence with which you execute these final touches, transforming your dining room into a restaurant-caliber stage.
The Philosophy of the Final Touch
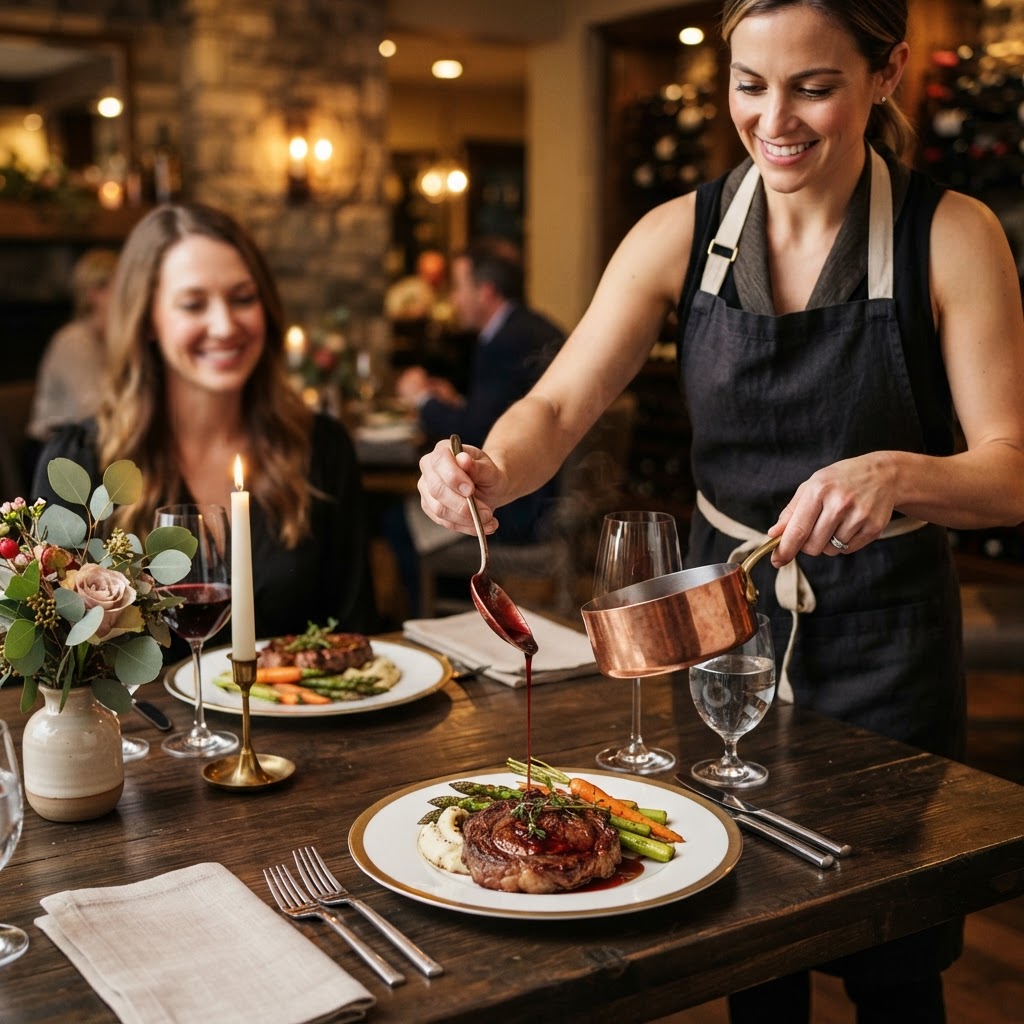
The core of the tableside finish is the concept of thermal and aromatic volatility. Professional chefs understand that certain elements—the perfume of fresh citrus zest, the volatile oils in cracked black pepper, or the delicate crispness of a warm glaze—are ephemeral. They degrade within seconds of being exposed to heat or air. By moving these final touches to the table, you are essentially "resetting the clock" on the freshness of your dish. This is not merely a gimmick; it is a technical necessity for achieving the highest level of culinary excellence. When a sauce is poured over a dish at the table, it retains its optimal viscosity and temperature, coating the protein exactly as intended rather than sitting in a pool of lukewarm liquid.
Managing Expectations and Mise en Place
Preparation is the absolute cornerstone of a successful tableside operation. You cannot attempt to execute these techniques if your workspace at the table is cluttered or if you are missing a single tool. Your table should be staged with the same precision as a station in a high-end French bistro. Use elegant trays or wooden boards to corral your components, ensuring that every oil, herb, or finishing salt is within arm’s reach. If your technique involves fire or heat, ensure that your tools—whether a butane torch, a chafing dish, or a warmed copper saucepan—are safely positioned away from the edges of the table where they might be knocked over.
The secret to a seamless tableside finish is the illusion of effortlessness. The diner should see the beauty of the result, not the sweat of the preparation.
When planning your menu, look for opportunities to incorporate one, and only one, tableside element. Trying to perform multiple finishing steps at the table can lead to chaos and cold food. Instead, focus on the most impactful stage of the meal—usually the main course or the dessert. Think about the sensory progression: how can you surprise your guests? A cold, refreshing gazpacho poured over a heap of seasoned cucumber and avocado is far more memorable than a bowl of soup simply placed in front of them. This is the art of the reveal.
Mastering the Pour: Sauces and Consommés
The "pour" is perhaps the most classic tableside technique, yet it is often executed poorly by amateurs. The goal is to create a moment of visual elegance while ensuring the sauce reaches the palate at the correct temperature. Whether it is a rich veal demi-glace, a delicate beurre blanc, or a clear mushroom consommé, the liquid must be hot enough to perform its function without being so boiling that it risks splashing or damaging the dish beneath it. A good rule of thumb is to keep your sauce between 140°F and 150°F for service; this provides a luxurious mouthfeel without scalding the plate or the guest.
Precision and Control
To pour with the grace of a professional, you must utilize the right vessel. A small, tapered copper saucier with a long handle provides the best control. When pouring, do not hover too far above the plate. Get close. The stream should be steady and controlled, beginning in the center of the plate and circling outward if the sauce is intended to coat the base, or poured directly over the protein if it is meant to enhance the crust. Never pour from a bowl; the lack of a spout will inevitably lead to drips and a messy presentation.
The Role of Aromatics and Zesting
Aromatics are the bridge between the nose and the palate. The process of zesting a fresh lemon or grating nutmeg directly over a dish releases essential oils that are otherwise trapped inside the skin of the ingredient. By the time a dish leaves the kitchen, much of the initial volatile aroma has faded. Bringing a fresh Microplane and a hunk of Parmesan, a block of dark chocolate, or a fresh truffle to the table allows the guest to experience that initial "burst" of fragrance. This is not just about flavor; it is about the neuro-sensory experience of dining.
Technique and Timing
When grating, hold the Microplane at a 45-degree angle to the dish. Use long, smooth strokes rather than short, jagged ones to ensure a consistent, fluffy texture that looks like snowfall. The thickness of your grate can change the profile of the dish; a fine grate will melt almost instantly into a hot sauce, while a coarser grate provides a textural contrast that can be delightful on top of pasta or a seared scallop.
A meal is not just a collection of ingredients; it is a sequence of aromatic signals designed to wake the senses and prepare the palate for the next layer of complexity.
Always source the freshest aromatics possible. Dried or pre-grated spices have zero place in a tableside finish. If you are using citrus, look for fruit that is heavy for its size, indicating high juice content and healthy, oil-rich skins. If you are using truffles or high-end cheeses, keep them chilled until the very last second before they hit the plate. This ensures they remain firm enough to grate perfectly, preventing a clumpy, unsightly mess.
Incorporating Fire and Heat
There is a primitive, universal appeal to fire in the kitchen. Using a handheld butane torch at the table to caramelize a sugar crust, melt a thin layer of Gruyère on an onion soup, or lightly smoke a piece of cedar-plank salmon adds a layer of drama that is impossible to ignore. The key here is safety and subtlety. You are not trying to roast the food; you are attempting to trigger the Maillard reaction or achieve a delicate caramelization on a sugar-dusted dessert.
Safety and Skill
When using a torch, always maintain a distance of at least three to four inches from the food. Move the flame constantly; never let it settle in one spot, or you will end up with a bitter, burnt patch rather than a delicious, golden char. For sugar crusts, start at the center and work your way out, allowing the sugar to liquefy and brown evenly. If you are working with alcohol for a flambé, exercise extreme caution. Use a long-reach igniter and never pour directly from the bottle—always use a measured glass or small metal pitcher.
* Ensure your guests are aware of what you are about to do.
* Keep a fire extinguisher nearby, even if you think you don't need it.
* Work on a heat-resistant surface, such as a marble slab or a thick wooden cutting board.
* Avoid using torches near flammable decorations or loose napkins.
Herb Infusions and Essential Oils
Sometimes, the most dramatic tableside move is a simple drizzle of a vibrant, herb-infused oil. This technique adds a visual pop of color and a concentrated hit of fresh, grassy, or spicy flavor that can elevate a dish from "good" to "gourmet." Imagine a deep green basil oil drizzled over a white tomato soup, or a spicy chili-garlic oil finished over a bowl of braised greens. The visual contrast alone is enough to draw the eye and create an expectation of quality.
The Art of the Drizzle
The secret to a perfect drizzle is the viscosity of your oil and the steadiness of your hand. Your infused oil should be strained through several layers of cheesecloth or a coffee filter to ensure it is crystal clear and vibrant in color. When drizzling, start from the outer edge and move toward the center in a spiral pattern, or use a squeeze bottle to create small, deliberate dots (a classic "polka dot" plating technique) for a more modern, artistic finish.
The professional chef does not just cook; they curate. Every oil, every herb, every drop of sauce is a deliberate choice made for the guest's sensory experience.
Always ensure the oil is at room temperature. If it is too cold, it will be too viscous and will not flow smoothly. If it is too warm, it may lose its bright, fresh color. Store your finishing oils in small, elegant glass bottles or metal cruets. The presentation of the vessel is just as important as the oil itself. Consider the vessel’s pour speed—you want a thin, controlled stream, not a heavy glug.
Tableside Carving and Portioning
Carving a whole roasted chicken, a rack of lamb, or a salt-crusted fish at the table is a grand tradition that has unfortunately fallen out of favor in many households. Reinstating this practice elevates a family dinner to a festive occasion. It shows that the host is not afraid of the ingredients and understands the beauty of the product in its whole form. The key to successful carving is a perfectly sharpened knife and a rested protein.
The Science of the Rest
Never attempt to carve a roast immediately after it comes out of the oven. You must allow the protein to rest for at least 15 to 20 minutes for larger cuts like roasts, or 5 to 10 minutes for smaller ones. This allows the muscle fibers to relax and reabsorb the juices, ensuring that every slice is succulent. If you carve too early, those precious juices will end up on your carving board instead of on the palate of your guest.
The Final Act: Dessert Spectacle
Dessert is the ideal time to go big. Because it is the last thing the guest will taste, a tableside finish here leaves a lasting impression. This is the moment for the flambé, the tableside pour of a warm chocolate ganache, or the dusting of high-end cocoa or powdered sugar through a stencil. The goal is to finish with something that is light, aromatic, and visually stunning.
The Flambé Technique
A classic flambé, such as Bananas Foster, is the pinnacle of tableside theater. The reaction between the alcohol and the high heat creates a dramatic flame that caramelizes the sugars in the pan while cooking off the raw edge of the spirit. Use a high-proof spirit—at least 40% alcohol (80 proof)—to ensure a clean, bright flame. Brandy, rum, or Grand Marnier are excellent choices, each offering a unique flavor profile that complements fruit or chocolate.
* Ensure all other guests are clear of the table before igniting.
* Use a long-handled pan to keep the heat away from your body.
* Add the alcohol away from the direct heat source if possible, then move it back to the burner to ignite.
* Keep a lid nearby to smother the flame if it grows larger than you intended.
The Equipment of a Master Host
To execute these techniques consistently, you must invest in a few key pieces of equipment. You don't need a professional kitchen, but you do need tools that are functional and visually appropriate for the dining room. A high-quality copper saucier, a sharp carving set, a reliable butane torch, and a set of elegant squeeze bottles are the building blocks of a professional-style service.
Selecting Your Tools
Choose tools that are easy to clean and maintain. Stainless steel or copper are ideal for their heat conductivity and aesthetic appeal. When choosing a carving board, look for wood that is dense, like maple or walnut, which will hold up to the edge of your knife without damaging it. Ensure your carving board has a juice groove to prevent spills on your table linen.
Equipment is the extension of the cook's intent. Choose tools that feel like they belong in your hand, and the food will follow suit.
Don't neglect the aesthetics of your serving pieces. If you are using a small tray for your finishing ingredients, choose one that complements your existing table setting. Whether it is a rustic wooden board, a sleek marble slab, or a vintage silver tray, the presentation of your mise en place is the opening note of the tableside performance.
Maintaining Composure and Pace
The biggest mistake a host can make is allowing the tableside finish to become a source of stress. If you are panicked, your guests will be tense. The goal of this style of service is to enhance the atmosphere, not to create a high-pressure environment for the chef. Practice your movements until they feel natural, and remember that even professional chefs make mistakes. If a drizzle goes slightly off-center or a flame isn't quite as large as you hoped, keep your composure and carry on.
Pacing the Service
Pacing is everything. Do not rush the finishing touches, but do not dawdle, either. The conversation at the table should flow naturally around your actions. Don't be afraid to explain what you are doing—"I'm finishing this with a quick grate of fresh nutmeg to highlight the earthiness of the root vegetables"—but don't feel the need to narrate every single movement. Allow the action to speak for itself.
Conclusion
The art of the tableside finish is not about performing; it is about serving. It is a way of showing your guests that you care enough about their experience to invest the time and effort into making the final moments of the cooking process as fresh and vibrant as possible. By incorporating these techniques, you are elevating your home hosting to a level that is rarely seen outside of the world's best restaurants. You are creating a memory, not just a meal.
The true beauty of this approach lies in its versatility. You don't need to do everything; you only need to do what feels right for you and your menu. Start with something simple—a tableside pour of a sauce or a quick zest of fresh citrus—and build your confidence from there. As you master these skills, you will find that the process of finishing a dish at the table is just as enjoyable for you as it is for your guests.
Remember that the goal is always the same: to provide a memorable, high-quality experience that leaves your guests feeling spoiled. When you bring the heat, the fragrance, and the precision to the table, you are showing your respect for the ingredients and your desire to create something truly special. Keep practicing, stay calm, and above all, enjoy the process. The "tableside finish" is your opportunity to step out of the shadows of the kitchen and take your rightful place at the center of the celebration.
Final Thoughts
As you continue your culinary journey, keep looking for ways to push your boundaries. The professional kitchen is a place of constant evolution, and your home kitchen should be no different. The techniques discussed here—the pour, the grating, the fire, the drizzle, and the carve—are merely the beginning of what you can achieve. Each of these methods provides a framework for creativity, allowing you to tailor your service to your own unique style and the preferences of your guests.
Don't be discouraged by initial stumbles. The first time you try to carve a roast in front of an audience or ignite a sauce, it may not be perfect. That is entirely expected. Great hosting is a skill that is honed over time, through repetition and the occasional failure. Embrace the trial and error, and let every meal be a learning opportunity. Your guests will appreciate the effort, regardless of whether the execution is 100% textbook.
Finally, remember that the warmth you bring to the table is more important than the technical perfection of the sauce. The "tableside finish" is a means to an end, and that end is the joy of shared experience. When you connect with your guests, when you engage their senses, and when you bring them together around a beautifully presented dish, you have succeeded in every way that matters. Keep the flame of your passion lit, and keep the art of hospitality alive and well in your home.


Get the Next Recipe
Weekly recipes, techniques, and gear picks — straight to your inbox.
