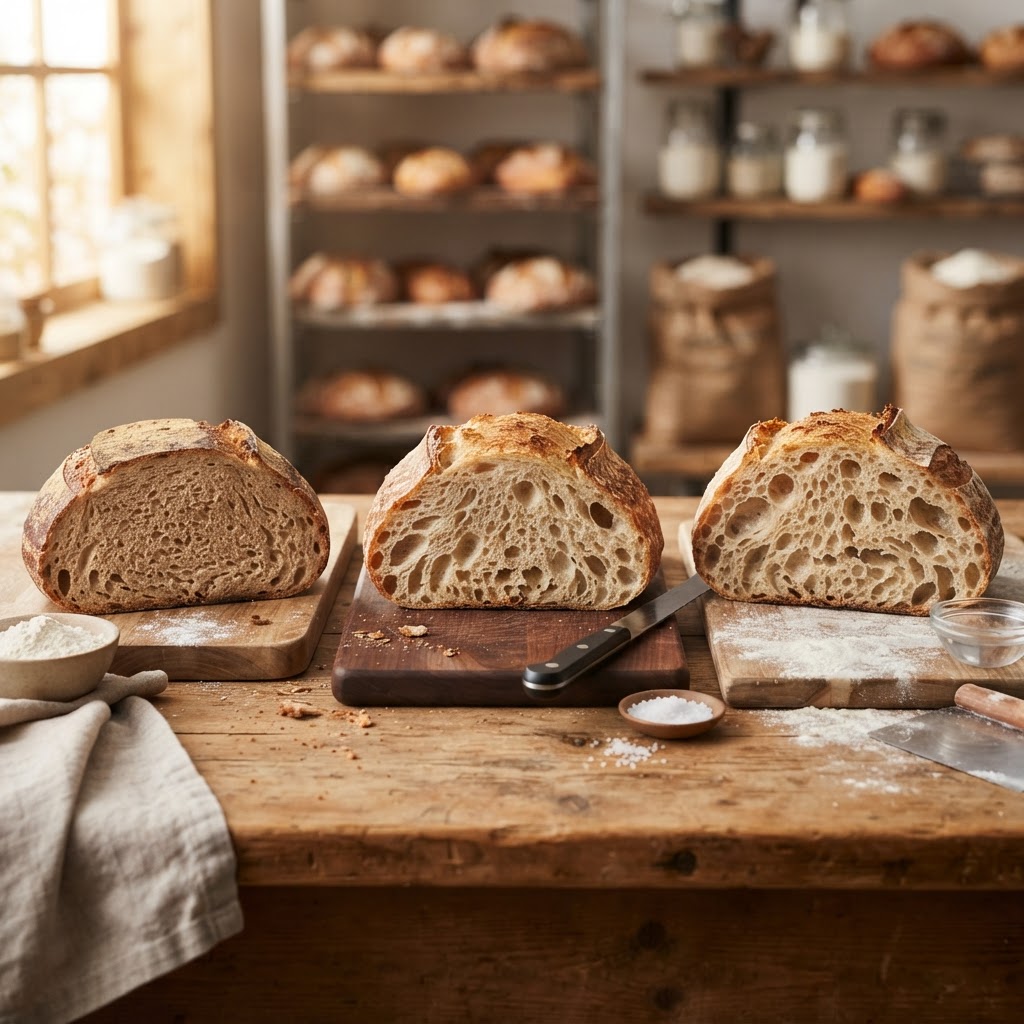
The Baker’s Hydration Guide: How Water Ratios Transform Your Dough’s Crust and Crumb
There is an inherent magic in the way that flour, water, salt, and yeast—four humble, inexpensive ingredients—transform into the golden-brown crust and airy, open crumb of a masterfully baked loaf. For many home cooks, the journey into bread baking begins with a simple, forgiving recipe, often yielding a dense, sandwich-style bread. However, as your curiosity grows, you inevitably find yourself standing at the crossroads of baker’s percentages and the daunting mystery of hydration. It is the single most influential variable in your baking toolkit, dictating not just the texture of the finished loaf, but the very temperament of the dough you handle. Understanding how water ratios affect gluten development, oven spring, and evaporation is the difference between a flat, chewy disc and a towering, artisan-style boule that crackles when it hits the cooling rack.
Mastering hydration requires a shift in perspective, moving away from volumetric measurements like cups and spoons toward the precision of the baker’s scale. When you stop thinking in terms of "a splash of water" and start calculating the exact weight of your liquid relative to your dry base, the kitchen becomes a laboratory rather than a guessing game. High-hydration doughs are notorious for being sticky, unruly, and difficult to shape, which is why most beginners start with low percentages. But by learning to manage these wet doughs through gentle handling and strategic folding, you unlock textures that are impossible to achieve with stiff, dry mixtures. This guide is designed to demystify the water-to-flour ratio, helping you harness the power of hydration to elevate your home-baked loaves to a professional standard.
If you have ever felt discouraged by a loaf that turned out like a brick or suffered from a crumb so tight it looked like a rubber eraser, know that the fault rarely lies with your skill level, but rather with the hydration math. We are here to "Blame The Chef"—or in this case, the recipe—because once you understand the variables, you become the captain of your own kitchen. We will explore how different flour proteins interact with water, why temperature management is critical when working with high-moisture doughs, and how you can manipulate your environment to ensure that every loaf you pull from the oven is a triumph. Prepare to get your hands messy, embrace the stickiness, and fundamentally change your relationship with your sourdough starter and commercial yeast alike.
The Foundation of Baker’s Percentages
The secret language of the bakery is Baker’s Percentage, a system where the weight of every ingredient is expressed as a ratio of the total flour weight, which is always set to 100%. This is the foundation upon which all professional recipes are built, allowing bakers to scale their production up or down without affecting the final quality of the bread. When we speak of hydration, we are specifically referring to the percentage of water relative to the total flour in the mix. For example, a recipe using 500 grams of flour and 350 grams of water is operating at 70% hydration. This mathematical certainty is what allows you to predict how a dough will behave long before you even add your salt or yeast.
Understanding the Ratio
In practice, most standard loaf breads fall into the 65% to 75% range, which provides a balance between ease of handling and a desirable open crumb. Once you venture above 80%, you enter the territory of "wet" or "high-hydration" doughs, such as ciabatta or traditional sourdough baguettes. These doughs require specialized techniques like coil folds or lamination because the high water content weakens the dough’s structure, making it prone to spreading if not properly strengthened. By utilizing a scale, you move beyond the inconsistency of measuring cups, which can vary wildly depending on how tightly you pack your flour, leading to massive hydration errors that ruin the fermentation process.
The Role of Flour Protein
Not all flours are created equal, and their ability to hold water is dictated by their protein content. High-protein bread flours, typically containing 12% to 14% protein, can absorb and retain significantly more water than lower-protein all-purpose flours without turning into a soupy mess. When you increase hydration, you are essentially asking your flour to build a sturdier network of gluten to contain that water as it converts to steam. If your flour isn't strong enough, the gluten network will collapse under the weight of the water, leading to a loaf that fails to rise. Always consider the water absorption capacity of your specific brand of flour before pushing your hydration limits.
"Hydration is not just a measurement; it is the heartbeat of your dough. It dictates how quickly fermentation occurs, how the yeast migrates through the matrix, and ultimately, how the finished loaf sings when it hits the cooling rack."
The Science of Crumb and Crust
The crumb of a bread—the internal structure—is essentially a map of gas retention. As fermentation progresses, the yeast consumes sugars and releases carbon dioxide, which is trapped by the gluten network created by the hydration of your flour. A higher hydration level increases the elasticity of the gluten, allowing the air bubbles to expand significantly more than in a drier, stiffer dough. This leads to that coveted, "open" crumb characterized by large, irregular holes, often referred to by bakers as an "alveolated" structure. If you are aiming for a classic airy sourdough, you need enough water in the system to keep the dough extensible enough to stretch under the pressure of expanding gases.
Moisture and Steam
The crust, conversely, is a direct result of how water interacts with the heat of your oven. When your loaf enters the oven, the moisture in the dough turns to steam, causing the bread to expand rapidly—a phenomenon known as oven spring. If your dough is too dry, it will set prematurely, preventing the full expansion of the loaf and resulting in a thick, leathery crust. High-hydration doughs, provided they have been shaped correctly, will develop a thinner, crispier, and more blistered crust because the moisture facilitates a faster and more thorough Maillard reaction on the surface of the bread before the center sets.
Managing Evaporation
One professional chef tip is to manage the steam in your oven during the first 15 to 20 minutes of baking. Even a high-hydration dough can result in a dull crust if the oven environment is too dry. By using a Dutch oven or a baking stone with a steam tray, you trap the moisture evaporating from the loaf back onto the surface, which keeps the exterior soft and supple for longer. This allows the bread to continue expanding fully before the crust hardens and darkens. The water you put into the dough is not just for the crumb; it is the primary engine for the structural development of the entire loaf.
Techniques for High-Hydration Success
When working with dough hydration levels exceeding 75%, standard kneading methods like the "heel of the hand" approach are not only ineffective but can actually damage the gluten you are trying to develop. Instead, you must rely on gentle, tension-building techniques that prioritize the integrity of the gas bubbles you have worked so hard to cultivate. The stretch and fold method is the industry standard for these types of doughs. By stretching the dough up and folding it over itself every 30 minutes during the bulk fermentation, you gradually organize the gluten strands without ever overworking or deflating the dough.
The Power of Lamination
For very high-hydration doughs—those reaching 85% or higher—lamination is a game-changer. By gently pulling your dough out into a thin, translucent sheet on a lightly oiled counter and folding it back over itself like a letter, you create an incredible amount of strength and structure in a single motion. This technique effectively "layers" the gluten, which is essential for trapping those large air bubbles we desire in artisan bread. It is a visually satisfying technique that, while appearing complex, is actually one of the most efficient ways to handle sticky, wet doughs without adding excess flour that might dry out your finished product.
Coil Folds for Stability
As the dough nears the end of its bulk fermentation, it will become increasingly pillowy and fragile. This is where the coil fold becomes invaluable. Unlike the stretch and fold, which can be somewhat aggressive, a coil fold involves lifting the dough from the center and letting the two ends tuck under itself through the power of gravity. This method builds tension perfectly without degassing the dough. If you find your dough is spreading flat during the final proofing stage, it is often a sign that you need one or two more sets of folds to build that necessary internal tension.
"A wet dough is not a failed dough; it is a lively, energetic medium that demands patience and a delicate touch. Do not fight the stickiness—embrace it, because that is where the magic lives."
Temperature Management and Fermentation
Hydration and temperature are inextricably linked in the baker's craft. Warmer doughs ferment faster, which can be an advantage when you are on a tight schedule, but they can also lead to a "slack" or runny dough that loses its shape easily. When you are working with higher hydration, keeping your ambient dough temperature around 75°F (24°C) is generally ideal. If your water is too warm, the fermentation will race ahead of the gluten development, and you will end up with a loaf that feels like a puddle of glue. Conversely, using cold water (or even ice water) can slow the fermentation significantly, giving you more time to develop strength through multiple folding sessions.
The Cooling Effect
Pro tip: If your kitchen is particularly hot during the summer months, consider using cold water directly from the refrigerator to hydrate your flour. This practice, known as delayed fermentation, allows the gluten to hydrate and develop while keeping the yeast activity subdued. This ensures that when you finally place the loaf in the oven, the yeast has plenty of energy left for the final push of oven spring. Always keep a digital probe thermometer handy; knowing the exact temperature of your dough after the initial mix is one of the most reliable ways to ensure consistent results, regardless of the season.
Monitoring Yeast Activity
Hydration also dictates the speed at which your yeast—whether it is a wild sourdough starter or commercial yeast—moves through the matrix. Wetter doughs allow the yeast to navigate more easily, which can lead to a more even crumb, but it also means that the dough is more sensitive to over-proofing. If your dough feels "soupy" or smells excessively acidic, you may have let the fermentation go too far. Keep a close watch on the dough’s volume; usually, a 50% to 75% increase during the bulk stage is the sweet spot for most artisan-style loaves.
Flour Choices: Beyond the Label
The hydration level you choose should ultimately be informed by the type of flour you have in your pantry. While "Bread Flour" is the common recommendation for high-hydration loaves, do not shy away from incorporating whole wheat or rye flour for flavor. However, keep in mind that these flours are significantly thirstier than white flour. They contain bran particles that act like little blades, cutting through the gluten strands and absorbing a massive amount of water. If you are adding whole grains to your recipe, you should expect to increase your total hydration by 5% to 10% to achieve the same consistency you would get with a 100% white bread flour loaf.
The Autolyse Technique
To maximize the benefits of your hydration, use the autolyse method. This involves mixing only your flour and water together for 30 to 60 minutes before adding the salt, yeast, or starter. During this rest period, the flour fully hydrates, and the enzymes begin the process of breaking down starches into sugars and initiating the gluten development process. An autolysed dough is significantly more extensible and easier to work with, even at higher hydration levels, because the flour has had time to fully absorb the moisture without the interference of salt, which acts as a tightener.
Adjusting for Environment
Your local climate—specifically the relative humidity—will play a role in how your dough behaves. If you live in a very humid environment, your flour may already be holding more ambient moisture, meaning you might need to dial back the added water by 1% or 2% to keep the dough manageable. In arid, high-altitude climates, you may find that you need to increase your hydration to compensate for the faster evaporation rates. Developing an intuition for how the dough feels—the "tackiness" on your fingers—is just as important as the numbers on your scale.
Troubleshooting Common Issues
If you find that your loaf consistently turns out flat, the issue is rarely just about the water—it is about the structure. A loaf that spreads into a pancake is usually suffering from two problems: under-fermentation or insufficient surface tension. Surface tension is what holds the loaf together as it expands in the oven. To achieve this, you must master the "preshape" and "final shape." Even if your hydration is perfect, if you don't create a strong "skin" on the outside of the loaf during the shaping process, the internal pressure will cause it to burst outward rather than rising upward.
The "Float Test" and Windowpane
How do you know if you have added enough water and folded the dough enough? The windowpane test is your best friend. Take a small piece of dough and gently stretch it between your fingers. If you can stretch it until it is thin enough to let light pass through without it tearing, your gluten is perfectly developed. If it tears, you need more folds. If you are working with a very wet dough, use the "slap and fold" technique on the counter to bring it together, but be careful not to introduce too much air too early.
Patience is an Ingredient
"True artisan baking is a dialogue with the dough. You provide the environment, the time, and the hydration, but the bread decides how it wants to grow. Listen to it, and you will never produce a bad loaf again."
Final Thoughts
The path to mastering bread hydration is not paved with perfect loaves from day one; it is paved with sticky fingers, flour-dusted countertops, and the inevitable occasional "pancake" that nonetheless makes for excellent croutons. By understanding that hydration is a tool for manipulation—a lever you can pull to change the texture, crumb, and crust of your bread—you take the mystery out of the process. Remember that the numbers are your guide, but your senses are your ultimate authority. Feel the elasticity of the dough, observe the bubbles, and smell the sweet, yeasty aroma of fermentation.
As you continue your baking journey, try experimenting with incremental changes. Take a recipe you know well and increase the hydration by 2% or 3%. Observe how the handling changes, how the proofing time shifts, and how the final crumb structure evolves. This iterative process is how every professional baker reaches the level of mastery that turns simple flour and water into something extraordinary. There is no such thing as a "perfect" hydration level, only the hydration level that produces the bread you love to eat.
So, go ahead and "Blame The Chef" if your first high-hydration experiment feels like a mess. That mess is simply the evidence of you pushing your boundaries and expanding your skill set. Whether you are baking a dense, rustic whole wheat loaf at 70% hydration or a light, airy ciabatta at 85%, remember that the most important ingredient is your patience. With every loaf, you are learning the unique language of your kitchen, your oven, and your flour. Keep the scale out, keep your hydration notes detailed, and most importantly, keep baking. The perfect loaf is just one hydration percentage point away.



Get the Next Recipe
Weekly recipes, techniques, and gear picks — straight to your inbox.
