The Chemistry of Chocolate Tempering: From Seized to Silky
The world of chocolate is often perceived through the lens of indulgence, yet for the home cook, it represents one of the most rigorous scientific challenges in the kitchen. To achieve that signature "snap" when breaking a bar and the mirror-like shine that separates professional work from amateur efforts, one must look beyond the flavor profiles and into the molecular architecture of cocoa butter. Tempering is not merely a task of melting and cooling; it is the process of manipulating complex triglyceride crystals into their most stable configuration. When we fail to temper correctly, the results are visually evident: dull, grayish streaks known as "bloom" and a texture that feels soft or waxy on the palate. By understanding the chemistry behind these crystalline transitions, you can move from frustrating batches of seized chocolate to consistent, professional-grade confections.
Every professional chocolatier has a story about their first encounter with "seized" chocolate—that sudden moment when a smooth ganache turns into a gritty, clumpy mess. Often, this is a result of a minor introduction of moisture or, more frequently, an attempt to melt chocolate without respecting the thermodynamic requirements of its fat content. Chocolate is a suspension of solid particles, including cocoa solids and sugar, dispersed in a continuous phase of cocoa butter. Because cocoa butter is a polymorphic fat, meaning it can solidify into several different crystalline structures depending on its thermal history, the way we handle heat is the difference between a masterpiece and a waste of premium ingredients. Mastering this process requires patience, a reliable digital thermometer, and an appreciation for the precision of the culinary arts.
As you embark on your journey to master the art of tempering, consider this blog your comprehensive guide to the science of the kitchen. We will strip away the mystery surrounding the tempering curve and provide you with actionable, step-by-step techniques that you can implement in your own home environment. From the mechanical agitation required for stable crystal formation to the precise temperature thresholds for dark, milk, and white varieties, this post is designed to elevate your craft. Whether you are aiming to create intricate molded truffles, dip your own strawberries, or create sophisticated chocolate garnishes, the principles outlined here will provide the foundation for your future success. Let us move forward, armed with the knowledge of how to tame the cocoa bean and transform its volatile nature into something truly magnificent.
The Polymorphism of Cocoa Butter
The core of tempering lies in the fascinating world of polymorphism. Cocoa butter, the primary fat in chocolate, can solidify into six distinct crystal forms, labeled I through VI. These crystals vary in their melting points, stability, and physical appearance. Form I crystals are the most unstable, forming at very low temperatures and melting almost instantly, while Form VI crystals are the result of long-term storage and represent the final, most stable state of aged chocolate. For the chocolatier, our goal is to exclusively cultivate Form V crystals. These are the "goldilocks" of the chocolate world: they possess a high enough melting point to remain solid at room temperature while providing the glossy sheen and audible snap that we associate with high-quality chocolate.
Why Stability Matters
When chocolate is melted entirely and then allowed to cool without intervention, it inevitably reverts to a disorganized mix of crystals, mostly the unstable lower forms. This leads to the phenomenon known as fat bloom, where cocoa butter migrates to the surface, creating an unsightly, powdery white haze. While this bloom is perfectly safe to eat, it ruins the texture and the consumer's perception of quality. By cooling the chocolate to a specific temperature and re-heating it slightly, we encourage the growth of these critical Form V crystals, which act as "seeds" for the rest of the chocolate to follow.
Tempering is the art of teaching the molecules of chocolate to align in a perfect, crystalline lattice. Without this structure, chocolate is merely a dull, waxy shadow of its potential.
Understanding the stability of these fats allows you to troubleshoot common issues. If your chocolate is too thick, you may be hovering in a temperature range where the cocoa butter is beginning to set, or perhaps your chocolate has absorbed a trace amount of water, which acts as a nucleating agent for disaster. By maintaining a strict thermal profile, you bypass the chaos of random crystallization and instead orchestrate a precise, orderly solidification.
Essential Tools for the Tempering Home Cook
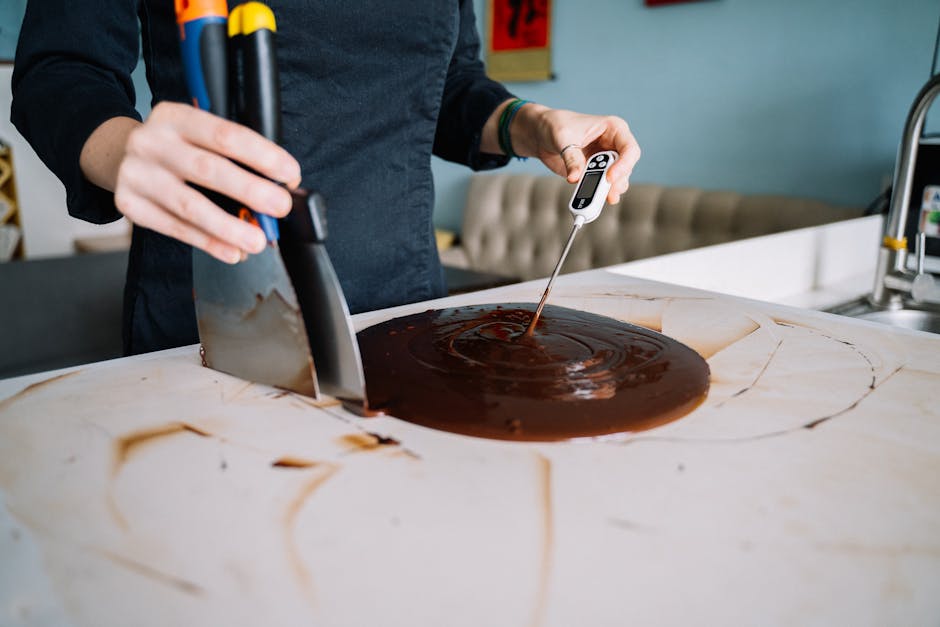
While the professionals use stone-slab tables and marble countertops to cool their chocolate, the home cook can achieve identical results with a few well-chosen tools. The most important instrument is a high-quality digital infrared or probe thermometer. Because chocolate is sensitive to fluctuations of as little as two degrees, relying on the "touch test" is a recipe for failure. You need the precision of a device that can provide an instantaneous, accurate reading to ensure you are hitting your target temperatures exactly.
Recommended Equipment List
Beyond the thermometer, you will need tools that assist in the mechanical agitation of the chocolate, which is just as important as the thermal management. When we talk about "seeding," we are physically adding stable, pre-tempered chocolate into melted, untempered chocolate to provide a blueprint for the molecules to copy. To do this, you will need:
The Role of Agitation
Mechanical agitation is the process of constantly stirring your chocolate throughout the cooling process. This movement does two things: it ensures that the temperature remains uniform throughout the bowl, preventing localized hot or cold spots, and it helps the cocoa butter molecules collide and link up in the desired Form V structure. Without constant stirring, your chocolate will not have the homogeneity required for a smooth finish, and you risk creating pockets of untempered, unstable fats.
The Step-by-Step Tempering Process
The actual process of tempering generally follows a "melt, cool, and warm" cycle. This cycle is universal, though the specific temperatures vary depending on the type of chocolate—dark, milk, or white. The goal is to melt the chocolate completely to destroy all existing crystal structures, cool it to a point where the desired Form V crystals begin to form, and then warm it back up just enough to melt away any unstable lower-form crystals that may have also formed.
Working with Dark Chocolate
Dark chocolate, with its higher cocoa butter content and lack of milk solids, is the most forgiving to temper. Start by melting two-thirds of your chocolate until it reaches roughly 115°F to 120°F (46°C–49°C). Once completely smooth, remove it from the heat and add the remaining third of chopped chocolate—your "seed." Stir constantly as the temperature drops. Your target is to bring the chocolate down to roughly 82°F to 84°F (28°C–29°C). At this point, the chocolate should be thick and glossy.
The Final Stretch: Re-warming
Once you hit your cooling target, you must gently and briefly apply heat again—either by placing the bowl back over the double boiler for just a few seconds or using a heat gun—to raise the temperature back to the "working range." For dark chocolate, this is 88°F to 90°F (31°C–32°C). This final step is crucial; it melts away the unstable Form IV crystals, leaving only the stable Form V. Once you reach this range, your chocolate is "in temper" and ready to be used.
A professional chef never rushes the cooling process. Tempering is a rhythmic dance between heat, movement, and patience; lose your focus, and the lattice breaks.
Keep in mind that the room temperature of your kitchen plays a massive role. If your kitchen is too hot, the chocolate will take forever to set; if it is too cold, it may set before you can finish your work. Aim for an ambient temperature of 68°F to 70°F (20°C–21°C) whenever possible.
Troubleshooting Common Tempering Failures
Even the most seasoned chefs occasionally run into problems. If your chocolate seems thick, grainy, or refuses to set with a shine, you have likely encountered a "seized" or "out of temper" state. Seizing is almost always caused by a microscopic drop of water entering the chocolate. Because sugar is hygroscopic, it grabs that moisture immediately, creating a syrup that causes the cocoa solids to clump together. Once chocolate has seized, it cannot be salvaged for coating or tempering, though it can be melted down with cream to create a ganache.
Identifying Bloom
If your chocolate appears with white streaks after it has set, it has "bloomed." This is a sign that your temper was either lost during the process or that the chocolate was not tempered correctly from the start. If you notice your chocolate blooming, do not despair. You can simply remelt the entire batch and begin the tempering process again from scratch. The cocoa butter is not damaged; it simply needs to be restructured.
Grainy texture:* Usually indicates the chocolate was overheated or not stirred enough during the cooling phase.
Dull finish:* Typically means the chocolate cooled too slowly or the ambient temperature of the room was too high.
Difficulty setting:* Likely means the chocolate did not have enough time or the proper "seed" crystals to create a solid foundation.
When to Start Over
There is no shame in restarting a batch. In fact, professional chocolatiers often have a "scrap bowl" for chocolate that didn't quite make the cut. Because chocolate is a natural product, it reacts to humidity, ambient temperature, and even the agitation speed. If you are struggling, check your equipment—is your thermometer calibrated? Are your bowls perfectly dry? Sometimes, the smallest factor is the culprit, and a fresh start with a clean, dry bowl is the most efficient path forward.
Advanced Techniques: Seeding vs. Tabling
While we have focused primarily on the "seeding" method, which is the most accessible for home cooks, there are other methods used in professional settings. The tabling method involves pouring two-thirds of melted chocolate onto a cool marble slab and working it back and forth with a bench scraper and palette knife. This method uses the cold marble to rapidly cool the chocolate and creates a high degree of shear, which promotes a very uniform, stable crystal structure.
Why Seeding Wins at Home
For the home cook, tabling is often impractical due to the mess and the requirement of a large, high-quality marble surface. The seeding method allows for better temperature control and is significantly less messy. By using finely chopped, high-quality chocolate as your seed, you can achieve the same level of crystalline stability as the tabling method without the need for specialized stone surfaces.
The Power of Constant Movement
Regardless of the method you choose, the secret is constant movement. As the cocoa butter cools, it needs a continuous, gentle flow to ensure that the crystals are distributed evenly. If you leave the chocolate to sit, the cocoa butter will begin to form large, disorganized clumps that lead to a dull appearance. Your spatula is your most valuable tool; use it to scrape the sides and bottom of your bowl continuously. Think of this as the "kneading" phase of the tempering process.
Maintaining Temper During Work
Once your chocolate is in temper, the work is only half done. You now have a working window, usually lasting between 30 and 60 minutes, where the chocolate is perfectly stable. However, as you dip or mold, the temperature of the chocolate will continue to drop. It is vital to monitor the temperature throughout your project. If it starts to dip toward the bottom of the working range, apply a very small amount of heat to bring it back up to the sweet spot.
The "Test" Method
Always perform a streak test before you begin dipping or molding. Take a small piece of parchment paper or the tip of a knife and dip it into your tempered chocolate. Place it in a cool spot for three to five minutes. If it sets with a uniform, glossy sheen and doesn't smear when you touch it, you are ready to go. If it stays soft, streaky, or dull, your chocolate is not in temper, and you need to continue the process.
The test streak is the final judge. Never skip this step; a few minutes of waiting can save you hours of disappointment.
Do not be afraid to adjust. If your chocolate is slightly out of temper, you can often save it by adding a small amount of new seed and continuing to stir. Mastery of this fine-tuning is what distinguishes a beginner from a home professional. With every batch, you will develop an intuitive sense for the look and feel of perfectly tempered chocolate.
The Nuances of White and Milk Chocolate
It is important to note that white and milk chocolate have different melting and tempering points than dark chocolate due to the presence of milk solids and a higher percentage of cocoa butter or fats. Because they contain milk proteins, they are more sensitive to high heat and can burn or scorch much faster than dark chocolate. Always use lower heat settings and be extra vigilant with your thermometer when working with these varieties.
Temperature Charts for Different Chocolates
Use these as a guide for your next project, but remember that the specific manufacturer of your chocolate may provide slightly different recommendations on the packaging.
Protecting the Flavor
Because milk and white chocolates contain more sugar and milk solids, they are more susceptible to absorbing odors from your kitchen. Keep your workspace clean and free of strong-smelling ingredients like onions, garlic, or spices while you are working. Chocolate is a sponge for aromas, and the high-fat content makes it particularly effective at retaining unwanted scents. By keeping your environment neutral, you ensure that the complex flavors of the cacao—or the delicate notes of the dairy—shine through in the final product.
Final Thoughts
Mastering the science of tempering is a rewarding endeavor that transforms the way you view chocolate. It is a discipline that rewards precision, patience, and a deep respect for the ingredient itself. You have learned that tempering is not a mystical art but a verifiable application of chemistry, where the manipulation of triglyceride crystals creates the perfect structure for glossy, snappy, and shelf-stable confections. By focusing on the essential techniques—using a reliable thermometer, maintaining constant agitation, and respecting the specific temperature curves for different chocolate varieties—you are now equipped to tackle even the most ambitious projects.
Remember that failure is merely data. Every bowl of seized chocolate is a lesson in temperature control or moisture management. As you continue to practice, you will find that the process becomes second nature. Your hands will learn to feel the thickening of the chocolate, and your eyes will recognize the subtle transition from a matte finish to a brilliant, professional shine. Do not let the complexity deter you; rather, let it inspire you to treat every tempering session as an opportunity to refine your skills and produce something truly beautiful.
As you move forward, continue to experiment. Try using different percentages of cocoa solids, test the boundaries of your tempering range, and most importantly, share your creations with others. There is a profound joy in offering a piece of perfectly tempered, handmade chocolate to a friend—knowing the science and the heart that went into crafting that snap. You are now part of a long tradition of culinary artisans, and with these tools and this knowledge, the potential for what you can create in your own home kitchen is limited only by your imagination. Happy tempering!
Get the Next Recipe
Weekly recipes, techniques, and gear picks — straight to your inbox.
