The Healthy Home Cook’s Guide to "Nutrient-Lock" Blanching: Mastering Flash-Cooking Techniques to Maximize Color, Crunch, and Vitamins
We have all been there: you head to the market, buy a pristine, vibrant bunch of organic broccoli or a bundle of asparagus that looks like it was plucked from a garden five minutes ago, only to watch it turn into a dull, mushy, olive-drab tragedy on your dinner plate twenty minutes later. As home cooks, we often prioritize speed and convenience, inadvertently sacrificing the very nutritional integrity we strive for by over-boiling or over-steaming our precious produce. The culinary term for this avoidable catastrophe is "vegetable fatigue," and it is the single most common reason why people claim they "don’t like vegetables." The good news is that the solution isn't found in a complex laboratory, but rather in a simple, fundamental technique used in professional kitchens for centuries: Nutrient-Lock Blanching.
By understanding the science of flash-cooking, you can transform your kitchen into a hub of high-performance nutrition. This technique isn't just about preserving the visual appeal of your plate; it is about protecting the delicate vitamins, minerals, and phytonutrients that heat-sensitive vegetables often lose when subjected to prolonged boiling. When you master the rapid thermal transfer required for proper blanching, you ensure that your vegetables retain their crisp texture, their jewel-toned hues, and their dense nutritional value. It is the secret weapon of every chef who wants to maintain the integrity of an ingredient while making it palatable and safe for the dinner table.
In this guide, we are going to pull back the curtain on the process of blanching, moving beyond the simple "boil and dump" mentality. We will explore the precise temperatures required for optimal enzymatic inactivation, the importance of the ice-bath shock, and the specific ratios of water to salt that make all the difference. Whether you are prepping for a high-end stir-fry, creating the perfect salad base, or simply trying to get your family to eat more greens without a fight, this guide is your blueprint for becoming a master of the flash-cook. Let’s stop blaming the ingredients and start taking control of our kitchen results with the precision of a culinary professional.
The Science of the Cell Wall: Why Blanching Works
The goal of blanching is essentially to "stop the clock" on biological decay. When vegetables are harvested, they begin a process of cellular respiration and enzymatic activity that slowly degrades their texture, color, and flavor profile. By submerging produce in rapidly boiling water for a very short duration, we essentially neutralize the enzymes that lead to browning and softening. This is the enzymatic inactivation phase, and it is the cornerstone of professional vegetable prep.
Beyond just stopping enzymes, blanching acts as a cleaning and conditioning agent. It brightens the pigments within the plant tissues by removing the layer of air that naturally surrounds the surface of the vegetable. This is why a blanched piece of green bean looks neon bright compared to its raw counterpart. It removes the gaseous barrier, allowing the light to reflect directly off the chlorophyll-dense cell walls. Furthermore, it kills any surface bacteria and removes residual grit that a simple rinse might miss.
It is important to remember that heat is a double-edged sword. If you cook for too long, you break down the pectin—the structural fiber that keeps vegetables crisp—leading to the dreaded "mush" factor. By hitting the vegetable with intense heat for a short burst and then immediately arresting that cooking process with cold water, you achieve the "al dente" state that remains firm, vibrant, and delicious. This is the hallmark of a skilled cook who understands the physics of heat transfer.
Understanding Thermal Shock
The transition from boiling water to ice water is not just a suggestion; it is a vital step. When you move a vegetable from 212°F (100°C) to 32°F (0°C), you are creating a thermal shock that prevents the residual heat in the vegetable from continuing to cook it from the inside out. Without this shock, the center of a stalk of broccoli will continue to cook for minutes after it has been removed from the pot, turning a perfect green into a disappointing grey.
The Professional Setup: Tools and Ratios
You do not need an industrial kitchen to master this technique, but you do need the right equipment to ensure consistency. The most common mistake home cooks make is using a pot that is too small for the amount of vegetables being cooked. If you add a pound of cold asparagus to a small pot of water, the temperature of the water will plummet, turning your blanching into a slow steam that results in loss of texture.
Aim for a ratio of at least one gallon of water per pound of vegetables. This ensures that the water returns to a boil almost immediately upon adding the produce. If the water takes too long to boil back up, you have effectively failed the blanching process. Your pot should be deep and wide, providing enough room for the vegetables to move freely. A rolling boil is essential to keep the vegetables suspended and cooking evenly.
Salt is your secondary tool for maintaining color and enhancing flavor. You want your blanching water to be as salty as the sea. This is not for seasoning the vegetable through-and-through, though it helps; it is for osmotic regulation. Salt helps keep the water-soluble vitamins inside the vegetable rather than leaching them out into the water. If the water is not sufficiently salted, the vegetable will turn bland and watery.
"Blanching is the silent professional of the kitchen. It is the difference between a salad that sits heavy and dull and one that sings with vitality and crunch."
The Technique: Step-by-Step Execution
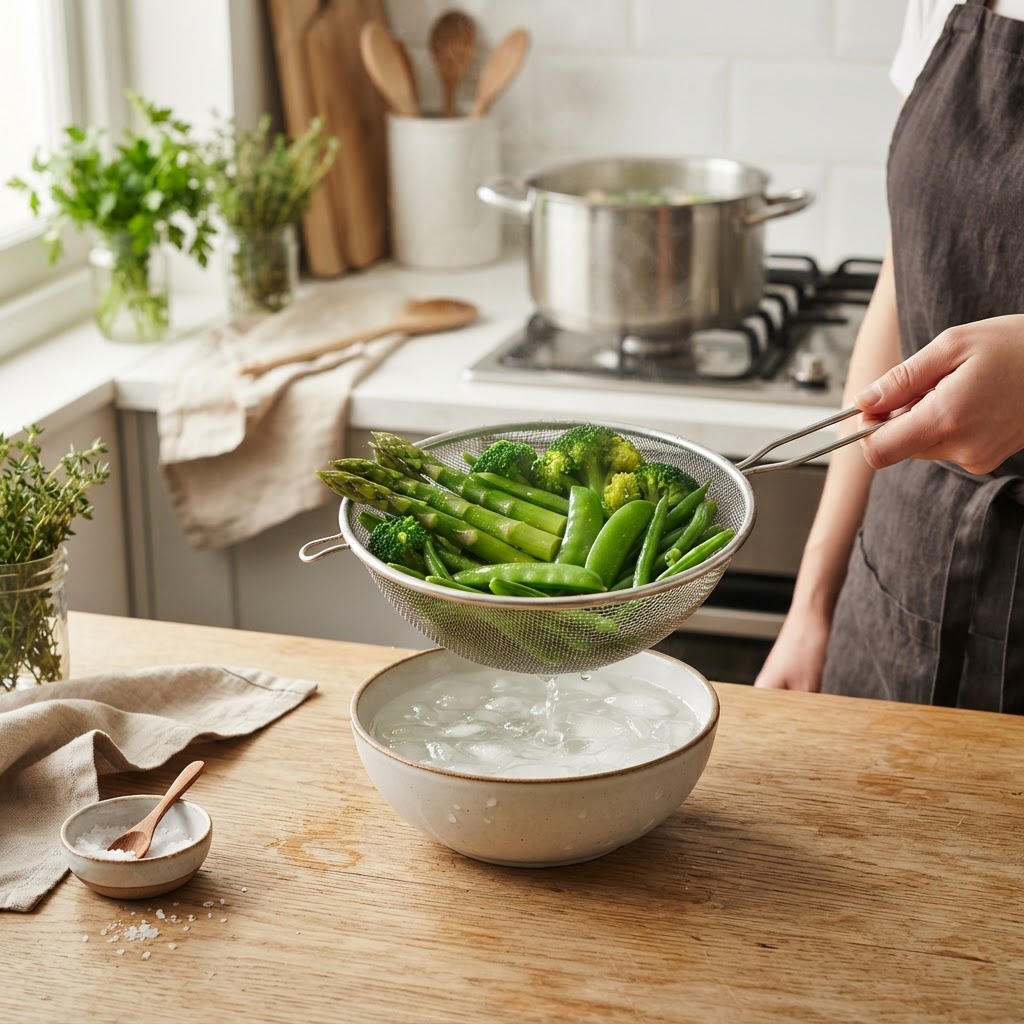
Follow these steps every time you work with hardy vegetables like green beans, asparagus, snap peas, or carrots. First, bring your large pot of heavily salted water to a vigorous, rolling boil. While that is happening, prepare your ice bath. Fill a large bowl with half ice and half cold water. This ratio is critical; if you have too much water and not enough ice, the heat from the vegetables will warm the water too quickly and the shock will be ineffective.
Next, add your vegetables to the boiling water in small, manageable batches. Do not overcrowd the pot. As the vegetables boil, keep a slotted spoon or a spider strainer handy. Keep a close watch; for delicate vegetables like asparagus or baby spinach, this process can take as little as 30 seconds. For firmer vegetables like carrots or root crops, you might need two to three minutes. The visual cue is the color change—it should become brighter and more intense.
Once the time is up, immediately remove the vegetables and plunge them into the ice bath. Gently agitate the vegetables to ensure all sides are exposed to the cold water. Let them soak for a duration equal to the time they spent in the boiling water. Once they are cold to the touch, remove them from the bath and spread them out on a clean kitchen towel or paper towels. Drying is an essential final step, as residual moisture can make your future stir-fry or salad dressing watery and flavorless.
Timing Chart for Perfect Results
Nutrient Preservation: Maximizing the Bioavailability
There is a persistent myth that cooking vegetables destroys all their nutrients, but the reality is much more nuanced. Some nutrients, such as beta-carotene and lycopene, actually become more bioavailable when exposed to light, controlled heat. Blanching is the ideal middle ground; it softens the fibrous cell walls that our human digestive systems cannot break down effectively, while keeping the heat-sensitive vitamins, like Vitamin C and folate, largely intact.
By minimizing the time that the vegetable spends in hot water, we limit the leaching of water-soluble nutrients. If you were to boil broccoli for ten minutes, the water would turn green—that color is the evidence of your vitamins and minerals escaping into the water you are about to pour down the drain. Blanching, by contrast, keeps the water mostly clear, ensuring those nutrients stay inside the food where they belong.
Furthermore, if you are planning to store your vegetables for a few days, blanching acts as a form of preservation. The enzymatic inactivation means the produce will stay fresher for longer in your refrigerator. You can prep a large batch of blanched vegetables on a Sunday, store them in airtight containers, and have a healthy, "ready-to-go" ingredient base for the entire work week. This is the ultimate hack for the healthy, busy home cook.
Common Pitfalls and How to Fix Them
Even experienced cooks stumble when it comes to the nuances of heat transfer. One of the most common issues is the "soggy bottom" syndrome, which usually happens because the vegetables were not dried sufficiently after the ice bath. When you add wet vegetables to a hot pan, you aren't sautéing them; you are steaming them, which ruins the texture of your final dish. Always take the extra sixty seconds to pat your blanched produce dry with a clean towel.
Another frequent problem is the "under-blanch," where the vegetables remain raw in the center. This often happens because the home cook is afraid of the heat and pulls the vegetables out too early. Use a timer; don't rely on your intuition when you are first learning the craft. You want the texture to change, but the structure to hold. If you bite into a piece of broccoli and it still feels hard or woody, you haven't cooked it long enough.
Lastly, don't ignore the quality of your water. If your tap water has a high mineral content or chlorine smell, it will affect the taste of your vegetables. If you notice an "off" metallic taste in your blanched goods, try using filtered water. It seems like a minor detail, but at the professional level, water quality is just as important as the quality of the olive oil or the salt you use.
"A kitchen is not a place for guess-work. It is a laboratory of taste and texture. When you stop fearing the stove and start mastering the science of heat, your cooking will elevate overnight."
The "Flash-Sauté" Finish: Elevating Your Dish
Once you have mastered the art of the blanch, you are ready for the "Flash-Sauté" finish. This is where the magic happens. Because your vegetables are already perfectly blanched and seasoned from the salted water, they require very little effort to finish. Simply heat a heavy-bottomed pan with a small amount of fat—like high-quality extra virgin olive oil or clarified butter—and toss the blanched vegetables in for sixty seconds.
This process adds a layer of depth and flavor that you simply cannot achieve with raw or steamed vegetables. The high heat of the pan adds a slight caramelization to the exterior, while the internal structure remains firm and perfectly cooked. You can add aromatics like minced garlic, red pepper flakes, or a squeeze of fresh lemon juice at the last second, knowing that your vegetables are already at the peak of their potential.
This technique is perfect for weeknight dinners. Imagine coming home after a long day and having a bag of blanched asparagus ready in your fridge. You toss them into a hot pan with a bit of butter and lemon zest, and in two minutes, you have a restaurant-quality side dish that is healthier and fresher than anything you could get from a takeout container. It is the ultimate manifestation of the "healthy home cook" lifestyle.
Why Fat Matters in the Final Toss
Fat is a flavor carrier. When you finish your blanched vegetables with a healthy fat, you are helping your body absorb the fat-soluble vitamins (A, D, E, and K) found in the produce. A drizzle of avocado oil or a small knob of grass-fed butter isn't just about taste—it is a nutritional necessity for maximizing the health benefits of your meal.
Scaling Up: Prep-Ahead Strategies for Busy Families
One of the greatest challenges for the modern home cook is managing the time between work and dinner. Blanching is the ultimate solution for "Batch-Prepping." You can dedicate thirty minutes on a Sunday afternoon to blanching a variety of vegetables—green beans, carrots, peppers, and snap peas—and store them in the refrigerator for up to four or five days.
When you are prepping for a large family, consider the "par-cooking" aspect of this method. You can blanch your vegetables to about 80% doneness, store them, and then finish them in the oven or on the grill later. This is especially useful for hosting dinners where you want to serve hot vegetables but don't want to spend the entire evening hovering over the stove.
Remember to invest in good quality, clear containers. If you can see the bright colors of your prepped vegetables, you are much more likely to use them. A dull, sad-looking container of leftovers will sit in the back of your fridge until it turns to liquid, but a crisp, neon-green container of blanched beans is an invitation to eat well. Your environment in the kitchen matters just as much as your technique.
Final Thoughts
Mastering the art of Nutrient-Lock Blanching is about more than just cooking a vegetable—it is about respecting the integrity of the food you bring into your home. When you take the time to learn the specific temperatures, the importance of the salt ratio, and the necessity of the ice bath, you transition from a person who "makes food" to a person who truly understands the science of nutrition. You stop blaming the quality of the produce or the limits of your stove, and you begin to appreciate the precision that goes into every healthy bite.
As you move forward, keep a notebook of your times and results. Culinary mastery is a lifelong practice built upon the foundation of repeated, disciplined experiments. You will find that after just a few attempts, the timings will become second nature to you, and the sight of dull, mushy vegetables will be a thing of the past. Your kitchen will become a space where color and crunch are the standard, not the exception, and your health will reap the long-term rewards of your efforts.
So, the next time you find yourself staring at a bunch of kale or a head of cauliflower, don't reach for the steamer basket out of habit. Instead, fill your largest pot, get that water boiling, grab your bowl of ice, and embrace the process. You are doing more than just preparing a meal; you are unlocking the full potential of your ingredients. Take pride in that, because a well-blanched vegetable is a testament to the fact that simple, science-based habits truly do create the best results in the home kitchen. Happy cooking, and keep pushing those boundaries of flavor and health.

Get the Next Recipe
Weekly recipes, techniques, and gear picks — straight to your inbox.
