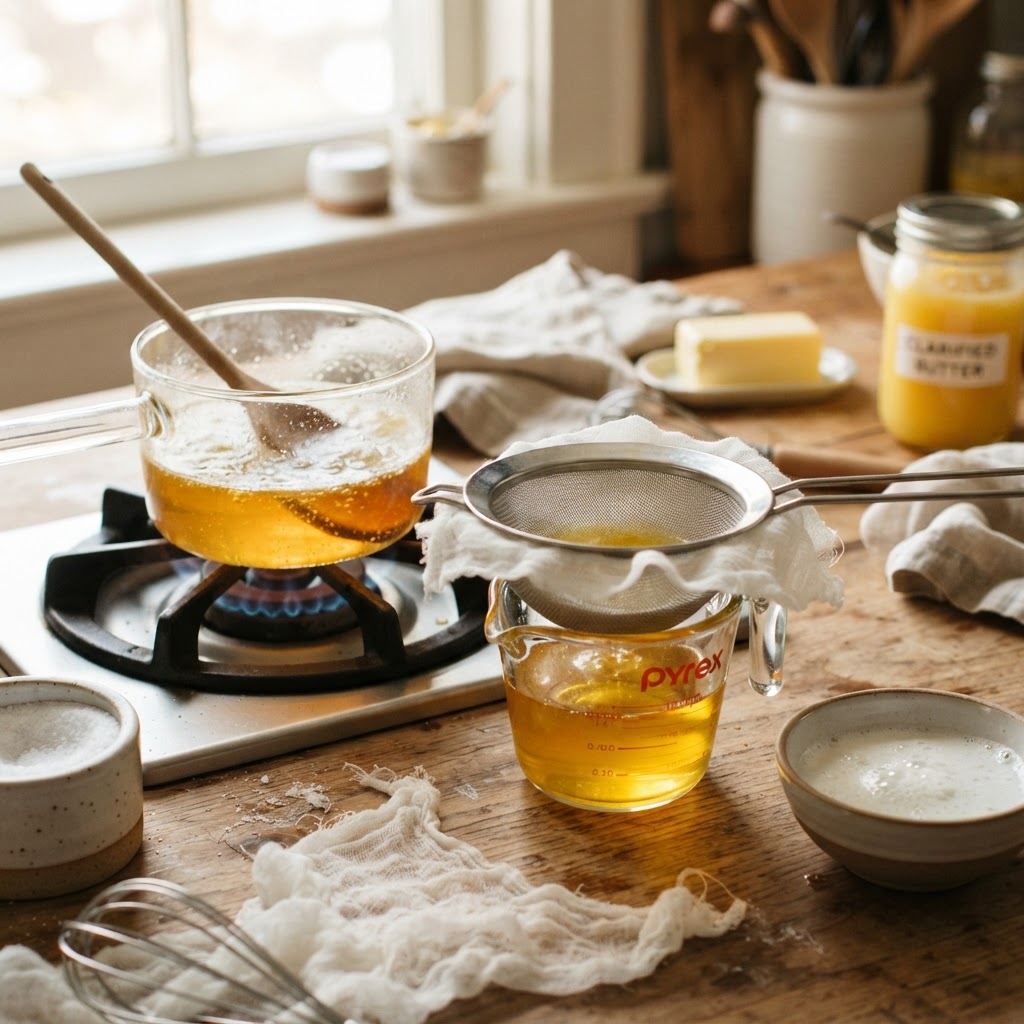
The Home Cook’s Guide to Clarified Butter: Mastering Milk-Solid Separation for High-Smoke-Point Cooking and Rich Flavor Depth
There is a specific, unmistakable magic that happens in a professional kitchen when a chef reaches for a squeeze bottle of liquid gold. It is not just oil, and it is certainly not mere butter; it is the culinary equivalent of a secret weapon that separates the amateur attempts at a sear from the restaurant-quality perfection we all crave. Clarified butter, often referred to in professional circles by its French name, beurre clarifié, is the backbone of high-heat sautéing and the foundation for some of the world’s most luxurious emulsified sauces. As home cooks, we have been conditioned to fear the smoke point, often reaching for flavorless neutral oils that leave our proteins sad, pale, and uninspired. By understanding the science of milk-solid separation, you unlock the ability to harness the deep, nutty essence of real butter without the catastrophic scorching that usually accompanies its use.
The process of clarification is, at its heart, a lesson in patience and chemistry. Butter is not a simple fat; it is a complex emulsion consisting of approximately 82% milk fat, 16% water, and 2% milk solids—proteins and sugars that are delicious in a browned state but ruinous when they begin to burn at temperatures above 300°F. When you strip away the water and the solids, you are left with pure, golden fat that can withstand temperatures upwards of 450°F. This transition transforms a temperamental ingredient into a workhorse that can sear a steak, poach lobster, or sauté delicate vegetables with a professional precision. Learning to master this technique is arguably the single most impactful skill you can bring into your home kitchen this year.
Stepping into the world of clarified butter means rethinking your pantry staples. While you can certainly buy jars of "ghee" at the grocery store, nothing compares to the freshness, quality control, and cost-effectiveness of producing it in your own kitchen. It requires nothing more than a heavy-bottomed saucepan, a bit of time, and a watchful eye. As we move through this guide, you will learn to navigate the subtle visual cues of the separation process, ensuring that every batch you make is crystal clear and brimming with depth. Once you experience the superior flavor profile that homemade clarified butter imparts, you will find it nearly impossible to go back to the standard oils you previously relied upon for your daily cooking needs.
Understanding the Chemistry of Clarification
At the molecular level, butter is a beautiful, unstable mixture of fat, water, and protein. The water content is what causes butter to "spit" and sputter in a hot pan, while the milk solids—specifically the casein and whey proteins—are the primary culprits behind the acrid, black particles that form when you attempt to fry over high heat. By heating the butter slowly, we induce a separation process known as decantation. The water evaporates as steam, the heavier milk solids sink to the bottom of the vessel, and the pure fat rises to the top as a glistening, translucent layer.
The Science of Smoke Points
Every cooking fat has a specific smoke point, the temperature at which it begins to break down, release free radicals, and produce acrid, blue smoke. Raw butter has a very low smoke point, typically around 300°F to 325°F, which is insufficient for a good Maillard reaction on most proteins. By removing the impurities, we effectively raise the smoke point of the fat significantly, sometimes approaching 485°F. This allows you to achieve a dark, caramelized crust on your food without the bitter chemical taste of burnt proteins.
Why Quality Butter Matters
Because you are concentrating the fat, the quality of the base ingredient is non-negotiable. Always reach for unsalted, high-fat European-style butter (often labeled as "cultured" or "84% fat"). The higher fat content means less water to evaporate and less milk-solid buildup to manage. Avoid salted butter entirely, as the salt content will concentrate during the reduction process, leading to a finished product that is far too aggressive and salty for delicate pan sauces or baking applications.
"The difference between a home cook and a chef is often found in the precision of their fats; clarified butter is the difference between a grey, boiled protein and a golden, caramelized masterpiece."
Equipment and Setup for Success
You do not need a commercial kitchen to excel at this technique. In fact, simple tools often yield the best results because they allow you to observe the process more closely. You will need a heavy-bottomed saucepan, ideally made of stainless steel or copper, to distribute heat evenly and prevent hot spots that could prematurely brown the milk solids. A wide surface area is generally preferred as it facilitates faster water evaporation.
Essential Tools
A fine-mesh strainer* (or a conical chinois if you want absolute clarity).
Cheesecloth or a coffee filter* for the final straining phase.
A clean glass jar* for storage, preferably one that has been sterilized.
A spoon or a small ladle* to skim the surface foam during the process.
Managing the Heat
The most critical factor in this process is temperature control. You are not looking for a rapid boil; you are looking for a gentle simmer. Set your burner to the lowest possible heat setting. If your stove runs hot, consider using a heat diffuser to protect the integrity of the fat. Remember that butter is delicate; if you rush the process, you risk browning the solids before they have fully separated, which will result in a darker, nuttier flavor profile often associated with ghee rather than pure, neutral clarified butter.
The Step-by-Step Clarification Process
Now that you understand the "why," it is time for the "how." Follow these steps meticulously, and you will achieve a professional-grade product every single time.
Troubleshooting Your Batch
If your butter looks slightly brown or smells toasted, you have accidentally entered the realm of beurre noisette (browned butter). While delicious, this is not what we are aiming for in neutral clarified butter. If this happens, your heat was likely too high. Do not discard it—use it for pasta sauces or baking, and start again with a fresh batch at a lower heat. If your butter remains cloudy, it means there is still moisture present. Keep it on the lowest heat setting for an additional 5–10 minutes to allow the water to fully evaporate.
Storage and Preservation
One of the great advantages of clarified butter is its longevity. Because you have removed the water (which encourages microbial growth) and the milk solids (which oxidize and spoil), your clarified butter is incredibly shelf-stable. In a cool, dark pantry, it can last for months, and in the refrigerator, it can stay fresh for nearly a year. This makes it an ideal staple to keep on hand for whenever inspiration strikes.
Storage Best Practices
Always use an airtight, dark glass container. Light and oxygen are the enemies of fat stability. If you are keeping it on the counter, ensure the lid is sealed tightly after every use to prevent the absorption of ambient kitchen odors. If you are storing it in the refrigerator, expect it to turn into a solid, waxy block. This is completely normal. Simply scoop out what you need with a dry spoon and watch it melt instantly the moment it touches your hot pan.
The Dangers of Moisture
The biggest enemy of your clarified butter is water introduction. Never use a wet spoon to scoop fat from the jar, and ensure your pan is completely dry before adding the clarified butter. Even a single drop of water can cause the fat to sputter and, more importantly, can introduce the bacteria that will eventually cause your fat to go rancid. Always practice hygienic scooping to keep your supply pristine.
"True flavor is not just about what you add to a dish, but what you take away. By stripping butter of its volatile proteins, you reach the pure essence of the fat, leaving behind a blank, golden canvas for flavor."
Culinary Applications: Beyond the Sauté
Clarified butter is a multi-purpose tool that transforms a variety of dishes. While many home cooks use it exclusively for searing scallops or steak, its applications are vast. Because of its clean, buttery flavor, it is the superior choice for high-heat techniques that require a richness that vegetable oil simply cannot provide.
The Perfect Sear
When searing proteins, you want an even, deep brown crust. Standard butter burns too quickly, leaving you with black specks on your fish or chicken. Clarified butter provides the necessary thermal stability to keep the pan hot and consistent. You will notice that your proteins brown more evenly and slide across the pan with ease, rather than sticking or burning prematurely.
Luxurious Emulsions and Sauces
If you have ever attempted a classic Hollandaise or Béarnaise sauce, you know that the temperature and fat content are critical. Clarified butter is the gold standard for these emulsified sauces because it integrates smoothly with the egg yolks without adding unnecessary moisture. It allows for a silky, rich texture that holds its structure much longer than sauces made with whole butter.
Baking and Beyond
You can also use clarified butter in baking. It provides a deeper, richer flavor in pie crusts and shortbreads compared to standard butter. Since it lacks water, it can sometimes change the texture of baked goods—making them slightly more delicate or "short"—so it is best used in recipes where you want a buttery, crisp edge.
Advanced Techniques: Infusions and Beyond
Once you have mastered the basic clarification process, you can begin to experiment with flavor infusions. This is a common practice in many global cuisines, particularly in the preparation of ghee in Indian cooking, where the butter is sometimes simmered with aromatics to infuse the fat with layers of complexity.
Savory Infusions
Try adding a clove of smashed garlic, a sprig of fresh thyme, or a few dried chili flakes during the final stage of simmering. The hot fat will extract the essential oils from these ingredients, resulting in a compound clarified butter that adds instant depth to your finished dishes. This is an incredible trick for finishing grilled vegetables or brushing onto warm crusty bread.
Culinary Tips for the Pros
Don’t waste the solids*: The white, milky solids left at the bottom of the pan—known as the "milk scum"—are incredibly flavorful. Instead of throwing them away, stir them into mashed potatoes, oatmeal, or scrambled eggs for a massive boost of umami.
Patience is a virtue*: Do not attempt to strain the butter too quickly. Letting it sit allows the heavy solids to settle firmly at the bottom, which makes the straining process much cleaner.
The "Spoon Test"*: If you are unsure if the butter is ready, dip a spoon into the golden liquid and pull it out. If it is perfectly clear with no cloudy streaks or white particles floating in the fat, it is ready.
Final Thoughts
Mastering the art of clarified butter is a rite of passage for any cook who is serious about their craft. It represents a shift in mindset: moving from simply following a recipe to understanding the fundamental components of the ingredients you work with every single day. By taking the time to separate the fat from the solids, you are actively choosing to elevate the quality of your home-cooked meals, bringing the standards of a professional restaurant into your own kitchen.
Do not be discouraged if your first batch is not perfectly crystal clear. Culinary mastery is built upon the foundation of trial and error. The act of watching the butter melt, smelling the toasted notes, and observing the separation of the milk solids is a meditative process that connects you more deeply to your food. Over time, you will develop an intuitive sense for the heat, the timing, and the visual cues, eventually performing this task without needing to reference a guide.
Remember that clarified butter is a tool for longevity. Not only does it provide better performance in the pan, but it also allows you to buy high-quality, grass-fed butter in larger quantities and preserve it safely. It is a cost-effective, flavor-positive, and technically superior way to manage your pantry. Once you have a jar of golden, liquid sunshine sitting on your counter, you will find yourself reaching for it for everything from your morning eggs to your evening roast.
As you move forward, keep experimenting. Try different types of high-quality butter, play with herbal infusions, and pay attention to how your sears change as you refine your technique. The "Blame The Chef" philosophy has always been about taking control of your kitchen, one technique at a time, and empowering yourself with the knowledge that great cooking is accessible to everyone. You have the tools, the science, and the technique—now it is time to get into the kitchen and start clarifying.
May your pans always be hot, your butter always clear, and your crusts always perfectly golden. The journey toward becoming a better cook is a marathon, not a sprint, and there is no better place to start than the foundation of every great French sauce and every perfect steak. Happy cooking, and may your kitchen always smell of success.
Stay curious, stay hungry, and keep pushing the boundaries of what you think you can achieve with simple, honest ingredients. Whether you are searing a thick ribeye, poaching a delicate piece of white fish, or simply elevating your daily sauté, clarified butter is your partner in the pursuit of culinary excellence. See you in the next lesson, where we continue to demystify the kitchen and sharpen your skills. Until then, keep the heat low and your standards high.
Get the Next Recipe
Weekly recipes, techniques, and gear picks — straight to your inbox.
