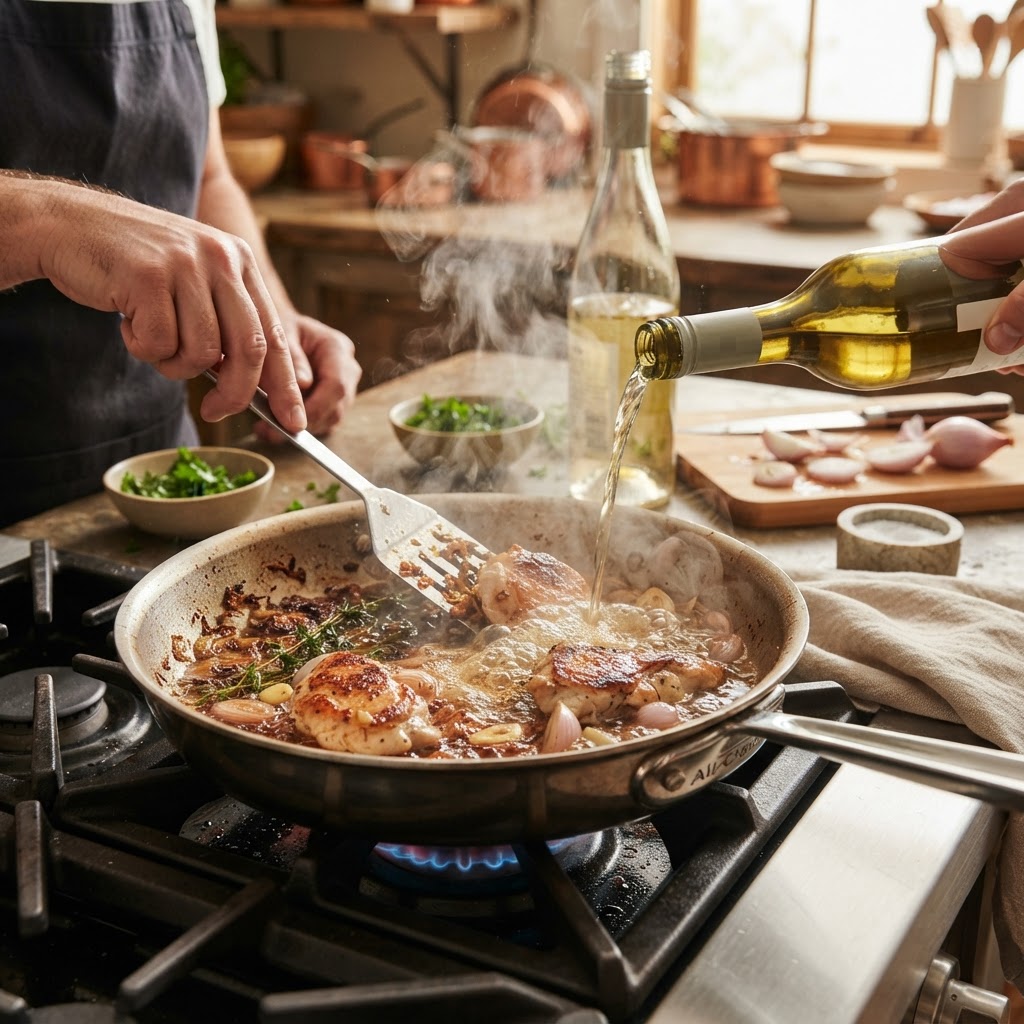
The Home Cook’s Guide to Deglazing: How to Turn Pan Bits into Flavorful Sauces
If you have ever stared at a cast-iron skillet after searing a thick ribeye or sautéing a medley of wild mushrooms, you have likely noticed the dark, crusty bits clinging stubbornly to the bottom. In the culinary world, these precious remnants are known as the fond, and they are the undisputed foundation of professional-level flavor. Many home cooks make the mistake of scrubbing these bits away, treating them as cleanup clutter rather than the secret ingredient they truly are. Understanding how to unlock this treasure trove through the art of deglazing will fundamentally change the way you approach your nightly meals. By learning to transform these drippings into rich, velvety pan sauces, you effectively bridge the gap between a standard home-cooked dinner and a restaurant-quality dining experience.
Deglazing is one of those foundational culinary techniques that feels intimidating at first but becomes second nature with just a few repetitions. At its simplest, it is the process of adding a cold or room-temperature liquid to a hot pan immediately after searing meat or vegetables, allowing the steam and solvent properties of the liquid to lift the fond from the metal. This action not only cleans your pan effortlessly but also creates a concentrated base for a pan sauce that carries the deep, savory essence of the ingredients you just cooked. It is a rapid, high-impact method that relies on the chemical reaction between heat and protein, providing a bridge between the Maillard reaction that occurs during browning and the final liquid component of your dish.
When you master the art of deglazing, you stop relying on bottled gravies or heavy, store-bought thickeners and start trusting your own palate. The process requires very little in terms of equipment, usually demanding nothing more than a sturdy skillet, a wooden spoon, and a splash of liquid—be it wine, stock, or even citrus juice. As you practice this, you will learn to adjust your heat levels to ensure the fond caramelizes without burning, and you will develop an intuitive sense for the balance between acidity, fat, and salt. This guide is designed to strip away the mystery surrounding this professional kitchen staple, providing you with the exact techniques and ratios you need to master the technique in your own home kitchen. With a bit of patience and an adventurous spirit, you will soon find that the best part of the meal is the sauce you create from what everyone else considers "the mess."
The Science of the Fond: Why You Should Never Scrub Early
To truly excel at deglazing, you must first develop a healthy respect for the fond. The term is French, translating literally to "bottom" or "foundation," and it refers to the browned bits that remain in a pan after proteins—like chicken, pork, or beef—have been seared in fat. These bits are not burnt; they are the result of the Maillard reaction, a complex chemical reaction between amino acids and reducing sugars that occurs when food is subjected to high heat. When you sear a steak, the surface undergoes this reaction, creating hundreds of different flavor compounds that are far more complex than the flavors found in the raw meat itself.
When you deglaze, you are essentially performing a solvent extraction on those compounds. The liquid you add—whether it is an acidic wine or a flavorful stock—acts as a catalyst to dissolve the sugars and proteins that have bonded to the metal. Because the pan is hot, the liquid evaporates rapidly, intensifying the flavors of the fond and incorporating them into the liquid medium. If you were to skip this step, you would be discarding the most concentrated, savory part of your meal, leaving behind only the surface texture of the meat rather than the total flavor profile of the cooking process.
"The fond is not merely a byproduct of searing; it is the concentrated soul of the pan. To discard it is to discard the very essence of the meal's narrative."
Understanding Heat Management
The key to a perfect fond lies in the temperature of your pan. If your heat is too low, the food will steam in its own juices rather than browning, resulting in a grey, bland finish. If your heat is too high, the fond will turn from golden-brown to black, which results in a bitter, acrid sauce that is impossible to salvage. Aim for a medium-high heat where you can see the fat shimmering but not smoking. When you drop your protein into the pan, let it remain undisturbed until it releases naturally from the surface; if you find yourself prying the meat off, it is not ready to be flipped.
The Role of Materiality
The type of pan you use significantly affects the quality of your fond. Stainless steel and cast iron are the gold standards for deglazing because they are designed to form a strong, even crust. Non-stick pans, while convenient, are specifically engineered to prevent the proteins from adhering to the surface, which means you will rarely develop the rich, dark fond required for a sophisticated pan sauce. If you want to take your cooking to the next level, transition to a heavy-bottomed stainless steel pan, which allows you to monitor the color of the fond clearly, ensuring it reaches the "mahogany" stage rather than the "charred" stage.
Choosing Your Deglazing Liquid: A Spectrum of Flavor
The choice of liquid is where your personal style as a chef really begins to shine. While dry white wine is the classic choice for lighter proteins like chicken, fish, or pork chops, the options are as varied as your spice cabinet. The primary rule here is to use a liquid that provides enough acidity to balance the richness of the fat left in the pan. The acid helps to cut through the heavy lipids, brightening the flavors and creating a more balanced, palatable sauce.
The Wine Factor
When cooking with wine, never use something you would not drink. A cheap "cooking wine" often contains high levels of sodium and additives that can ruin a sauce. For deglazing, you want a dry wine with high acidity—think Sauvignon Blanc, Pinot Grigio, or even an un-oaked Chardonnay for white-meat dishes. If you are cooking red meats like beef or lamb, a dry red wine like a Cabernet Sauvignon or a Merlot works beautifully. The tannins in the red wine pair excellently with the deeper, beefy intensity of the fond produced by red meat, providing a robust, full-bodied sauce.
Beyond the Vine
If you do not want to use alcohol, there are plenty of excellent alternatives that provide the necessary acidity and depth:
Stock or Broth:* Chicken, beef, or vegetable stock is the most versatile option. Because they are already seasoned and flavored, they make for a very savory, traditional gravy-style sauce.
Citrus Juice:* Fresh lemon or lime juice can add a vibrant, zesty finish to pan-seared scallops or white fish.
Vinegar:* A splash of balsamic, sherry, or apple cider vinegar works wonders, but be careful with the ratio as the acidity is much higher than that of wine or stock.
Verjus:* An excellent, non-alcoholic alternative made from unripened grapes that provides a sharp, acidic punch similar to white wine.
"The beauty of a pan sauce lies in its adaptability. A simple splash of liquid can transform a rustic dinner into a sophisticated feast, provided you respect the acidity levels of your chosen base."
Ratios and Reducing
When deglazing, you generally want to start with about 1/2 cup to 3/4 cup of liquid for a standard 12-inch skillet. Pour the liquid in slowly; it will bubble up aggressively, so be mindful of your face and hands. Once the liquid is in, use a flat-edged wooden spoon or a high-heat silicone spatula to scrape the bottom of the pan. You should see the bits dissolve almost instantly. From there, turn the heat to medium-high and allow the liquid to reduce by about half or two-thirds. This process, known as reduction, concentrates the flavor and naturally thickens the sauce as the water content evaporates.
The Art of Mounting: How to Finish Like a Professional
Once your sauce has reduced to a syrupy, concentrated consistency, you have reached the final stage of the process: mounting. In professional kitchens, this is often referred to as "mounting with butter" or monter au beurre. This step is what separates a thin, watery liquid from a glossy, professional-grade sauce that coats the back of a spoon. It adds a luxurious texture and a depth of flavor that binds the acidic notes of the wine or stock with the savory notes of the fond.
The Monter au Beurre Technique
Remove the pan from the heat entirely before adding your fat. If the sauce is boiling when you add the butter, the milk solids will separate from the fat, resulting in a greasy, broken sauce rather than an emulsion. Cut cold butter into small cubes and whisk them into the pan one by one. The goal is to create a stable emulsion where the butter fat is suspended in the liquid. As you whisk, you will see the sauce transform from a dark, thin broth into a light, creamy, opaque glaze that clings beautifully to your protein.
Seasoning and Finishing Touches
After mounting, give your sauce a quick taste. Does it need more salt? Often, the salt from the stock or the natural salinity of the meat is enough, but don't be afraid to adjust. If it tastes too acidic, add another tiny knob of butter. If it tastes dull, a squeeze of lemon or a pinch of fresh herbs—parsley, tarragon, or chives—can provide a "lift" that makes the flavors pop. This final taste-test is your opportunity to correct the balance before serving, ensuring that every bite is as delicious as you intended it to be.
Avoiding Common Pitfalls
Advanced Deglazing: Incorporating Aromatics and Fortifiers
Once you have mastered the basic deglaze, you can begin to introduce "layering" to your pan sauces. This involves adding aromatics—like minced shallots, garlic, or fresh herbs—to the pan after the meat has been removed but before you add your deglazing liquid. By cooking these aromatics in the remaining fat for 30 to 60 seconds, you infuse the flavor into the oil, which is then picked up by the liquid. This creates a much more complex, three-dimensional flavor profile than a simple pan sauce alone.
The Role of Alliums
Finely minced shallots are the gold standard for pan sauces because they provide a subtle, oniony sweetness that softens as it cooks. Garlic is equally useful but must be watched carefully; because it has a lower burning point than shallots, it should be added in the final 30 seconds of sautéing. If you add garlic too early, it will brown and become bitter, ruining the entire base. A pro tip is to sweat these aromatics until they are translucent and soft before pouring in your wine or stock.
Fortifiers for Depth
If you want to take your sauce to the next level, you can add "fortifiers" to your reduction. A teaspoon of Dijon mustard whisked in during the mounting phase adds a sharp, tangy emulsifying agent that helps keep the sauce smooth. A teaspoon of tomato paste added during the aromatic phase provides an umami punch that pairs perfectly with beef or lamb. You could even incorporate a tablespoon of heavy cream to turn your pan sauce into a rich, decadent cream sauce, perfect for pouring over pork chops or sautéed mushrooms.
The Fresh Herb Factor
Adding soft herbs at the very end is crucial. Herbs like thyme or rosemary can handle the heat of the cooking process if added early, but delicate herbs like parsley, chives, tarragon, or chervil should always be stirred in off the heat, right before serving. This preserves their bright, green color and essential oils, adding a fresh, aromatic finish that cuts through the intensity of the concentrated pan drippings. Remember: dry herbs for the beginning, fresh herbs for the end.
Troubleshooting the "Broken" Sauce
Every cook, even those with decades of experience, will eventually face a "broken" sauce. This occurs when the fats separate from the liquid, leaving you with a pool of oil floating on top of a watery, bitter base. While it can be frustrating, it is almost always fixable. The most common cause is adding butter to a sauce that is too hot, or adding it too quickly without constant whisking. When the emulsion fails, the fat clumps together rather than staying suspended.
The Repair Mission
If your sauce breaks, don't pour it down the drain. First, remove the pan from the heat. Sometimes, simply adding a teaspoon of cold liquid (stock or water) and whisking vigorously will re-emulsify the sauce. If that fails, place a fresh, clean bowl on your counter, add a tablespoon of heavy cream or even a tiny splash of hot water, and slowly whisk your broken sauce into that liquid, bit by bit. Think of it like making a hollandaise or a mayonnaise; you are essentially re-building the emulsion from scratch.
Maintaining Temperature Control
Preventing a broken sauce is always easier than fixing one. The cardinal rule of pan sauces is to perform the final mounting off the heat. Move your pan to a cold burner or a trivet before you start adding your butter. If you have been cooking at high heat, the pan itself will hold enough residual energy to melt the butter slowly. If you find the butter is melting too fast, move the pan away from the stove entirely. By controlling the heat, you control the final texture of the sauce, ensuring that glossy, velvet finish every single time.
From Basics to Brilliance: A Practical Example
To put all of this into practice, let’s consider a standard preparation for a Pan-Seared Chicken Breast. First, season your chicken generously with salt and pepper on both sides. Heat two tablespoons of oil in a stainless steel skillet over medium-high heat. Place the chicken in the pan and sear for about 5 to 7 minutes per side, depending on thickness, until golden brown. Once the chicken is cooked, remove it to a plate to rest—resting is essential for juice retention.
The Step-by-Step Process
This simple workflow produces a sauce that tastes like it took hours of preparation, yet it was completed in the time it took for the chicken to rest. By following this method, you utilize the chemistry of the pan to create a flavor profile that is impossible to achieve with a simple butter or oil drizzle. It is efficient, it is delicious, and it is the hallmark of a confident home cook who understands how to manage their ingredients to maximize return.
"The secret to cooking isn't found in a complicated recipe, but in the confidence to manipulate the ingredients you have right in front of you. A good pan sauce is the ultimate test of that confidence."
Final Thoughts
Mastering the art of deglazing is about more than just making a tasty sauce; it is about changing your mindset regarding the kitchen. When you view every crusty, dark brown bit at the bottom of your pan as an opportunity rather than an annoyance, you become a more intuitive and resourceful cook. You start to see the potential for flavor in every stage of the cooking process. You learn to listen to the sizzle, monitor the color of the fond, and balance the acidity of your liquids. This is the transition from a cook who follows directions to a chef who understands the language of flavor.
Do not be discouraged if your first attempt results in a sauce that is too salty or slightly broken. These are the lessons that build intuition. Experiment with different liquids—try a splash of pomegranate juice with duck, or a bit of hard cider with pork. Play with different aromatics, from leeks to minced ginger, and see how they interact with the proteins you choose. The more you experiment, the more you will recognize the patterns and ratios that yield the best results for your specific palate.
At the end of the day, "Blame The Chef" is about empowering you to take control of your culinary narrative. You have the tools, the technique, and the science now—all that remains is the practice. So, the next time you finish searing that steak or sautéing those vegetables, don't reach for the sponge. Reach for the wine, pick up your wooden spoon, and start building your own foundation of flavor. Your dinner is about to get a whole lot better, and you will find that the best part of the meal is the one you created yourself, right there in the bottom of the pan. Keep cooking, keep deglazing, and most importantly, keep tasting as you go. You are well on your way to becoming the master of your own kitchen.
Get the Next Recipe
Weekly recipes, techniques, and gear picks — straight to your inbox.
