The Home Cook’s Guide to Fermentation Vessels: Mastering Temperature and Sanitation for Consistent Homemade Kimchi and Kraut
Fermentation is perhaps the most magical intersection of science and culinary art that a home cook can master. It transforms humble, inexpensive vegetables like cabbage, radishes, and carrots into complex, probiotic-rich powerhouses that elevate any meal from mundane to extraordinary. While many beginners are intimidated by the prospect of "spoiling" food intentionally, the reality is that controlled fermentation is a rigorous process of preservation that has sustained human civilization for millennia. By mastering the environment in which your ferments thrive, you move beyond mere recipe-following and begin to understand the biological dialogue between salt, temperature, and microbial life. This guide is designed to strip away the mystery surrounding your equipment so you can focus on the alchemy of flavor.
When we talk about "Blame The Chef," we often mean that the result is only as good as the technique applied, and in the world of ferments, your vessel is your most vital tool. Whether you are aiming for the effervescent crunch of a traditional Napa Cabbage Kimchi or the sour, lactic punch of a classic German Sauerkraut, the container you choose acts as the shield against spoilage. We aren’t just throwing vegetables into a jar; we are creating a micro-ecosystem that requires specific environmental inputs to flourish. Understanding the interplay between air, surface area, and thermal stability will save you from the heartbreak of a soft, moldy batch and ensure that your refrigerator is always stocked with healthy, tangy ferments.
Preparation is the secret weapon of the professional kitchen, and that principle applies tenfold to the home fermentation station. Before a single cabbage leaf is chopped, you must consider the ergonomics of your workspace, the cleanliness of your implements, and the specific needs of your chosen bacteria. Lacto-fermentation relies on Lactobacillus—a genus of beneficial bacteria that thrives in anaerobic, saline environments. If you ignore the basics of sanitation or fail to account for ambient temperature swings, you aren’t just making kraut; you’re playing Russian roulette with your produce. Let’s dive deep into the mechanics of these vessels and the methods that turn home cooks into masters of the crock.
The Evolution of the Fermentation Vessel
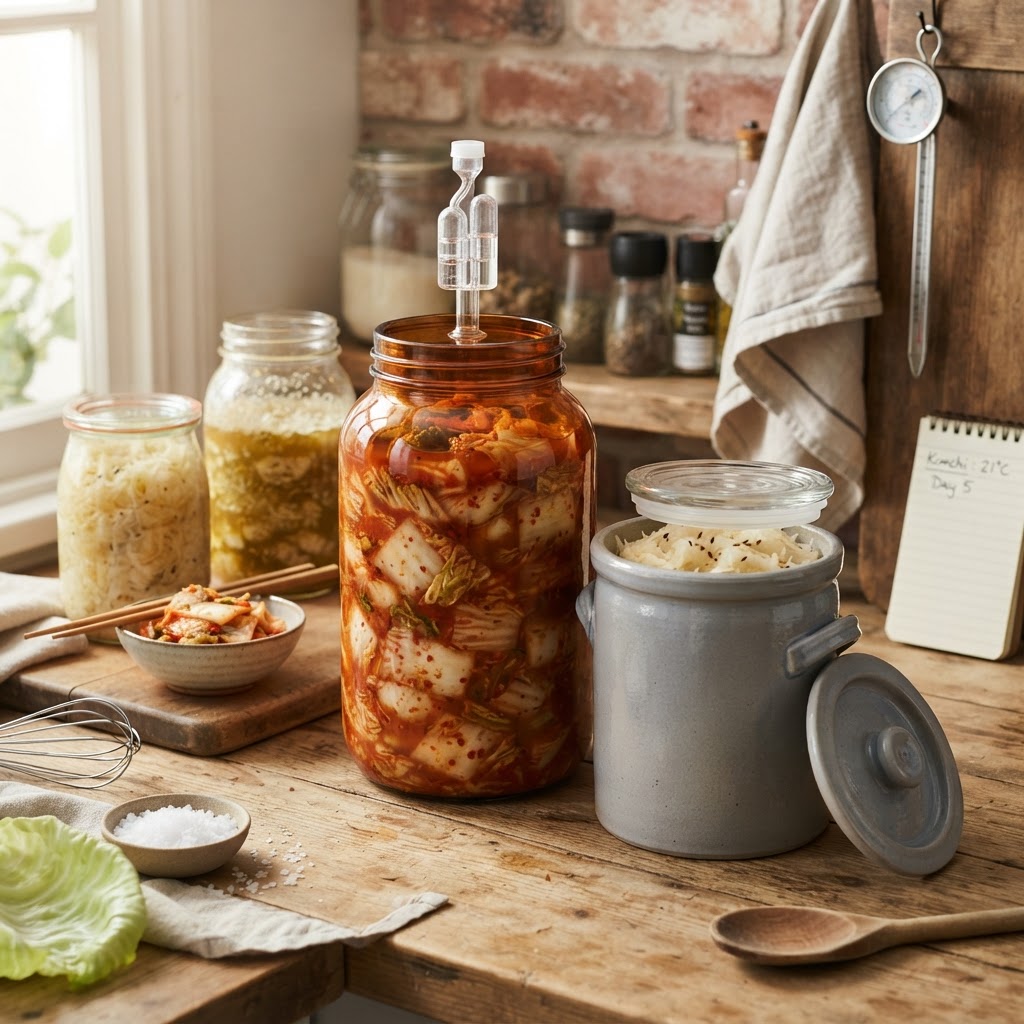
The history of fermentation is the history of the ceramic crock, a vessel engineered for thermal mass and light exclusion. Traditional stoneware crocks have been used for centuries because they are heavy, opaque, and naturally porous, allowing for a slight, steady exchange of gases. When selecting a vessel, the weight of the material is not just a matter of durability; it is a matter of thermal stability. A heavy ceramic vessel will hold a consistent temperature better than a thin-walled glass jar, protecting your ferment from the rapid fluctuations in temperature that often occur in a kitchen during the shift between day and night.
Choosing Between Glass and Ceramic
While I often suggest glass for beginners because it allows you to visualize the fermentation process—watching the bubbles rise is half the fun—professional chefs often prefer ceramic for long-term aging. Glass is non-porous and easy to sanitize, making it the safest bet for those new to the craft who need to spot potential surface mold immediately. However, ceramic is superior for "dark aging," which is essential for certain kimchi styles that require a deeper, more mellow profile. If you use glass, ensure it is stored away from direct sunlight, as UV rays can degrade the delicate vitamin profile of your vegetables and cause unwanted temperature spikes.
The Importance of Surface Area
One common mistake home cooks make is using a vessel that is too large for the amount of produce being fermented. If your vessel is too wide, the surface area of the brine becomes a liability. A large surface area increases the chances of unwanted aerobic yeast, such as Kahm yeast, forming a film on top of your ferment. You want to choose a vessel that allows the vegetables to be fully submerged by their own juices without leaving excessive headspace at the top. A tight, narrow neck on a jar or a properly weighted crock is your best defense against oxygen exposure.
The secret to a perfect kraut isn't just the cabbage—it's the patience to let the brine do the work while the vessel shields the colony from the chaotic outside air.
Mastering Temperature Control for Microbial Success
Temperature is the invisible hand that guides your fermentation, and it is arguably the most common factor in batch failure. Lactobacillus bacteria are happiest in the "Goldilocks zone" of 65°F to 72°F (18°C to 22°C). If your kitchen is colder than this, the fermentation process will be sluggish, potentially allowing undesirable bacteria to gain a foothold before the acidity levels drop sufficiently. Conversely, if your kitchen is too hot, the fermentation will happen at a breakneck speed, leading to mushy, soft vegetables that lack the crisp snap we look for in a high-quality kraut.
The Impact of Ambient Heat
During the summer months, keep your vessels in the coolest part of the house, perhaps a basement or a pantry that does not receive direct sunlight. If you are struggling with high ambient temperatures, you can utilize a "water bath" technique: place your fermentation jar inside a larger bowl filled with cool water. This acts as a heat sink, insulating the ferment against rapid fluctuations. Conversely, in the winter, if your kitchen drops below 60°F, you may need to move your vessels to a warmer room, perhaps near an internal wall or inside an insulated cabinet, to keep the microbes active.
Monitoring with Precision
Do not guess the temperature of your ferment. A simple adhesive thermometer strip applied to the outside of your vessel provides instant, constant feedback. If you see the temperature spiking above 75°F, move the vessel immediately. Remember that the fermentation process itself is exothermic—it creates heat as the bacteria consume the sugars in the vegetables. In large-batch fermentations, the core of the crock can actually be several degrees warmer than the ambient room temperature. This is why smaller batches are often more consistent for the home cook.
Sanitation: The Non-Negotiable Foundation
In a professional kitchen, sanitation is not a suggestion; it is the bedrock of food safety. When we talk about sanitization in fermentation, we aren't talking about sterile surgical conditions, but rather the creation of a "hostile environment" for pathogens while encouraging the growth of beneficial bacteria. You must wash your hands, your cutting boards, and your knives with hot, soapy water before you even think about the produce. Avoid using bleach, as even microscopic residues can inhibit the growth of the very lactobacillus you are trying to cultivate.
The Boiling Water Rinse
Before you fill your vessel, perform a final, thorough rinse with boiling water. This will ensure that any lingering dust or microscopic contaminants are neutralized. Let your vessel air-dry on a clean rack—do not use a kitchen towel, as towels are notorious harbors for bacteria that can ruin a batch. If you are using glass jars, check the rims for any chips or cracks. A compromised seal is the entry point for fruit flies and mold spores, both of which will force you to discard your batch.
Managing Salt Ratios
Salt is not just for flavor; it is the primary safety mechanism in your fermentation vessel. It draws the water out of the vegetables through osmosis and creates the specific environment where lactobacillus dominates other, less desirable microbes. For most vegetable ferments, aim for a 2% to 3% salt ratio by weight. Weigh your vegetables, then multiply that weight by 0.02 or 0.03 to determine how much salt to add. Always use non-iodized sea salt or kosher salt; iodine can sometimes interfere with the fermentation process and alter the color of the vegetables.
Salt is the primary moderator of microbial speed; by drawing moisture out, it creates the essential brine that serves as the barrier between success and spoilage.
The Art of the Brine and Weighting
The most critical rule of fermentation is: Keep it submerged. Oxygen is the enemy of the lactic acid bacteria you want. If a piece of cabbage or a slice of radish floats to the surface and is exposed to air, it will quickly develop fuzzy, colored mold. This is why weighting your vegetables is not an option; it is a necessity. Use glass weights, clean stones (boiled for 10 minutes), or a heavy cabbage leaf tucked under the shoulder of the jar to ensure everything stays pinned beneath the brine.
Achieving the Perfect Brine
If your cabbage or vegetables are not producing enough liquid after you have salted them and massaged them, do not panic. Simply create a supplemental brine by dissolving 1 tablespoon of salt into 2 cups of filtered, non-chlorinated water. Pour enough over your vegetables to fully cover them, leaving at least an inch of headspace at the top of the container. Chlorine in tap water can hinder the fermentation process, so use filtered or spring water whenever possible.
The Role of Weights and Followers
Glass Weights:* These are ideal because they are easy to clean and don't impart any flavor to the vegetables.
Ceramic Weights:* Often used with traditional crocks; ensure they are lead-free.
The "Leaf" Method:* If you have no weights, reserve the thick outer leaves of your cabbage, fold them into a small square, and wedge them tightly across the surface of the shredded vegetables to keep them submerged.
Followers:* A smaller glass jar or a food-safe silicone disk can also act as a follower to ensure everything stays down.
Understanding Gas Exchange: The Airlock Debate
Every active ferment creates carbon dioxide as a byproduct. In the old days, our ancestors used crocks with "water troughs" that allowed this gas to escape while preventing outside air from entering. Today, the home cook has access to airlock lids that achieve this same goal with much greater ease. These lids are highly recommended because they allow the gas to bubble out without requiring you to "burp" the jar manually. If you are using a standard canning lid, you must commit to a daily ritual of loosening the cap to release pressure; if you forget, the pressure buildup can result in a messy explosion of brine.
Why Airlocks Win
Airlocks offer the advantage of "set it and forget it." By maintaining a one-way valve, they ensure that the atmosphere inside your jar remains strictly anaerobic, which is the only way to ensure the specific, sour, and crisp texture of a true fermented product. With a standard lid, every time you open it to "burp" the jar, you introduce oxygen back into the environment, increasing the risk of mold. For those committed to the craft, investing in a few high-quality fermentation lids is a small cost for a massive improvement in consistency.
When to "Burp"
If you are using a basic jar without an airlock, you must be disciplined. Burping involves turning the lid just enough to hear the hiss of gas escaping, then immediately tightening it back down. Do this once a day, preferably at the same time. If you notice the jar lid bulging, you are already overdue. This is a sign that your fermentation is very active, and you should consider moving the vessel to a cooler spot for a day to slow down the metabolism of the bacteria.
Monitoring the Stages of Fermentation
A ferment is a living thing, and it goes through distinct phases. The first phase, which lasts for about 48 hours, is the initiation phase, where the salt draws the juices out and the lactobacillus begins to overtake the existing plant bacteria. During this phase, you may notice that the brine looks cloudy or even a bit murky—this is completely normal. The second phase is the active fermentation phase, where the bubbles are most pronounced and the brine becomes increasingly acidic. This is when the flavor profile is being "written" by the microbes.
Signs of Success
Your nose is your best friend during these phases. A healthy ferment will have a clean, sharp, slightly sour smell. It should remind you of the tang of a good pickle or yogurt. If you smell anything rotten, putrid, or intensely funky like a wet gym sock, you have likely had a contamination event. In that case, do not hesitate; discard the batch and start over. Fermentation is safe, but it is not a place for gambling—when in doubt, throw it out.
Recognizing Spoilage
Fuzzy Mold:* If you see any fuzzy growth (white, blue, or green), it is mold. Toss it.
Sliminess:* If the vegetables themselves have turned into a soft, slippery slime, the bacteria have not succeeded in lowering the pH quickly enough. This can happen if the temperature was too high or the salt ratio was too low.
Off-Odors:* Any smell of rot or decay is an immediate indicator of bad bacteria colonization.
Kahm Yeast:* A thin, white, powdery film on the surface is likely Kahm yeast. While not strictly dangerous, it can ruin the flavor. Skim it off, ensure your brine is covering everything, and check your salt levels.
The professional chef knows that the ferment is not finished until the pH has dropped into the safe zone; this is the point where the food becomes not just delicious, but preserved.
Final Thoughts
Mastering the art of fermentation is a journey that rewards the patient, the observant, and the meticulous. By taking control of your vessels, your temperatures, and your sanitation practices, you are doing more than just saving money on groceries—you are engaging in a culinary tradition that connects you to the natural world. Don't be discouraged by the occasional failed batch; even in the best professional kitchens, fermentation can be unpredictable. What separates the home cook from the master is the willingness to analyze what went wrong, adjust the variables, and start the next batch with renewed confidence.
As you become more comfortable with these basics, I encourage you to experiment with aromatics. Add ginger, garlic, chili flakes, or even apples to your krauts. The principles of the vessel remain the same, but the flavor possibilities are endless. Remember to keep your environment cool, your hands clean, and your salt ratio precise. When you pull that first crisp, tangy forkful of homemade kimchi from the jar six weeks from now, you will taste the difference that technique makes. You aren't just eating vegetables; you are eating the byproduct of a successful, healthy, and controlled biological process.
Enjoy the process, embrace the tang, and always remember that when your kraut turns out perfectly, you deserve the credit—but when it doesn't, you can always blame the chef. Happy fermenting, and may your jars always bubble with activity. By integrating these practices into your regular routine, you will soon find that you can no longer tolerate store-bought versions of these items. Your palate will have been permanently elevated, and you will have achieved a level of culinary independence that is truly satisfying. Keep experimenting, keep tasting, and keep mastering the vessel. Your kitchen is now a laboratory, and your pantry is about to become the most interesting place in your home.


Get the Next Recipe
Weekly recipes, techniques, and gear picks — straight to your inbox.
