The Home Cook’s Guide to Ice-Bath Blanching: Mastering Rapid Cooling Techniques for Vibrant Color and Crisp Texture in Summer Vegetables
There is a specific kind of heartbreak that occurs when you drop a handful of vibrant, emerald-green asparagus into a pot of boiling water, only to pull it out five minutes later to find a pile of limp, olive-drab stalks. As home cooks, we are often taught the basic mechanics of cooking—boil this, sear that, roast the other—but we rarely focus on the precise, scientific transitions that occur during the cooling phase. The technique of ice-bath blanching is the professional kitchen’s secret weapon for preserving the integrity of seasonal produce. It is not merely a task of convenience; it is a thermal management strategy that halts the cooking process the very millisecond your vegetables reach the "al dente" sweet spot. When you master the art of the shock, you effectively lock in the pigment, the crunch, and the nutritional density of your harvest, turning a humble side dish into a restaurant-quality centerpiece.
For many, the idea of preparing an ice bath feels like an unnecessary extra step, an annoyance that creates another bowl to wash. However, consider the chemistry involved: vegetables continue to cook through residual heat long after they leave the boiling water. If you simply drain your green beans and set them on a plate, the interior heat continues to break down the cellular walls, turning that crisp snap into a mushy disappointment. By plunging these items into a sub-zero environment, you immediately stop the enzymatic activity responsible for discoloration and softening. It is the culinary equivalent of hitting the pause button on time itself, allowing you to manipulate the texture of your produce with the precision of a chemist.
In this guide, we are going to move beyond the basics of boiling water and explore the professional-grade methodology of thermal shocking. Whether you are prepping for a large summer gathering, packing lunches for the week, or simply trying to elevate your Tuesday night dinner, this technique will transform your vegetable game. We will delve into the physics of water displacement, the ideal salt-to-water ratios for seasoning, and the subtle nuances of timing that separate an amateur effort from a professional-grade preparation. Prepare to look at your vegetable crisper with new eyes, because once you learn to master the chill, you will never settle for "overcooked" again.
The Science of the Blanch and the Shock
At its core, blanching is a two-part process consisting of a brief immersion in boiling liquid followed by an immediate submersion in ice-cold water. The initial heat is essential for destroying surface bacteria, brightening the color by expelling air from the intercellular spaces, and softening the tough fibers of the vegetable. However, it is the shock that is the true hero of this technique. Without the cold water, your vegetables are simply undergoing a slow, uncontrolled steam-cooking process that will inevitably lead to flavor loss and textural degradation.
Understanding Enzymatic Activity
When you drop a vegetable into boiling water, you are denaturing enzymes that cause browning and loss of flavor. If you do not cool the vegetable quickly enough, these enzymes can reactivate or allow the residual heat to finish the degradation process. The ice bath acts as a rapid thermal conductor, pulling heat away from the core of the vegetable faster than air cooling ever could. This preserves the chlorophyll, which is why a properly blanched piece of broccoli retains that vivid, neon-green hue rather than fading into a dull, brownish-gray.
The Role of Salt and Water Volume
Professional chefs will tell you that your blanching water should taste like the sea. Salt does more than flavor the food; it raises the boiling point of the water, which allows for a more efficient transfer of heat, and it helps maintain the cellular structure of the vegetables through osmotic pressure. You should aim for a high water-to-vegetable ratio—at least 4:1—to ensure that the temperature of the water does not drop significantly when you add the cold vegetables. If you crowd the pot, the water temperature will plummet, and you will end up boiling your produce for too long, losing the very crispness you are trying to preserve.
"The difference between a home-cooked vegetable and a chef-prepped vegetable is almost always found in the cooling process. Never underestimate the power of a proper ice bath to preserve the life of your ingredients."
Preparing the Perfect Ice Bath
A common mistake made by novices is underestimating the volume of ice required to properly shock a batch of vegetables. An ice bath is not just cold water; it is a slurry of ice and water that remains at or near 32°F (0°C). If you have more water than ice, the heat from the hot vegetables will melt the ice cubes instantly, and you will be left with a lukewarm bath that fails to shock the produce effectively.
The Ice-to-Water Ratio
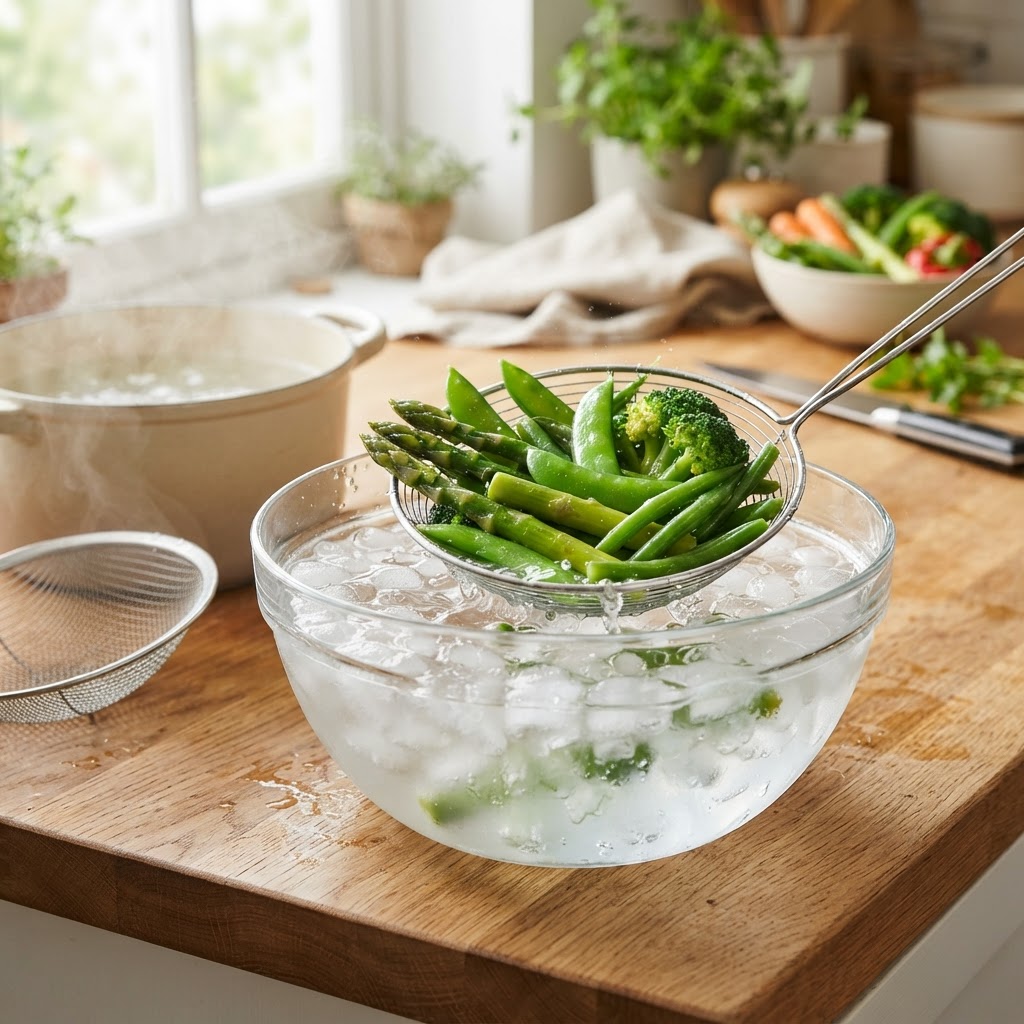
You want your vessel to be at least 50% ice by volume. I recommend using a large mixing bowl or even a clean kitchen sink if you are working with large quantities. Begin by filling your vessel halfway with ice, then add just enough cold water to create a slurry. If you can see through the water to the bottom of the bowl, you do not have enough ice. As you add the hot vegetables, the ice will melt; be prepared to replenish the ice if you are working in multiple batches.
Managing Temperature Drift
During the process of shocking, the water temperature will naturally rise. You must monitor this closely. If the water begins to feel tepid to the touch, your vegetables are still slowly cooking. Professional chefs will often use a slotted spoon or a fine-mesh spider to transfer the vegetables, ensuring that they can move quickly from the pot to the bath. Never dump the contents of the pot into a colander and then try to transfer them; the time spent in the air allows for significant carry-over cooking. Use the spider to lift them directly from the boil into the ice.
Mastering Timing for Specific Vegetables
Not all vegetables are created equal. The duration of your blanch depends entirely on the thickness, density, and cellular structure of the plant matter. A thin snow pea will require significantly less time than a dense carrot slice or a thick stalk of asparagus. Mastering the timing is an intuitive process, but it begins with a clear understanding of your benchmarks.
Categorizing Your Produce
Leafy Greens:* Spinach, chard, and kale require very little time, usually 30 to 60 seconds. Because their cell walls are thin, they wilt almost instantly in boiling water.
Sturdy Cruciferous Vegetables:* Broccoli florets and cauliflower require 2 to 3 minutes. You are looking for a tender stem that still offers a slight resistance when bitten.
Legumes and Pods:* Green beans and sugar snap peas need 3 to 4 minutes. These vegetables benefit from the "snap" test—if it is limp, you have gone too far.
Root Vegetables:* Carrots and parsnips require the most time, often 4 to 5 minutes, depending on the thickness of your cut.
The "Test Bite" Method
There is no shame in tasting your product. Before you pull the entire batch, take one piece and move it to the ice bath for 10 seconds. Eat it. If it is still too raw or woody, give the pot another 30 seconds. If it is already starting to lose its structural integrity, you need to pull it immediately. This trial-and-error approach is how every line cook learns the specific characteristics of the produce they are handling that day.
The Importance of Thorough Drying
Once your vegetables have been thoroughly shocked, you might be tempted to move them directly to a salad or a hot pan. However, the presence of excess surface water is the enemy of texture and seasoning. If you are planning to sauté these vegetables later, the residual water will cause them to steam in the pan instead of searing, leading to that same mushy result we have worked so hard to avoid.
Utilizing Kitchen Towels
After the ice bath, transfer the vegetables to a clean, dry lint-free kitchen towel. Gently pat them dry. Do not skip this step. Removing the surface moisture allows for the Maillard reaction to occur if you choose to finish your vegetables in a hot pan with butter or oil later. If the vegetables are wet, the pan temperature drops, and the moisture release prevents any browning or caramelizing from happening.
Proper Storage Techniques
If you are blanching in advance for a dinner party, once the vegetables are dry, store them in an airtight container lined with a dry paper towel. This will absorb any lingering moisture and keep the vegetables crisp for up to 48 hours. When you are ready to serve, you can toss them into a high-heat pan with aromatics, or simply warm them through in a gentle steam. Because the blanching is already done, you only need to bring them up to serving temperature, keeping their color and texture perfectly intact.
"The blanching process is not about cooking the vegetable through; it is about setting the color and texture so that the final dish is a vibrant, crisp, and fresh representation of the ingredient's natural state."
Advanced Applications of Blanching
Once you have conquered basic vegetable blanching, you can apply this technique to more complex culinary projects. It is a fundamental tool for preserving the harvest in late summer, preparing ingredients for frozen storage, and even refining the flavor profile of potent ingredients like garlic or onions.
Preserving for the Freezer
If you have an abundance of summer zucchini or garden peas, blanching is the only way to ensure they taste good after a stint in the freezer. Enzymes continue to function even at sub-zero temperatures, causing "off" flavors and textural degradation over time. By blanching and shocking, you halt these enzymes permanently. Simply blanch, shock, dry, and lay them on a parchment-lined baking sheet to freeze individually (this is called IQF, or Individually Quick Frozen) before bagging them.
Mellowing Strong Flavors
Have you ever used raw onion or garlic in a recipe only to find it completely overpowers the dish? A quick 30-second blanch can take the "bite" out of red onions or garlic cloves without turning them into mush. By dropping them into boiling water and then immediately shocking them, you leach out the harshest sulfur compounds while maintaining a satisfying crunch. It is a brilliant way to make raw salads more palatable and balanced.
Common Pitfalls and How to Fix Them
Even experienced home cooks encounter issues with the blanching process. The most common problems are usually related to the temperature of the water or the speed of the transition from heat to cold. Let’s diagnose these issues so you can avoid them in your own kitchen.
The "Grey Green" Phenomenon
If your greens turn an unappealing olive-drab, you have likely either under-salted your water or allowed them to sit in the boiling water for too long. Chlorophyll is heat-sensitive; overcooking releases natural acids from the vegetable, which react with the chlorophyll and degrade it into pheophytin, the compound responsible for that dull color. Keep your timing tight and ensure your ice bath is ready before the vegetables hit the water.
The Soggy Finish
If your vegetables are limp immediately after coming out of the ice bath, your boiling water was likely not at a full, rolling boil when you dropped them in, or you left them in too long. Always bring your water to a vigorous, rapid boil before adding your ingredients. This ensures that the water temperature doesn't drop too far, and the quick blast of intense heat seals the exterior of the vegetable before the center can become waterlogged.
Expanding Your Culinary Repertoire
Once you begin utilizing this technique regularly, you will find that it unlocks a new level of culinary confidence. It is a method that demands attention to detail, but rewards the cook with results that look and taste as though they came straight out of a professional line. Whether you are blanching delicate herbs for a vibrant pesto, par-boiling potatoes for the perfect roast, or shock-chilling summer asparagus for a cold salad, you are practicing the fundamentals of high-end cooking.
The Texture Paradigm
In modern cooking, texture is just as important as flavor. A dish that is uniformly mushy is boring, regardless of how well-seasoned it is. By incorporating blanched vegetables into your meals, you provide a necessary contrast to softer elements like grains, beans, or proteins. That snap you achieve through ice-bath blanching provides a "pop" of freshness that elevates the entire dining experience, making it feel lighter and more intentional.
Efficiency in the Kitchen
Finally, blanching is a boon for the busy host. When you have a dinner party planned, the stress of cooking everything at the last minute is immense. By blanching your vegetables earlier in the day, you remove the most time-consuming part of the vegetable preparation. When guests arrive, you simply need to finish the produce with a quick sear, a toss in vinaigrette, or a brief steam. It changes your kitchen from a site of panic to a site of graceful preparation.
"True culinary mastery isn't found in complicated recipes or exotic ingredients; it is found in the discipline of perfecting the basics, like how we treat our vegetables from the pot to the plate."
Final Thoughts
The art of ice-bath blanching is a testament to the fact that simple techniques often yield the most impressive results. It is the bridge between a home-cooked meal that feels a bit tired and one that radiates vitality, color, and professional precision. By taking the extra few minutes to prepare a proper ice slurry, by being militant about your boiling times, and by respecting the necessity of immediate cooling, you are engaging in the same workflow that feeds diners in the best restaurants in the world.
As you continue your journey in the kitchen, remember that every detail matters. The way you handle your heat, the way you use your salt, and the way you manage the cooling process are all reflections of your growth as a chef. Don't be afraid to experiment with different varieties of vegetables, from delicate spring peas to robust autumnal carrots. Keep a close eye on your clock, keep your ice bucket full, and trust the process. You will soon find that the vibrant, crisp vegetables you produce become a staple of your cooking, earning you the reputation of a cook who truly understands the science of flavor and texture.
Remember, "Blame The Chef" is about taking ownership of your kitchen environment. When you master these techniques, you are no longer just following a recipe; you are understanding the why behind the how. You are controlling the chemistry of your food, and in doing so, you are ensuring that every bite you serve is the very best version of itself. So, pick up those tongs, get that water boiling, and prepare to master the chill. Your future salads, sides, and stir-frys will thank you. Keep practicing, keep tasting, and above all, enjoy the process of turning fresh, seasonal bounty into something truly extraordinary.

Get the Next Recipe
Weekly recipes, techniques, and gear picks — straight to your inbox.
