The Home Cook’s Guide to Pan-Deglazing: How to Turn Leftover Browned Bits into Restaurant-Quality Pan Sauces
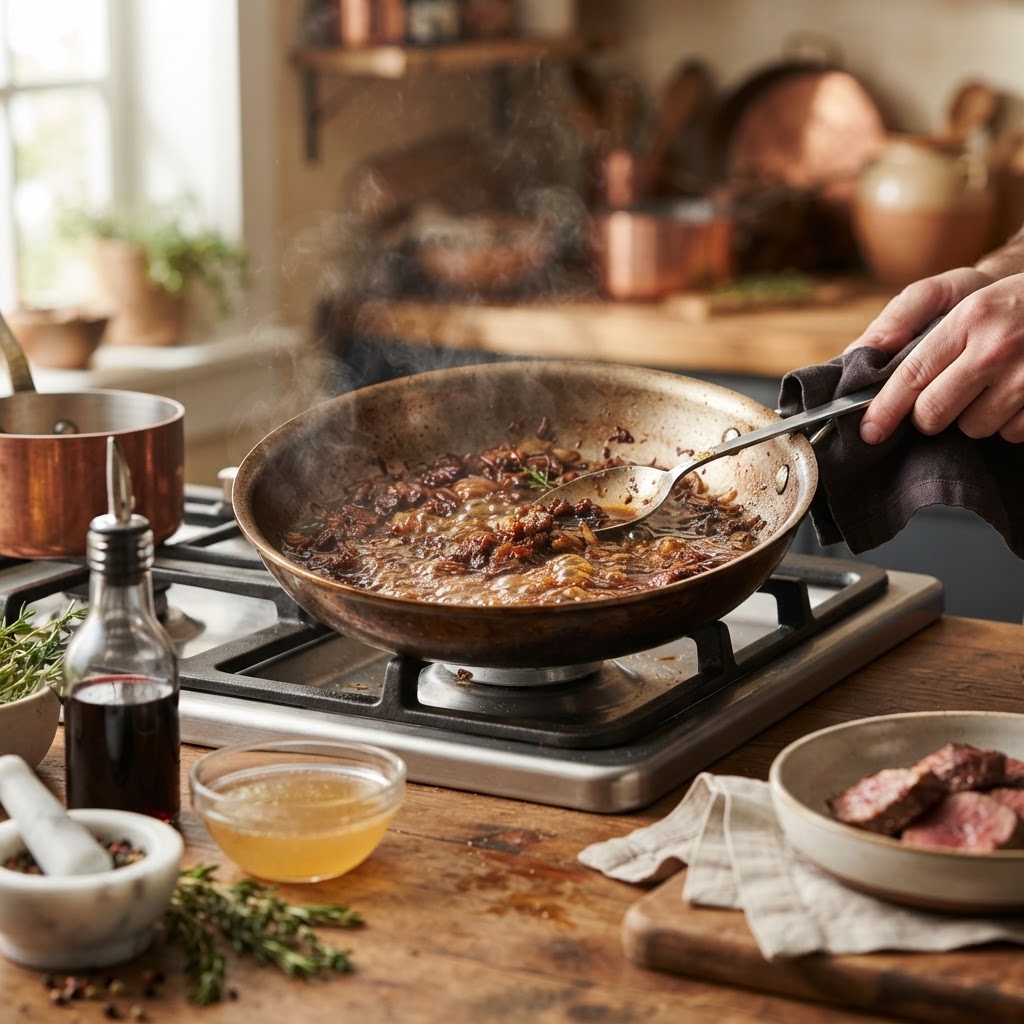
If you have ever stared at the bottom of your skillet after searing a steak or pan-roasting chicken, you might see a dark, crusty residue and assume it is something to be scrubbed away. To the untrained eye, those stubborn, stuck-on bits look like a cleaning problem, but to a seasoned chef, they are actually the most valuable component of your entire meal. This material is known as fond, a French term that translates literally to "bottom" or "foundation," and it represents the concentrated essence of everything you just cooked. By mastering the art of pan-deglazing, you can transform these overlooked remnants into a silky, flavor-packed sauce that rivals anything found in a five-star dining room. It is the single most effective way to elevate a home-cooked dinner from merely functional to truly extraordinary.
Learning to deglaze is a rite of passage for every home cook, yet it is often surrounded by unnecessary intimidation and mystery. Many people fear they will burn their pan or create a chaotic mess, but the technique is actually quite forgiving once you understand the basic mechanics of how proteins and acids interact. You are essentially using a liquid to dissolve the caramelized sugars, proteins, and aromatic compounds that have bonded to the metal surface of your pan during the searing process. When done correctly, this technique lifts the flavor off the metal, emulsifies with your cooking fats, and creates a glossy, cohesive sauce that adds moisture and depth to your dish. It is a fundamental skill that bridges the gap between following a recipe and understanding how to build layers of flavor from scratch.
This guide is designed to strip away the pretense and provide you with a reliable, repeatable method for creating pan sauces every time you fire up your stove. We will explore the science behind the Maillard reaction, discuss the best liquids to use for different types of proteins, and troubleshoot common issues like broken emulsions or over-salted reductions. Once you get comfortable with the process, you will find that you no longer need heavy, flour-thickened gravies or bottled condiments to finish your meat. Instead, you will have the confidence to look at your pan—no matter how messy it might look—and see the beginning of a masterpiece. Let us stop blaming the chef for kitchen mishaps and start celebrating the techniques that define professional-grade home cooking.
Understanding the Chemistry of Fond
The foundation of every great pan sauce starts long before the deglazing liquid hits the metal. It begins with the Maillard reaction, a complex chemical reaction between amino acids and reducing sugars that occurs when food is browned at temperatures typically between 280°F and 330°F (140°C to 165°C). This process is responsible for the deep, savory, and complex flavors that develop in seared meats, roasted vegetables, and sautéed aromatics. When you sear a protein, the juices evaporate, leaving behind these concentrated flavor molecules that weld themselves to the pan. If the pan is too cool, the food will steam rather than sear, failing to produce the necessary fond; if it is too hot, the sugars will burn, turning the fond bitter and acrid.
The Role of Surface Material
The type of pan you use significantly impacts how much fond is produced and how easily it can be deglazed. Stainless steel is the gold standard for pan sauces because it allows for excellent browning and creates a very reliable fond. Cast iron also works beautifully, though it can sometimes be more porous, requiring a bit more liquid to lift the bits effectively. Avoid using non-stick pans if your primary goal is to create a pan sauce, as the surface is designed specifically to prevent food from sticking, which inherently inhibits the formation of a robust fond.
Monitoring Your Heat
To achieve the perfect foundation, always ensure your pan is preheated before adding your cooking fat. Add your protein, and most importantly, resist the urge to move it until it releases naturally from the pan. This indicates that the browning process has occurred and the fond is forming. If you try to flip a steak too early, it will pull apart, leaving messy shreds in the pan rather than a clean, concentrated layer of flavor.
"The fond is not burnt debris; it is the liquid gold of the culinary world, holding all the savory complexity of your protein in a single, dehydrated layer of potential."
Selecting Your Deglazing Liquid
Once your protein is finished and set aside to rest, you are ready to introduce the deglazing liquid. This is the moment of truth where the transformation happens. You want to select a liquid that complements the flavor profile of the protein you cooked while providing enough acidity to balance the richness of the fats remaining in the pan. The most common deglazing liquids include dry white or red wines, vinegars, stocks, fruit juices, or even fortified spirits like brandy or cognac.
Why Alcohol Works
Alcohol is a superior deglazing agent because it is an excellent solvent for flavor compounds that are not water-soluble. When you add a splash of wine to a hot pan, the alcohol evaporates quickly, leaving behind the acidity and the concentrated essence of the grapes. This provides a brightness that cuts through the fat of a seared steak or a pan-roasted pork chop, preventing the final sauce from feeling too heavy or greasy on the palate.
The Rule of Ratios
A good starting point for a pan sauce is about 1/2 cup of liquid for every two servings of meat. However, this is flexible depending on how much fond you have created and how much reduction you plan to do. If you are using a concentrated chicken or beef stock, start with a smaller amount, as these often contain more sodium than wines. You never want your sauce to become a salt bomb, so always use unsalted stocks when possible, allowing you to control the final seasoning at the very end of the process.
The Art of the Reduction
Deglazing is merely the act of lifting the fond; reduction is the process that turns that liquid into a sauce. Once your liquid has hit the hot pan—creating a vigorous hiss and steam—you should immediately grab a wooden spoon or a high-heat silicone spatula. Gently scrape the bottom of the pan, working around the edges and center to ensure every last bit of fond is incorporated into the liquid. This is where the color and depth of your sauce will emerge.
Achieving the Perfect Consistency
After scraping, turn the heat to medium-high and let the liquid bubble away until it has reduced by at least half. As the water content evaporates, the remaining sugars and proteins will concentrate, naturally thickening the sauce. You are looking for a consistency that coats the back of a spoon—a texture often called nappe in professional kitchens. If the sauce becomes too thin, keep reducing; if it becomes too thick or syrupy, simply add a splash of water or more stock to loosen it up.
Temperature and Timing
Keep a close eye on the pan during the reduction phase. Because the liquid is full of sugars from the fond, it can go from perfectly reduced to burnt very quickly. Maintain a steady simmer rather than a violent boil to ensure the sauce stays emulsified and does not break. If you see the sauce separating or looking oily, whisk in a tablespoon of cold water or even an ice cube, which can help force the emulsion back together.
The Final Polish: Mounting with Butter
This is the secret that separates restaurant cooking from home cooking. Once your sauce has reached the desired consistency and depth of flavor, take the pan off the heat entirely. To give the sauce a professional, glossy finish and a luxurious mouthfeel, we use a technique called monter au beurre, or mounting with butter. Add one or two tablespoons of cold, cubed, unsalted butter into the warm sauce and whisk vigorously until it is fully incorporated.
Why Cold Butter Matters
Using cold butter is critical because it emulsifies into the liquid without melting too quickly, which would cause the milk solids to separate and turn the sauce into a greasy mess. By whisking the cold butter into the tempered sauce, you create a stable, velvety emulsion that clings to your meat beautifully. This finishing step also softens the sharp edges of the acidic wine or vinegar, creating a perfectly balanced final product.
Adjusting the Seasoning
Before you pour the sauce over your dish, take a small spoon and taste it. This is your last chance to adjust the flavor. You might find that it needs a pinch of kosher salt, a crack of freshly ground black pepper, or perhaps a tiny squeeze of lemon juice to perk it up. Do not skip the tasting step; it is the hallmark of a cook who cares about the final outcome.
"A sauce is not a secondary thought; it is the bridge that connects the texture of the protein to the richness of the garnish, tying the entire plate together with a single, harmonious note."
Common Pitfalls and How to Fix Them
Even experienced chefs occasionally run into trouble when making pan sauces. One of the most common issues is over-salting. This usually happens because the liquid you used was too salty, or because you allowed the sauce to reduce too much, concentrating the salt content significantly. If your sauce is too salty, you can try to mellow it out by whisking in a small amount of heavy cream or adding a touch of unsalted butter. In some cases, a small amount of honey or maple syrup can help counteract excessive saltiness, provided it doesn't clash with the savory elements of the dish.
Dealing with Burnt Fond
If you accidentally let your fond burn during the searing process, it is best to wipe the pan clean and start over. Burnt fond tastes bitter and will ruin the entire sauce, regardless of how high-quality your wine or stock is. To avoid this, keep an eye on your heat levels; if the pan starts to smoke excessively, pull it off the heat immediately. You want a deep mahogany brown, not black.
Broken Sauces
If your sauce looks broken or "split," it means the fat and liquid have separated. This often happens if the pan was too hot when you added the butter or if you tried to add too much fat at once. To fix it, remove the pan from the heat and whisk in a teaspoon of room-temperature water or a splash of heavy cream. Start whisking slowly, incorporating the liquid in a steady stream until the sauce comes back together into a smooth, emulsified state.
Scaling Up for Dinner Parties
When you are cooking for a crowd, the logistics of pan-deglazing can become more challenging. You cannot easily deglaze a giant roasting pan in the same way you would a small skillet, but the principles remain the same. If you are cooking for six or eight people, consider searing your proteins in batches or using multiple pans. If you must use a large roasting pan, place it directly over two burners on your stove. The wider surface area will require more liquid to deglaze effectively, so be prepared to have extra stock on hand.
Preparing Components in Advance
If you are worried about the timing, you can prepare a gastrique or a flavor-base ahead of time. A gastrique is a sweet-and-sour reduction made of vinegar and sugar that can be added to your pan juices to instantly boost the flavor profile. By having your aromatics—like minced shallots, garlic, or fresh herbs—prepped and ready to toss into the pan the moment the meat comes out, you can make a restaurant-quality sauce in under three minutes, even while your guests are waiting.
The Importance of Resting
Never, ever pour the pan sauce over the meat until the meat has finished resting. The proteins need time to relax and reabsorb their juices. If you pour a hot, acidic sauce over a fresh-off-the-heat steak, it can cause the meat to toughen prematurely. Plate your protein, allow it to rest for at least five to ten minutes, and spoon the sauce over it at the very last second just before serving.
Beyond the Basics: Infusing Complexity
Once you have mastered the standard pan sauce, you can start experimenting with aromatics to build more complex flavor profiles. Adding finely minced shallots or garlic to the pan immediately after removing the protein (but before adding the deglazing liquid) adds a layer of savory sweetness that is hard to replicate otherwise. Simply sauté the aromatics for about 30 seconds until they are fragrant, then proceed with your liquid.
Fresh Herbs and Aromatics
Incorporating fresh herbs like thyme, rosemary, or parsley at the end of the reduction process provides a fresh, vibrant lift to your sauce. You can also experiment with woody spices like whole peppercorns, crushed juniper berries, or even a star anise if you are working with pork or duck. These ingredients infuse the sauce during the reduction stage, creating a depth that surprises and delights the palate.
Creative Deglazing Liquids
While wine and stock are the go-to choices, do not be afraid to explore other options. Apple cider is fantastic for pork dishes, particularly when paired with a bit of mustard. Port wine creates a rich, syrupy finish that works beautifully with game meats like venison or duck. Even a splash of soy sauce or Worcestershire can provide an umami boost that takes a standard pan sauce to an entirely new level.
"The difference between a home-cooked meal and a professional dish often comes down to these final moments of finishing, where the cook takes control of the elements and balances them into a cohesive whole."
Final Thoughts
Mastering the art of pan-deglazing is not about being a perfect chef; it is about respecting the ingredients and understanding the process. By viewing those browned bits as the starting point rather than the end, you unlock a world of culinary possibilities that make the kitchen a more creative and satisfying space. There is a profound sense of accomplishment that comes from watching a few drops of wine and some stuck-on bits turn into a shimmering, professional-grade sauce. It teaches you to pay attention to your pan, to smell the development of flavors, and to trust your instincts when it comes to seasoning and reduction.
Do not be discouraged if your first few attempts do not turn out exactly like the sauces you find in restaurants. Cooking is a skill that develops over time, and every pan you deglaze provides more data on how heat, acidity, and fat work together. Start with simple combinations—a steak with a red wine reduction, or chicken with a bit of white wine and herbs—and observe how the sauce changes as you adjust the heat and the liquids. Once you have built this core competency, you will find that you no longer need complex recipes to create something delicious.
Blame the chef? Never. Own the kitchen. By taking ownership of these foundational techniques, you transform your role from someone who follows instructions to someone who truly crafts a meal. The next time you find yourself with a pan full of dark bits after searing a chop or a filet, remember that you are holding the foundation of your next great sauce. Grab your wooden spoon, pour a little liquid into the heat, and watch the magic happen. It is time to elevate your home cooking, one pan sauce at a time, and enjoy the fruits of your own culinary expertise. This process is the ultimate tool in your arsenal, proving that the best flavors are often the ones we have been looking at all along. Keep experimenting, keep tasting, and most importantly, keep cooking with confidence. Your kitchen is the only place you need to be to create something spectacular.
Get the Next Recipe
Weekly recipes, techniques, and gear picks — straight to your inbox.
