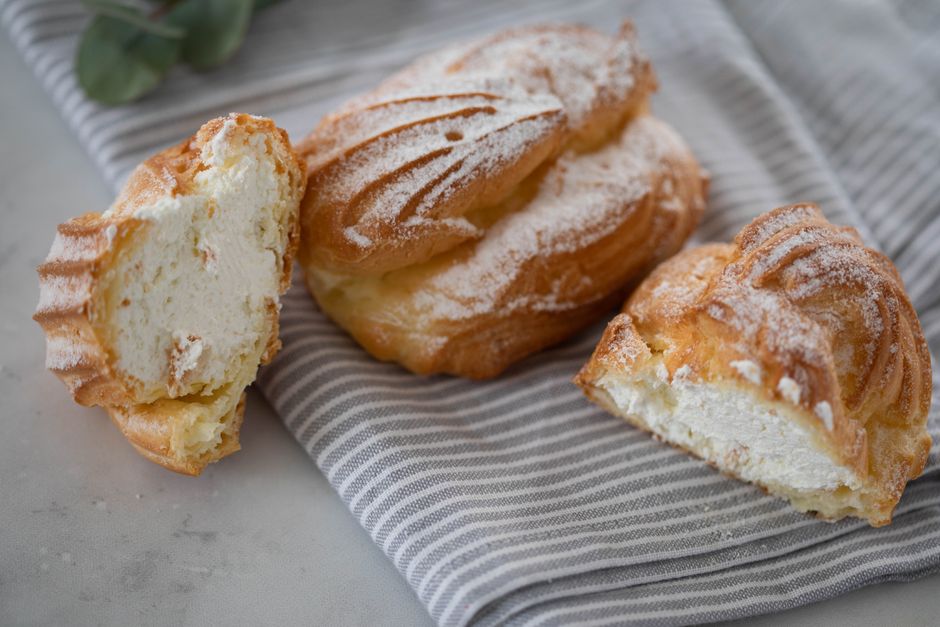
The Home Cook's Guide to Pate a Choux: Mastering Cream Puffs, Eclairs, and Gougeres
There is something inherently magical about the way a simple mixture of flour, water, butter, and eggs transforms into a hollow, golden vessel of air. For many home cooks, the mere mention of pâte à choux invokes a sense of trepidation, a fear that their delicate creations will collapse into soggy puddles the moment they leave the oven. Yet, once you strip away the intimidation, you will find that this dough is perhaps the most reliable and versatile tool in your baking arsenal. It requires no chemical leaveners like baking powder or soda; instead, it relies entirely on the power of steam to create its iconic structure. Mastering this technique is the single most important step toward moving from a home baker to a confident pâtissier.
When we talk about "Blame The Chef," we aren't suggesting you shift the burden of your kitchen failures onto someone else. Rather, we are embracing the philosophy that by understanding the "why" behind the technique, you take control of your culinary destiny. The beauty of choux pastry lies in its neutral flavor profile, which makes it the ultimate chameleon. Whether you are filling a crispy shell with sweetened chantilly cream for a classic profiterole, glazing a long éclair with dark chocolate ganache, or folding savory Gruyère into the dough to create addictive gougères, the foundation remains the same. Once you commit these ratios to memory, you will never need a recipe for choux again.
In this guide, we are going to break down the science of the panade, the importance of egg incorporation, and the subtle nuances of oven management. We will explore the common pitfalls—the dreaded raw interior, the premature collapse, and the uneven rise—and provide you with the professional secrets to avoid them every single time. By the end of this journey, you will no longer look at a display case in a French bakery with envy; you will look at it with the confidence of someone who knows exactly how to recreate those masterpieces in their own kitchen. Grab your heavy-bottomed saucepan and a sturdy wooden spoon, because we are about to master the art of the choux.
The Chemistry of Steam and Structure
At its heart, pâte à choux is a cooked dough, which is why it is often referred to as a panade. Unlike standard pastry doughs that rely on cold fat to create layers of flaky gluten, choux relies on a two-stage cooking process. First, you cook the flour and water/butter mixture on the stovetop, which gelatinizes the starch granules. This starch matrix is what provides the structural integrity needed to trap the steam generated during the baking process. If you skip this stovetop phase, or if you don't cook it long enough, the resulting structure will be too weak to hold the steam, leading to a deflated shell.
The second stage of the reaction occurs inside the oven. As the water within the eggs and the liquid base turns into steam, it pushes against the now-set starch walls of the dough. Because the panade has already been cooked, it is strong enough to expand without tearing, creating that famous hollow center. Achieving this requires high initial heat to shock the steam production, followed by a slight reduction in temperature to allow the structure to dry out and crisp up without burning the exterior.
The secret to a perfect puff isn't in a secret ingredient; it is in the patience you show your dough during the drying process. A dry panade is a stable panade, and a stable panade is the hallmark of a professional.
The Role of Ingredients
The ratio is simple: one part water, one part butter, one part flour, and roughly one-and-a-half to two parts eggs. The water provides the liquid for steam, the butter provides the fat for flavor and richness (which also tenderizes the crumb), and the flour provides the structural scaffold. The eggs are the wild card. They are responsible for the protein structure and emulsification, which prevents the dough from weeping or separating.
Troubleshooting the Ratio
If your dough feels too tight or dense, it is usually because the eggs were not incorporated properly or the starch wasn't fully gelatinized. Conversely, if your dough is too loose, it will spread like a pancake in the oven. The "V-test" is your best friend here: take a wooden spoon, scoop up some dough, and let it fall. It should fall off the spoon in a thick, slow ribbon that forms a V-shape on the spoon’s edge. If it’s too thick, add more egg; if it’s too thin, you’ve unfortunately added too much liquid and need to start over or add a touch more cooked flour paste.
Mastering the Panade Technique
The process begins on the stove, and this is where most mistakes happen. You must bring your water, butter, salt, and perhaps a pinch of sugar to a rolling boil. If the butter isn't fully melted before the water boils, your liquid ratio will be off, and your pastry will be inconsistent. Once you hit that boil, dump all of the flour in at once. Do not sprinkle it in gradually. Dump it in, and immediately begin stirring with a firm, heat-proof wooden or silicone spatula.
Within seconds, the mixture will pull away from the sides of the pan and form a cohesive, smooth ball. This is your cue to continue cooking, but don’t stop there. You need to keep stirring and pressing the dough against the bottom of the pan for another two to three minutes. You are looking for a thin film to form on the bottom of the saucepan—this is the indication that the excess moisture has evaporated and the starches are fully hydrated and cooked.
The Drying Phase
Many home cooks underestimate the importance of the drying phase. If you move to the egg-incorporation stage while the panade is too wet, you will be fighting an uphill battle. The dough needs to be hot enough to denature the proteins as you add the eggs, but not so hot that it "cooks" the eggs instantly upon contact. A good tip is to transfer the hot dough to a mixing bowl and beat it for a minute or two to let the steam escape before you start cracking your eggs.
Temperature Management
Using a stand mixer is ideal, but it can be done by hand. If using a mixer, use the paddle attachment on low speed. Add the eggs one at a time. The mixture might look like it is breaking or curdling after the first egg—this is normal! Keep mixing. It will eventually pull itself back together into a glossy, smooth, and thick paste. Never rush this step; the emulsion is what gives the choux its shine and final rise.
Piping and Oven Dynamics
Piping pâte à choux requires a steady hand and, more importantly, the right tools. Use a large, plain round tip (about 1/2 inch) for most applications like profiteroles and éclairs. If you want a decorative edge for gougères, a star tip is acceptable, but be aware that the sharp edges of a star tip can sometimes impede the uniform rise of the pastry. When piping, hold your bag at a 90-degree angle to the parchment-lined baking sheet, keeping the tip slightly hovering above the surface rather than dragging it through the dough.
Once piped, the appearance of the dough is crucial. If you have "tails" or points on your mounds of dough, take a damp finger and gently smooth them down. These little peaks are the first parts to burn in the oven and will detract from the aesthetic of your final product. Some chefs recommend an egg wash at this stage, but be careful—if the egg wash drips down the sides of the puff, it will glue the pastry to the pan and prevent it from rising.
Piping isn't just about shape; it's about consistency. Every puff on your tray must be the exact same size, or they will bake at different rates, leading to a tray of half-burnt and half-raw pastries.
The Oven Secret
For the first 15-20 minutes, do not—under any circumstances—open the oven door. The sudden drop in temperature and the rush of cool air will cause the steam to condense and the structural scaffold of your choux to collapse permanently. You want the heat to be high initially (around 400°F or 200°C) to generate a rapid surge of steam. Once they have puffed and are golden, you can lower the heat slightly (to 350°F or 175°C) to finish drying them out.
The "Piercing" Trick
Once you pull the choux from the oven, they will still contain internal moisture. To prevent them from becoming soggy as they cool, take a sharp paring knife or a skewer and poke a small hole in the side or bottom of each puff. This allows the remaining steam to escape. If you skip this, the steam will condense back into water inside the hollow cavity, turning your crisp exterior into a soft, chewy sponge.
Versatility: Sweet vs. Savory
One of the greatest joys of mastering pâte à choux is the sheer range of applications. In the realm of sweets, the éclair is king. An éclair should be long, uniform, and filled with a rich pastry cream (crème pâtissière). The shell should be crisp, providing a distinct contrast to the cool, creamy interior. When making éclairs, ensure your piping is consistent; use a ruler to mark your parchment paper if you need to. A messy éclair is a sad éclair, and elegance is part of the flavor experience.
On the savory side, we have the gougère. This is essentially a cheese-infused choux. The key here is the cheese selection—use a high-quality, aged Gruyère or Comté. The fat in the cheese will integrate with the butter in the dough, and the saltiness will elevate the neutral profile of the pastry. Fold the cheese in at the very end, once the dough is completely mixed and cooled slightly, to ensure you don't melt the cheese before it hits the oven.
Profiteroles and Croquembouche
For profiteroles, size matters. They should be bite-sized, roughly the size of a golf ball. When filling them, don't overfill, or the moisture from your cream will ruin the pastry within an hour. A classic croquembouche is essentially a tower of these profiteroles held together by hardened caramel. It is the ultimate test of a chef's patience and structural engineering skills, and it all starts with the humble choux you are making today.
The Savory Twist: Fillings and Toppings
Beyond cheese, you can incorporate herbs like chives or thyme into the dough. You can also experiment with savory fillings: whipped goat cheese with honey, a delicate salmon mousse, or even a mushroom duxelles. When doing savory choux, consider topping the dough with a sprinkle of sea salt or grated Parmesan before baking to add an extra layer of texture and depth.
Common Pitfalls and How to Fix Them
Every baker has dealt with the flat, rubbery puff. It is the rite of passage for every person who tries to learn this craft. If your puffs are flat, it is almost certainly a result of one of three things: the panade wasn't cooked long enough, the dough was too wet (too much egg), or you opened the oven door too early. If you find your dough is spreading excessively on the baking sheet, check your butter ratio—too much fat will inhibit the structural rise of the gluten.
Another common issue is color. If your choux burns before it is cooked through, your oven temperature is likely too high. If you find that the bottoms are burning but the tops are pale, your baking sheet might be too thick, or you might be placing the rack too low in the oven. Move your rack to the middle position and ensure your oven is properly calibrated with an external oven thermometer, as built-in dials are notoriously inaccurate.
A "failed" batch of choux is rarely a waste. If they don't rise into beautiful spheres, chop them up, toast them with butter and sugar, and use them as a textural element in a dessert bowl. Culinary failure is just a creative opportunity in disguise.
The Storage Dilemma
Choux pastry is best eaten fresh. The moisture in the air is the enemy of the crisp exterior. However, you can make the dough ahead of time, pipe it, and freeze it on a baking sheet before transferring it to a bag. When you are ready to bake, you can place them directly from the freezer into a hot oven, though you may need to add an extra five minutes to the baking time. Never store filled choux for more than a few hours, as the pastry will soften quickly.
Ingredients Checklist
Developing a Professional Workflow
Efficiency in the kitchen is what separates a chaotic home cook from a confident one. When you are preparing for a session of pâte à choux production, have your mise en place fully prepared before you even turn on the stove. This includes having your flour weighed out, your butter cubed for quick melting, and your eggs cracked into a bowl and lightly beaten so you can add them incrementally without stopping to crack shells mid-process.
When using a stand mixer, once the panade is cool enough to touch but still warm, keep the mixer running on low speed while you add the eggs. You can gauge the consistency better this way. If you are doing it by hand, use a sturdy wooden spoon and some muscle. The friction of the spoon against the bowl helps develop the emulsion. Don't be afraid of the dough; it’s meant to be worked.
The Importance of Resting
While some recipes suggest using the dough immediately, many professionals find that letting the dough "rest" for 15-20 minutes before piping allows the starches to fully hydrate and the fats to settle. This leads to a more uniform expansion in the oven. While it isn't strictly mandatory, it is a pro tip that often yields a slightly more consistent shape.
Cooling and Drying
Once you pull the tray from the oven, immediately transfer the puffs to a wire rack. If you leave them on the baking sheet, steam will collect underneath and create a soggy bottom. The goal is to maximize airflow around the entire pastry. If you are not serving them immediately, you can store the unfilled, completely cooled shells in an airtight container for a day, or crisp them up in a 300°F oven for 5 minutes before filling.
Advanced Techniques: The Craquelin
If you want to take your choux to the next level—the kind of level you see in high-end Parisian pâtisseries—you need to learn about craquelin. Craquelin is a thin, crisp disc of cookie dough that you place on top of your piped choux before baking. As the choux expands, the craquelin melts and spreads over the top, creating a sweet, crunchy, and aesthetically stunning shell.
To make it, mix equal parts butter, brown sugar, and flour into a paste. Roll it out very thin between two sheets of parchment paper, chill it, and cut out circles that match the size of your piped choux mounds. Place the frozen discs of craquelin directly on top of the raw dough. The result is a puff that is perfectly round, uniform, and possesses a professional-grade texture that is truly addictive.
The difference between a home-baked puff and a bakery-grade pastry is often just one added step. Craquelin is the simplest way to transform your kitchen output into a professional-level dessert.
Balancing Flavors in Craquelin
You can infuse your craquelin with cocoa powder for a chocolatey crunch, or add a pinch of cinnamon or cardamom to complement the filling inside. It acts as a protective layer, shielding the dough and ensuring the rise is uniform. It is the ultimate "chef's secret" for ensuring that every single puff looks identical, regardless of minor inconsistencies in the piping technique.
Scaling for Events
If you are planning to feed a crowd, pâte à choux is arguably the best pastry choice you can make. It is inexpensive, requires standard pantry staples, and can be prepared ahead of time. By freezing the piped mounds, you can have a "ready to bake" supply on hand. When the guests arrive, simply pull them out, bake, and fill. Your guests will be impressed by the complexity and the "freshness" of the pastry, and you will be able to enjoy the party instead of spending hours in the kitchen.
Conclusion
Mastering pâte à choux is about embracing the science of the kitchen. It is about understanding that baking is not just following a set of instructions, but learning how to manipulate the properties of flour, fat, and steam to achieve a desired result. By focusing on the gelatinization of the starches, the proper emulsification of the eggs, and the careful management of heat during the baking process, you have gained the ability to create everything from the simplest gougère to the most intricate croquembouche.
Remember that "Blame The Chef" isn't about pointing fingers; it’s about taking ownership of your skills. The next time you find your puffs aren't as tall as you'd like, don't get frustrated. Analyze the variables: Did you cook the panade long enough? Was the oven hot enough at the start? Did you add too much egg? By troubleshooting your own work, you are doing exactly what professional chefs do every single day in the back of the house.
As you continue to practice, you will develop an intuitive sense for the dough. You will know exactly when it has enough egg by the way it hangs off your spoon. You will know exactly when the panade is ready by the scent of the toasting flour. You will become comfortable with the rhythm of the kitchen, turning a chaotic pile of ingredients into a refined, delicious work of art. The journey of the home baker is paved with many batches of pastry, but there is no greater reward than pulling that tray of perfectly golden, perfectly hollow puffs from the oven. Enjoy the process, trust your instincts, and keep baking.




Get the Next Recipe
Weekly recipes, techniques, and gear picks — straight to your inbox.
