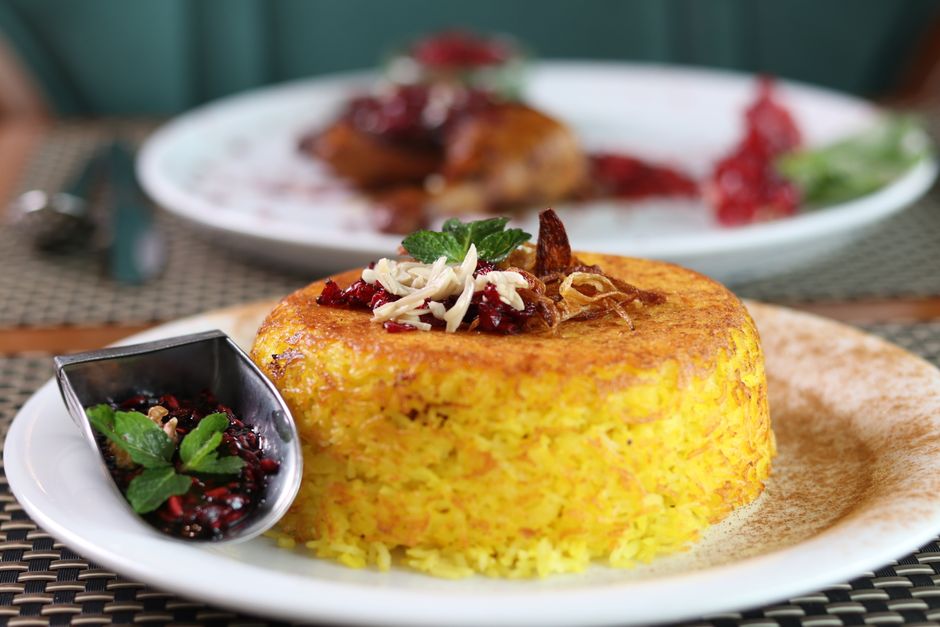
The Home Cook's Guide to Persian Tahdig: Mastering the Art of Crispy Saffron Rice
There is a singular, golden silence that falls over a dining room when a perfectly executed Tahdig is revealed. It is more than just a rice dish; it is a cultural centerpiece, a tactile marvel of engineering, and a testament to the patience of the cook who understands that fire is not an enemy, but a delicate tool. In the world of Persian cuisine, Tahdig—literally translating to "bottom of the pot"—is the ultimate prize, the bronzed, crispy layer of starch that separates the amateur from the master. When you lift the pot lid and see that monolithic disk of golden-brown saffron crust, you aren't just looking at dinner; you are witnessing a culinary triumph that demands reverence, time, and a healthy dose of respect for the process.
For the uninitiated, the concept of steaming rice to fluffy perfection while simultaneously frying the bottom layer to a shatteringly crisp consistency seems like a kitchen paradox. How can one pot hold two distinct textures without turning the whole vessel into a burnt, unmitigated disaster? The secret lies in the interplay of moisture management, starch manipulation, and the gentle, relentless heat of a well-seasoned pot. As we embark on this journey to master the art of the Persian crust, remember that this is a ritual. It is a slow, methodical dance that requires you to step away from the convenience of modern rice cookers and return to the visceral, hands-on intimacy of the stovetop.
If you have ever been intimidated by the prospect of flipping a mound of rice onto a serving platter with the grace of an acrobat, you are in the right place. Today, we are going to break down the chemistry of saffron, the importance of long-grain Basmati rice, and the exact physical maneuvers required to achieve that elusive, glass-like crunch. We will navigate the dangers of excessive steam, the necessity of the "tenting" technique, and the nuances of oil-to-butter ratios. By the time we finish, the kitchen will be filled with the intoxicating aroma of blooming saffron and butter, and you will have the confidence to serve a masterpiece that is structurally sound and gastronomically transcendent.
The Foundation: Understanding the Ingredients and Tools
Before a single grain of rice touches water, we must curate our materials. The choice of rice is not merely a suggestion; it is a requirement. You must source a high-quality, aged long-grain Basmati rice. The aging process reduces the moisture content in the grain, allowing it to absorb more liquid during the parboiling stage without disintegrating into a mushy porridge. If you use a short-grain variety, you will end up with a sticky, dense brick rather than the light, airy pillars of starch that characterize true Persian rice.
The Role of Saffron and Fats
Saffron is the lifeblood of this dish, providing both a regal color and a distinct, hay-like floral aroma. To get the most out of your threads, never add them directly to the rice. You must bloom the saffron by grinding the threads with a pinch of sugar or salt using a mortar and pestle, then steeping them in a few tablespoons of hot—not boiling—water. This extraction process releases the crocin and safranal, creating a liquid gold that will perfume your entire dish. Regarding fats, a blend of ghee (clarified butter) and a high-smoke-point neutral oil, such as grapeseed or avocado oil, is the professional secret. The butter provides the flavor, while the oil ensures the crust doesn't burn before the rice reaches the necessary crunch.
Selecting the Right Pot
The vessel you choose will dictate your success. A non-stick pot is the home cook’s best friend for Tahdig, especially when you are just beginning your journey. While professional Persian kitchens may utilize heavy-bottomed copper or stainless steel pots that have been "seasoned" through years of use, a high-quality non-stick coating provides a necessary safety net. Ensure your pot has a tight-fitting lid; if the lid is loose, you will struggle to trap the steam necessary to finish the upper layers of rice.
"The magic of Tahdig resides in the transition zone—the exact point where the rice transforms from soft, pillowy clouds into a golden, caramelized shield of flavor. It is a lesson in patience that rewards the cook who refuses to rush the flame."
The Ritual of Parboiling: The First Phase
The most common mistake home cooks make is skipping the parboiling stage. We are not simply boiling rice; we are preparing it to be cooked twice. You must bring a large pot of heavily salted water—it should taste like the sea—to a rolling boil. Add your thoroughly rinsed Basmati rice and keep a watchful eye. This is not a "set it and forget it" task. You are aiming for a texture that is soft on the outside but still retains a firm, slightly resistant center, often referred to as al dente.
Testing the Grain
How do you know it is ready? Take a grain of rice and press it between your thumb and forefinger. It should be tender enough to squash, but it should not disintegrate. If it becomes a paste, you have gone too far. If you feel a hard, white core, it needs another minute. Generally, this takes between 6 to 9 minutes, depending on the altitude and the specific brand of rice. Once it hits that sweet spot, drain it immediately into a fine-mesh colander and rinse it with cool water to halt the cooking process.
Mixing the Base
To create the perfect Tahdig, you need a binder. In a separate bowl, mix about two cups of your parboiled rice with a few spoonfuls of plain, full-fat Greek yogurt and a generous pour of your bloomed saffron water. The yogurt acts as a stabilizer, adding a tangy depth and ensuring the rice creates a cohesive, crispy layer that won't fall apart when flipped. Some chefs also add an egg yolk to the mixture for a richer, more uniform crust, though the yogurt-saffron method is the traditional, classic approach.
The Assembly: Constructing the Layered Masterpiece
Now that your components are ready, the assembly requires a steady hand. Place your non-stick pot on the burner and add your fat—two tablespoons of ghee and two tablespoons of neutral oil. Swirl it around so it coats the base and the sides of the pot up to about an inch. Once the fat is shimmering but not smoking, spread your yogurt-rice mixture across the bottom of the pot in an even, compact layer. Use the back of a spoon to press it down gently. You want a flat, uniform surface to ensure even browning.
Incorporating the Fluff
Carefully mound the remaining parboiled, un-dyed rice on top of the base layer. Use the handle of a wooden spoon to poke five or six steam holes through the mound, reaching all the way to the bottom. This allows steam to escape from the base and circulate through the upper layers, ensuring the top rice finishes as soft, fragrant grains. Pour a mixture of melted butter and a splash of water over the top of the mound, then cover the pot lid with a kitchen towel or a clean tea towel before securing it tightly.
The Importance of Tenting
The towel is a professional trick that serves two purposes: it absorbs excess condensation that would otherwise drip back onto the rice and make it soggy, and it creates a pressurized environment that mimics the effect of a traditional hearth oven. Ensure the corners of the towel are tucked away from the flame so they do not catch fire. This setup is the secret to getting a fluffy, dry top layer and a crispy, golden bottom.
"True Persian cuisine is a study in textures. If the rice is all soft, it is a porridge. If the rice is all hard, it is a failure. The goal is to provide a contrast that forces the diner to slow down, break the crust, and appreciate the harmony of the two states of starch."
The Art of the Flame: Managing the Heat
This is the phase where anxiety usually sets in, but you must remain calm. Start by cooking the rice on medium-high heat for about 5 to 7 minutes to establish the initial sear on the crust. You want the bottom to begin that transition to golden brown. After this initial jolt of heat, lower the burner to the lowest possible setting. You are now looking at a 45 to 60-minute window of slow, gentle transformation.
Avoiding the Burn
Do not succumb to the temptation to peek under the lid. Every time you lift the lid, you lose that precious steam pressure and drop the internal temperature of the pot. Trust your intuition. If you have a gas stove, use a heat diffuser if you have one, as this spreads the flame more evenly and prevents hot spots that could result in localized burning. You are not looking for a dark, charred black; you are looking for a deep, amber-colored brown that smells like toasted hazelnuts and butter.
Listening to the Pot
Believe it or not, you can "hear" the Tahdig. When the oil and butter at the bottom of the pot begin to crackle and sizzle, that is the sound of the rice frying in the fat. If the sound is too aggressive, lower the heat further. If there is no sound at all, your heat might be too low to initiate the crisping process. The transition from the sound of boiling water to the sound of frying oil is your cue that the crust has begun to solidify.
Troubleshooting Common Tahdig Failures
Every chef has ruined a batch of rice at least once. If your Tahdig is sticking to the bottom, it is likely because the pot wasn't sufficiently heated or the rice was too wet when it hit the pan. If the crust is pale, it means you didn't allow enough time on the initial high-heat sear, or you didn't use enough fat. Don't be discouraged; the beauty of this dish is that even the "failures"—the broken pieces of crust—are delicious.
The Moisture Conundrum
If you find your rice is too gummy, it usually points to a failure in the parboiling stage or an issue with the steam management. Ensure that your rice is truly drained after the cool water rinse. Even a few tablespoons of excess water in the colander can turn a perfect pot of rice into a clump of starch. Also, ensure your yogurt mixture isn't too liquid. The yogurt should be thick and clinging to the grains; if it's too thin, reduce the moisture by mixing in a bit more plain rice.
The Flip
The final act is the flip. When the time is up, remove the pot from the heat and let it rest for 5 minutes. This cooling period allows the crust to firm up and pull slightly away from the sides of the pot. Place a large serving platter over the pot, and with one swift, confident motion—perhaps using a kitchen towel to protect your hands—invert the pot. You want to feel the rice "drop" onto the plate. If you feel it stick, give the bottom of the pot a gentle, rhythmic tap.
Variations: Beyond the Classic Saffron
Once you have mastered the basic saffron Tahdig, you can begin to experiment with textures and flavors. A common and beloved variation is adding a layer of thinly sliced potatoes at the bottom of the pot before adding the rice mixture. The Potato Tahdig is arguably even more popular than the rice version, as the starch from the potatoes creates a thicker, sturdier, and incredibly addictive crust that absorbs the saffron and butter beautifully.
Adding Herbs and Fruits
You can also infuse your rice with fresh herbs like dill, parsley, and cilantro, or stir in barberries—small, tart red berries—and slivered pistachios. When adding herbs, layer them between the white rice, rather than mixing them into the Tahdig base, to ensure the colors remain vibrant. The tartness of the barberries provides a necessary contrast to the richness of the ghee-soaked rice, making each bite more complex and balanced.
Savory Additions
For a more substantial meal, many chefs add a layer of marinated chicken thighs or lamb chops at the bottom of the pot. This is known as Tahchin, a dish where the meat cooks in the juices and saffron, creating a one-pot meal where the rice serves as a crispy, fragrant wrapper. This technique requires a slightly longer cooking time to ensure the protein is fully rendered and tender, but the results are nothing short of spectacular.
Conclusion
Mastering Persian Tahdig is a journey that bridges the gap between science and soul. It requires you to be an active participant in your kitchen, learning to read the cues of heat, sound, and smell. While the technical steps are precise, the artistry comes in the repetition—the way you layer the rice, the way you balance the fat, and the confidence with which you finally invert the pot. Do not be intimidated by the potential for failure; treat each attempt as a masterclass in culinary patience.
When you finally pull that pot off the stove and reveal the golden, intricate lattice of crispy rice, you will understand why this dish is the pride of the Persian table. It is a humble combination of starch and fat, elevated by technique into something truly regal. Share it with your friends and family, and watch as they clamor for the biggest piece of the crust. It is a dish meant to be broken, shared, and savored. From my kitchen to yours, keep practicing, keep experimenting, and never stop pushing the boundaries of what you can create. Your journey to the perfect crust starts today.

Get the Next Recipe
Weekly recipes, techniques, and gear picks — straight to your inbox.
