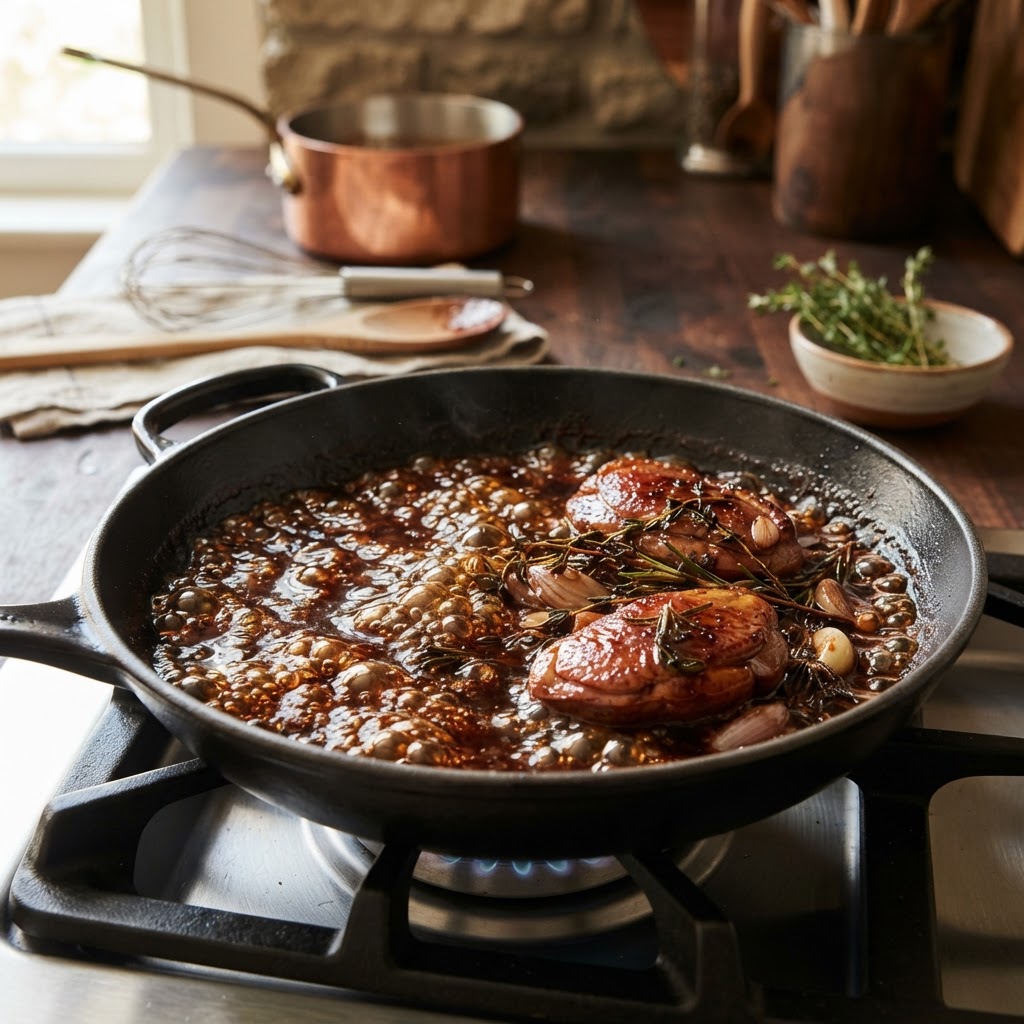
The Home Cook’s Guide to Reducing Reductions: Mastering Evaporation and Surface Area Ratios for Intense, Restaurant-Style Glazes
There is a singular, transformative moment in a professional kitchen that separates the amateur from the culinarian: the realization that sauce is not merely a condiment, but the architect of flavor. We have all stood at our stoves, staring down a pan of simmering stock, waiting for that elusive, syrupy consistency that turns a simple sear into a masterpiece. Often, we find ourselves retreating to the flour-thickened gravies of our youth, relying on starches to mimic the body that only true evaporation can provide. Mastering the art of the reduction is not just about time; it is a profound lesson in thermodynamics and chemistry, teaching us how to concentrate the essence of ingredients until they sing. By understanding the dance between water and solids, you unlock the ability to create restaurant-style glazes that cling to the back of a spoon and coat your palate with unparalleled intensity.
When we talk about reducing, we are essentially discussing the strategic removal of solvent—water—from a solute-rich base. Whether you are working with a dark beef bone broth, a bright citrus gastrique, or a savory balsamic glaze, the goal is always the same: to concentrate volatile aromatic compounds and sugars into a stable, glossy state. The home cook often fears this process, worrying about burning the pan or ending up with a salt-lick of hyper-concentrated minerals. However, once you learn to respect the relationship between heat intensity and surface area, the process becomes less of a guessing game and more of a controlled experiment. You are not just boiling liquid; you are distilling a narrative of flavor, reducing a gallon of potential into a concentrated, potent spoonful of culinary identity.
In this guide, we will peel back the curtain on the science of the simmer. We will move beyond the vague instruction to "boil until reduced by half" and look at the physical mechanics that dictate how your sauces evolve. From the importance of vessel selection to the nuances of mounting with cold butter, every step you take in the kitchen is an opportunity to elevate your craft. Prepare to look at your saucepan not as a container, but as a laboratory. When you finally master these techniques, you will find that you no longer need to rely on heavy thickeners or pre-packaged bouillon, as your own pantry and stove will provide everything you need to create luxury in your own home.
The Physics of the Pan: Surface Area and Evaporation Rates
The primary secret to a perfect reduction lies in the geometry of your cookware. Most home cooks reach for the deepest pot they own, assuming that volume requires depth, but this is a fundamental mistake when the goal is reduction. Evaporation occurs almost exclusively at the surface of the liquid. If you are simmering a quart of liquid in a tall, narrow saucepan, the rate of evaporation is hindered by the lack of exposure to the air. By choosing a wider, shallower vessel—often called a sautoir or a wide rondeau—you exponentially increase the surface-area-to-volume ratio, allowing water molecules to escape the liquid phase with far greater efficiency.
Understanding Your Vessels
When you select your pan, think about the evaporative throughput. A wide pan with a large diameter allows for a much more rapid reduction, which is beneficial for volatile ingredients like wine or fresh herbs that might lose their brightness if boiled for hours. Conversely, if you are looking to develop deep, caramelized notes in a long-simmering stock, you might choose a pan that provides a balance between evaporation and total immersion. Remember that stainless steel and copper are your best friends here, as they provide even heat distribution without the reactivity of aluminum or the unpredictable heat retention of cast iron.
The Impact of Ambient Humidity
It is easy to forget that the kitchen environment itself plays a role in your reduction speed. On a humid summer day, the air is already saturated with water vapor, meaning your liquid has a harder time escaping the pan. Conversely, in the dry heat of winter, you will notice your sauces reducing much faster. Always keep an eye on your liquid levels and don't rely solely on a timer. The visual cues—the way the bubbles move, the sheen of the surface, and the change in color—are far more reliable than the ticking of a clock.
"The reduction is the soul of the dish, stripped of its modesty and left to stand on its own flavor alone. Never rush the process, for the most complex notes emerge only when the water has retreated, leaving the essence behind."
Mastering the Maillard Reaction and Fond Development
Before you even start your reduction, the foundation must be built. The fond—those browned, caramelized bits of protein and sugar stuck to the bottom of your pan—is the heart of your sauce. When you deglaze this pan with an acid or alcohol, you are creating a base that is fundamentally superior to any stock you could pour from a box. The goal of your reduction is to preserve the integrity of these compounds while stripping away the excess water that dilutes them.
Deglazing for Depth
Deglazing is a two-step process that requires heat control. After you have seared your protein, pour your deglazing agent—be it red wine, sherry, or even a high-quality stock—into the hot pan. Use a wooden spoon to scrape the bottom vigorously. This is the deglazing technique. You want to incorporate those browned bits back into the liquid. Once this is done, you are ready to begin your reduction. If you move too fast here, you lose the chance to build the complex base flavors that will ultimately define the character of your finished glaze.
The Role of Sugar and Acid
Many home cooks struggle with a reduction that tastes "flat." This is usually due to a lack of balance. A great reduction often relies on the interplay between the sweetness of a reduction and the brightness of an acid. A gastrique, for example, is a classic French technique where you caramelize sugar and then deglaze it with vinegar. This adds a sweet-and-sour profile that cuts through the fat of a reduction, creating a high-gloss, high-flavor glaze that is essential for game meats or roasted root vegetables.
Temperature Control: Simmer vs. Boil
There is a significant difference between a violent, rolling boil and a gentle, consistent simmer. When you boil a liquid rapidly, you agitate the proteins and fats, which can lead to a cloudy, broken sauce that lacks that signature restaurant-style shine. Furthermore, an aggressive boil can lead to the burning of sugars at the edges of the pan, which introduces bitterness into an otherwise delicate glaze.
The Art of the Gentle Simmer
You want to maintain a controlled simmer, where small, lazy bubbles break the surface gently. This allows the water to evaporate without disrupting the emulsification of any fats that might be present in your reduction. If you are working with a wine-based reduction, keep the heat low enough that you don't burn off all the volatile aromatics before the sugar concentration reaches its peak. Temperature is a tool of precision; treat it as such.
Monitoring for Viscosity
How do you know when your reduction is finished? Do not rely on your eyes alone. Use the nappe consistency test. Dip a metal spoon into your sauce and pull it out. Turn it over so the back of the spoon is facing up. Run your finger through the center of the sauce on the spoon. If the sauce stays in place and doesn't run, leaving a clean "path" through the liquid, you have achieved nappe. This is the point at which your sauce will properly coat your protein, providing that beautiful, professional glaze that we all strive for in our home cooking.
The Final Polish: Mounting with Butter (Monter au Beurre)
Once you have reached your desired consistency, the final step in creating a restaurant-quality glaze is the technique of monter au beurre, or mounting with butter. This adds a final layer of luxurious texture and a glossy finish that makes the sauce feel substantial and velvety on the palate. The key here is that the butter must be cold, and the heat must be off.
Emulsification Mechanics
By adding cold, cubed butter to a hot reduction, you are creating an emulsion. The fat molecules from the butter are suspended within the liquid of your reduction, which thickens the sauce and gives it a glossy appearance. If the sauce is too hot, the butter will separate and leave a greasy film on the surface; if the sauce is too cool, the butter won't incorporate properly. You want the sauce to be just below a simmer, swirling the pan constantly to ensure the butter incorporates smoothly.
Flavor Infusion
This is also the moment where you can add fresh herbs, a drop of truffle oil, or a finishing touch of lemon juice. Because you have just mounted the sauce with fat, these flavors will be carried effectively across the tongue. Remember, mounting with butter is the final stage; it should be done right before serving to ensure the sauce stays emulsified and doesn't break. This is the difference between a liquid that sits on top of a steak and one that embraces it.
"A sauce is not merely a topping, but the bridge between the texture of the meat and the palate of the diner. When mounted with butter, it transforms from a simple reduction into a velvet coat of pure flavor."
Ingredients and Ratios: Building a Foundation
The quality of your reduction is entirely dependent on the quality of your base. If you are starting with a subpar, salt-heavy store-bought broth, your reduction will only serve to concentrate that salt, resulting in an inedible glaze. When making reductions at home, your best results will always come from high-quality, homemade stocks where you have full control over the salt content.
The Salt Trap
This is the most common mistake in reduction work. If you start with a salted liquid and reduce it by 75 percent, the salt concentration will be quadruple what you started with. Always begin with unsalted or low-sodium stocks. Only season your sauce at the very end of the process, after the reduction is complete. This allows you to taste the true concentration of the flavors before you commit to a seasoning profile.
Reducing Aromatics
If you are adding aromatics—shallots, garlic, herbs, or peppercorns—be aware of how their flavors concentrate. A handful of fresh thyme might be perfect in a gallon of stock, but if you reduce that stock into a demi-glace, the herb's woody notes can become overpowering. Add your aromatics early in the process for the long, deep flavors, but reserve a pinch of fresh herbs for the mounting stage to add a pop of vibrant, fresh aroma that cuts through the density of the reduction.
Stocks:* Use homemade beef, chicken, or vegetable stock.
Acids:* Red wine, sherry vinegar, balsamic, or citrus juices.
Fats:* Unsalted, high-quality European-style butter.
Sugar:* Use sparingly; maple syrup, honey, or raw sugar can add balance.
Troubleshooting Common Reduction Errors
Even experienced cooks run into trouble during the reduction process. The most common issue is a sauce that has become too salty or bitter. If you find your reduction has reached this point, don't panic. You can often "save" it by thinning it out with a little bit of unsalted stock or even a small amount of heavy cream. Cream is a wonderful equalizer; it mutes the bitterness and rounds out the saltiness, though it will turn your glaze into more of a cream sauce.
The Burnt Edge Scenario
If you have accidentally scorched the edges of your pan, stop immediately. Transfer the liquid into a clean pan, leaving the burnt bits behind. Do not try to scrape them into the liquid, as the bitter, carbonized flavor will ruin the entire batch. If the sauce still has a hint of bitterness, try adding a tiny touch of sugar or honey to counteract it. It won't fix the char, but it can mask it just enough to save the meal.
Thinning and Thickening
If your sauce is too thin but the flavor is perfect, you have a few options. You can continue to reduce, but if the flavor is already perfectly balanced, adding more heat might push it into the "too salty" territory. In this case, you can use a small amount of beurre manie (an equal mixture of softened butter and flour kneaded together) whisked in at the end. This will thicken the sauce without the long reduction time, keeping the flavor profile exactly where you want it.
The Aesthetic and Sensory Experience
The final, often overlooked aspect of a restaurant-style glaze is how it looks on the plate. A reduction should be deep, dark, and translucent. When you drizzle it over a steak or a rack of lamb, it should leave a visible trail that doesn't soak immediately into the meat. The visual appeal—the lustre of the glaze—is what triggers our appetite before the first bite.
The Importance of Straining
To achieve that professional look, you must pass your reduction through a fine-mesh chinois or a sieve before serving. Even if you have been careful with your aromatics, small pieces of shallot or herb stems can mar the glossy, smooth appearance of your reduction. A perfectly strained sauce should look like liquid silk. It should be uniform in color and texture, reflecting the light like a dark mirror.
The Plating Technique
When it comes time to serve, don't just pour the sauce over the meat. Use a spoon to carefully pool the sauce on the plate or to drizzle it in a controlled manner across the protein. This allows the guest to choose how much sauce they want with each bite and preserves the integrity of the crust on the meat. A professional-looking plate is clean, precise, and intentional. The sauce is the final word in that presentation, showing that you have mastered the time and heat required to produce something truly exceptional.
Final Thoughts
The journey to mastering the reduction is a journey toward culinary patience. It is an acknowledgment that greatness in the kitchen cannot be rushed; it must be simmered, watched, and nurtured. By understanding how surface area dictates evaporation, how heat shapes the texture of your liquid, and how butter binds your ingredients into a cohesive whole, you have moved from following recipes to understanding principles. This is the hallmark of the home chef who knows that a restaurant-style meal is not about magic—it is about the deliberate application of science and respect for your ingredients.
As you move forward, I encourage you to experiment. Take your favorite stock and try reducing it to different levels of consistency. Try mounting with different types of fats or introducing different acids into your deglazing process. The goal is not to memorize these steps, but to develop an intuition for the way a sauce behaves in the pan. Soon enough, you won't need to look at a clock or worry about measurements; you will simply look at the shimmer on the spoon, feel the viscosity, and know—with absolute certainty—that your sauce is ready.
Remember that "Blame The Chef" is a philosophy of ownership. When you serve a dish that glows with the intensity of a well-made reduction, you are not just serving food; you are serving your own time, effort, and curiosity. Keep your pans wide, your simmer low, and your butter cold. You are now equipped with the tools to take any simple protein or roasted vegetable and turn it into the centerpiece of a memory. Go back to your stove, experiment with that next batch of stock, and discover the profound satisfaction of turning nothing into everything.
***
In addition to the core techniques of evaporation and mounting, consider the role of collagen in your reductions. If you are making a beef or veal reduction, starting with ingredients rich in gelatin—like knuckle bones or oxtail—is vital. As these bones simmer, the collagen breaks down into gelatin, which gives your final reduction a luxurious, sticky mouthfeel that flour-thickened sauces simply cannot replicate. This is why restaurant stocks feel "tacky" on the lips; it is a sign of high-quality, long-extracted gelatin. If you want to replicate that at home, always prioritize bones with high cartilage content.
When selecting your wine for a reduction, the rule of thumb is to use something you would enjoy drinking, but skip the expensive vintage. You are concentrating the sugars and acids, which means a highly complex or delicate wine can sometimes lose its nuances. A solid, dry table wine is perfect. Avoid "cooking wines" found in grocery stores, as they are often packed with salt and preservatives that will work against your goal of creating a pure, intense flavor.
Finally, keep a record of your successful reductions. Note the starting volume, the type of pan used, and how much butter you added at the end. Culinary development is iterative. By documenting your wins and your near-misses, you refine your internal map of flavor. Whether it is a dark, punchy bordelaise or a bright, herbaceous citrus reduction, your palate is your best instructor. Trust it, keep refining your technique, and above all, enjoy the process of turning liquid into liquid gold. The kitchen is yours, and the result is in your hands.
When we discuss the "restaurant-style" glaze, we are also referencing a standard of consistency. Restaurants aim for perfection in every service. By mastering the reduction, you are ensuring that your own kitchen can meet that standard. When you have a batch of high-quality, reduced stock in your freezer—divided into small portions in an ice cube tray—you have the foundation of a five-star meal ready at a moment’s notice. Just grab two or three cubes, drop them into a pan, and finish them with a knob of butter.
This level of preparation changes the way you cook. It removes the stress of trying to build a sauce from scratch while your main course is resting. Instead, you are finishing a component that you have already perfected. You are the architect of your own culinary success, and the reduction is the keystone that holds your entire meal together. Keep practicing, keep tasting, and never underestimate the power of a pan, some heat, and the patience to watch the water evaporate into flavor.
The journey of the home cook is endless, but with these techniques, you have found the path to the most important element of fine dining. A great sauce covers a multitude of sins, but a perfect reduction elevates even the simplest ingredient to the sublime. As you continue to refine your craft, remember that the most complex flavors often come from the most humble origins—a few bones, some aromatics, and the patience to wait for the pan to tell you it is time. You are the chef, and the sauce is your masterpiece.
As you incorporate these methods into your weekly rotation, focus on the sensory memory of the reduction process. Listen to the sound of the simmer—a low, rhythmic bubble indicates you are in the "sweet spot" of evaporation. Watch the way the bubbles change from large and erratic to small, dense, and "angry" as the sugar content increases. These are the visual indicators that you are approaching the finish line. Do not fear the density; embrace it. A truly reduced sauce should be deep in color—almost black or mahogany—and possess a viscosity that holds a sheen under the kitchen lights.
If you find yourself becoming frustrated with the time it takes, remember that you are working with nature. You cannot force a liquid to reduce without changing its chemistry. The "hack" is not to increase the heat, but to increase the surface area. Every minute you spend waiting for that reduction to reach the perfect nappe consistency is a minute that the complex proteins and sugars are evolving, deepening, and maturing. It is time well spent, and the result will be a reflection of that dedication.
In the end, it is about the love of the craft. Whether you are cooking for a crowded table or just for yourself, the act of reducing a sauce is an act of care. It is a commitment to the idea that the food we eat deserves the time we spend preparing it. As you continue your culinary journey, keep these principles of surface area, heat, and fat emulsification in your toolkit. They will serve you better than any recipe book. Blame the chef, indeed—because when the food is this good, the credit belongs entirely to the care you took in the kitchen.
Finally, remember that the best way to learn is by doing. Do not just read about reductions; pick a night, clear your schedule, and commit to making a proper, long-simmered demi-glace or a reduction from scratch. You will make mistakes, you will occasionally over-reduce, and you might even scorch a batch. But in that process of trial and error, you will learn the unique language of your own stove. That knowledge is worth more than any recipe, and it is the true secret to becoming a confident, capable home cook who doesn't just follow instructions, but understands the art of the glaze.
As you stand at your stove tonight, consider the history of the sauces you are creating. You are participating in a tradition that spans centuries, from the mother sauces of Escoffier to the modern, minimalist reductions of today. You are a link in that chain. By mastering the reduction, you are preserving a craft that is increasingly rare in a world of quick-fix seasonings and artificial thickeners. Stay true to the process, stay curious, and keep those pans simmering. Your journey to the perfect glaze is only just beginning.

Get the Next Recipe
Weekly recipes, techniques, and gear picks — straight to your inbox.
