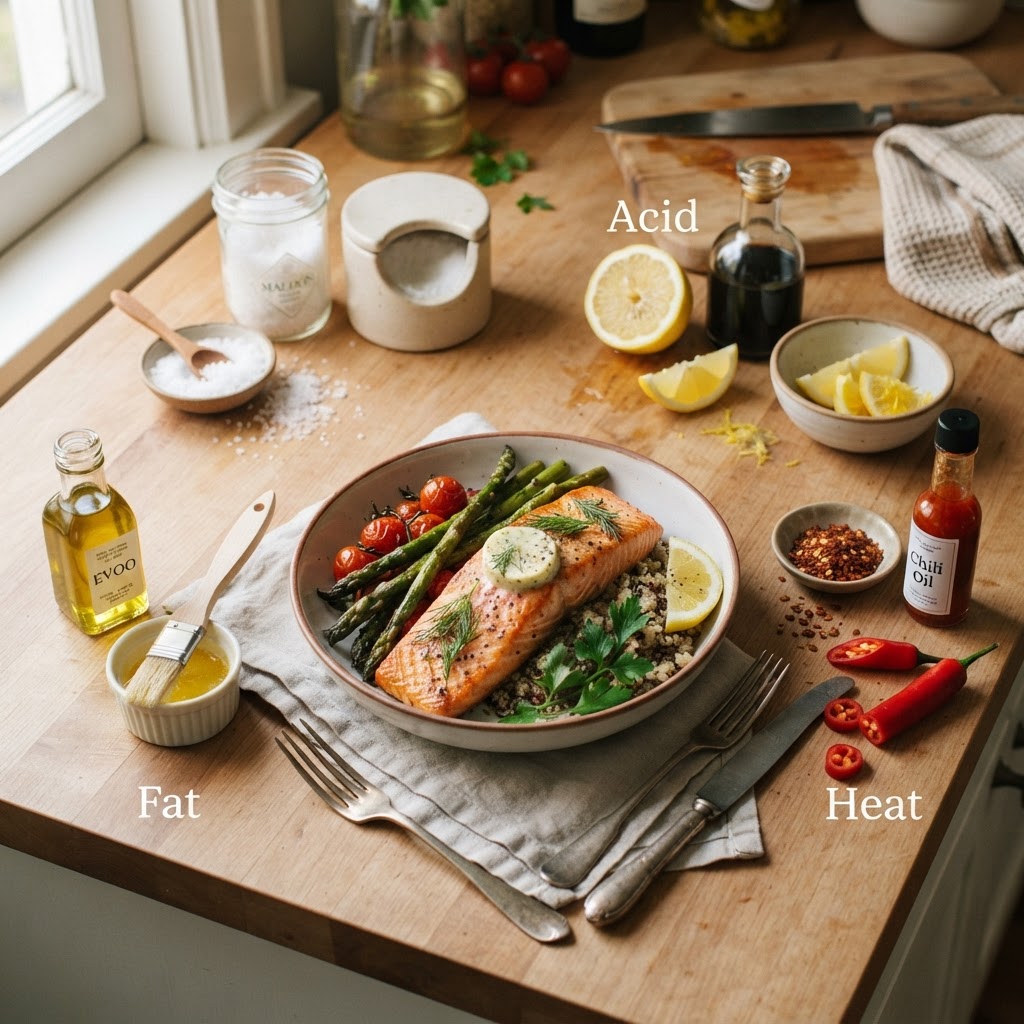
The Home Cook’s Guide to Seasoning: Mastering the Balance of Salt, Fat, Acid, and Heat for Every Dish
Have you ever stood over a simmering pot, tasting a sauce that felt suspiciously "flat" despite your best efforts to follow a recipe to the letter? Most home cooks fall into the trap of believing that the secret to restaurant-quality food lies in obscure ingredients or expensive kitchen gadgets. The truth is far more foundational: great cooking is the result of mastering the invisible architecture of flavor. When a dish fails to sing, it is rarely because you lacked a specific brand of spice; it is almost always because the essential elements of Salt, Fat, Acid, and Heat are out of alignment. Once you understand how these four pillars interact, you stop being a slave to recipes and start becoming an architect of your own culinary creations.
At "Blame The Chef," our philosophy has always been that the kitchen should be a laboratory of intuition rather than a prison of strict measurement. Seasoning is not a step you take at the very end of your cooking process; it is a continuous, iterative conversation between the cook and the ingredients. You must learn to taste your food at every stage, observing how a pinch of kosher salt transforms the bitterness of raw kale or how a squeeze of lemon juice cuts through the heaviness of a rich, fatty pork belly. By shifting your mindset from "following instructions" to "balancing flavor," you will find that even the most humble pantry staples can be elevated into a dish that commands respect and triggers memories.
This guide is designed to dismantle the intimidation factor often associated with professional seasoning techniques. We are going to explore the granular science of how these elements engage your palate, and more importantly, how you can manipulate them to suit your personal preferences. Whether you are searing a thick ribeye, whisking a vinaigrette, or slow-roasting a mountain of vegetables, the principles remain constant. Prepare to sharpen your knives, calibrate your palate, and finally understand why your food never quite tasted as good as it did when you were dining out. Let’s peel back the layers of professional seasoning and start building flavors that resonate.
The Foundation of Flavor: Salt as the Culinary Catalyst
Salt is not merely a seasoning that makes food taste "salty." Its true power lies in its ability to suppress bitterness and enhance the perception of sweetness and aroma in the ingredients you are cooking. When you add salt to a dish, you are performing a chemical reaction that opens up the food, allowing its inherent characteristics to shine through with clarity. If your food tastes bland, it is almost certainly under-salted. However, there is a nuance to application that separates the amateur from the pro: knowing when to salt is just as vital as knowing how much to salt.
The Timing of Salt Application
The golden rule is to salt early and often. If you only salt at the end of the cooking process, the flavor sits on the surface of the food like a coat of paint, rather than being integrated into the fiber of the ingredient. By salting vegetables, grains, or meats during the initial stages, you draw out moisture through osmosis, creating a concentrated environment where the flavor can develop in depth.
"Salt is the bridge between a raw ingredient and a finished dish; it is the fundamental tool that turns fuel into a meal."
Understanding Salt Types and Ratios
Do not treat all salts as interchangeable, especially when measuring by volume. A teaspoon of fine-grain table salt is significantly denser than a teaspoon of Diamond Crystal Kosher salt or coarse Maldon sea salt. If you use table salt in the same volume as kosher salt, your dish will likely become inedible.
Kosher Salt*: The professional standard due to its large, flat crystals that are easy to pick up and distribute evenly.
Sea Salt*: Best used as a "finishing salt" for texture and a burst of brightness on salads or grilled meats.
Table Salt*: Use only for baking where exact weight-based measurement is critical, as the anti-caking agents can add a metallic tang to delicate sauces.
The Role of Fat: Texture, Mouthfeel, and Flavor Carrier
Fat is the luxurious element of the culinary quartet. It serves two primary purposes: it acts as a medium for heat conduction, ensuring an even sear, and it serves as a flavor vehicle. Many of the most potent flavor compounds in herbs and spices are fat-soluble, meaning they cannot be fully extracted or tasted without a fat base. If you cook garlic in a dry pan, it burns; cook it in olive oil, and the oil becomes an aromatic infusion that coats the entire dish.
Choosing Your Fat for the Right Job
Different fats have different smoke points and flavor profiles, which dictate how they should be utilized in your kitchen. A delicate extra virgin olive oil is perfect for finishing a dish, but it will degrade and lose its nuance if used for high-heat searing.
High-Heat Fats*: Grapeseed oil, avocado oil, and clarified butter (ghee) are best for pan-searing, as they can withstand temperatures upward of 400°F (200°C) without burning or smoking.
Flavorful Fats*: Butter, animal fats like rendered duck fat or bacon grease, and high-quality cold-pressed oils should be used to build body and add richness to sauces, dressings, or finishing glazes.
The Emulsification Technique*: When you incorporate fat into a liquid-based sauce, such as whisking cold butter into a pan sauce, you create an emulsion. This process thickens the sauce and gives it a glossy, professional finish that clings to the food rather than running off it.
Building Depth with Fat
When you are building a base, often referred to as a soffritto or mirepoix, the fat is where the aromatics go to bloom. Start by heating your oil or butter until it ripples, then add your onions, celery, and carrots. The fat works to gently break down the cell walls of the vegetables, coaxing out the natural sugars. If you notice your pan is turning dark too quickly, you need more fat or lower heat; if it’s sluggish and pale, you need more patience.
"Fat is the conductor of the kitchen symphony, carrying the notes of your herbs and spices across the palate and ensuring that the taste lingers long after the first bite."
Acid: The Secret Weapon for Brightening Dull Flavors
If salt is the foundational support, acid is the lightning bolt. When a dish feels "heavy," "muddy," or "cloying," it is almost always crying out for acid. Acid brightens flavors by stimulating the salivary glands, which cleanses the palate and makes the subsequent bite taste just as vibrant as the first. This is why we squeeze lemon over fried fish or splash vinegar into a heavy beef stew; it’s a necessary counterpoint to the richness of the fat.
When to Introduce Acid
Acid is highly volatile, meaning its flavor can dissipate if introduced too early during long simmering processes. However, it can also be used as a marinade to tenderize tough proteins.
During Cooking*: Use acidic ingredients like tomatoes, wine, or citrus juices at the start of a slow-braise to help break down connective tissues.
At the Finish*: Always reserve a portion of your acid (like a squeeze of lemon, a drop of sherry vinegar, or a splash of lime juice) to add right before serving. This provides a "top note" of flavor that acts as a sensory wake-up call.
Balancing Act*: If your sauce tastes too acidic, do not reach for more salt. Instead, add a small amount of fat or a tiny pinch of sugar to round out the sharpness.
The Spectrum of Acidic Ingredients
Don't just stick to lemons and limes. Your pantry should be a library of acids, each offering a unique regional character and intensity.
Mastering Heat: The Science of Maillard and Texture
Heat is the physical energy that changes the state of your food. It is responsible for the Maillard reaction, the complex chemical process between amino acids and reducing sugars that gives browned food its distinct, savory, and crusty flavor. Mastering heat is not just about turning the dial on your stove; it is about understanding how energy penetrates the food you are preparing.
Managing Temperature Zones
Every pan has a temperature curve. When you drop a cold piece of meat into a hot pan, you instantly drop the temperature of that surface. This is why we recommend crowding your pan is the "home cook’s cardinal sin." If there isn't enough space for the steam to escape, the food will steam in its own juices rather than browning.
The Sear (400°F+ / 200°C+)*: Essential for proteins and root vegetables. You want immediate, intense contact.
The Sweat (150°F - 250°F / 65°C - 120°C)*: Essential for aromatic vegetables to release their essential oils without turning brown or bitter.
The Simmer (180°F - 200°F / 82°C - 93°C)*: Gentle energy to break down tougher proteins or meld liquid-based sauces.
The Carry-Over Cooking Factor
One of the most important professional techniques is understanding carry-over cooking. Your food does not stop cooking the second you turn off the burner. Because the heat continues to migrate from the exterior to the center of the item, you must remove your food from the heat source slightly before it reaches your target internal temperature. For a steak, this usually means pulling it off the fire at 125°F (52°C) for a perfect medium-rare result after resting.
"Heat is the brush you use to paint flavor onto your ingredients; without it, you are simply assembling, not cooking."
Building Flavor Layers: The Art of Sequential Seasoning
The most common mistake home cooks make is "one-shot seasoning," where they throw all the spices and salt into a dish at the very end. True flavor development is a sequential process. You build a base, add depth, and finally adjust the peaks. Imagine your dish as a piece of music: you need a steady rhythm section (salt and fat), a melody (the main ingredients), and high-frequency harmony (acids and fresh herbs).
The Sequence for Success
Seasoning "By Taste" vs. "By Recipe"
Recipes are suggestions, but your palate is the final authority. If a recipe calls for one clove of garlic, but you adore garlic, use three. If a recipe says to simmer for 20 minutes, but the vegetables are already tender, turn the heat off. Learn to adjust seasoning based on the viscosity and reduction of your liquid. As a sauce reduces, it concentrates. If you salt it heavily at the start, it will become impossibly salty once the liquid evaporates. Always season in layers, and taste your dish at every single layer.
Advanced Techniques: Infusion, Reduction, and Texture Contrast
Once you master the basics, you can start experimenting with advanced flavor manipulation. Infusion is the process of steeping aromatics—like rosemary, garlic, or even chili flakes—into a fat or liquid to pull out pure flavor without the texture of the ingredient itself. Reductions, on the other hand, are the ultimate way to concentrate flavor. By simmering a stock or wine slowly, you evaporate the water content, leaving behind a dense, potent essence of the original ingredient.
Textural Contrast
Flavor is not just about the tongue; it is about the entire sensory experience. A dish that is entirely soft or entirely crunchy lacks interest. The best chefs ensure that every bite has a mix of textures.
The Crunch*: Add toasted nuts, fried shallots, or fresh croutons to a creamy soup or a soft pasta dish.
The Cream*: Add a swirl of yogurt, a dollop of crème fraîche, or a spoonful of tahini to a sharp or acidic salad to provide balance.
The Snap*: Use fresh, raw vegetables to contrast with slow-cooked, tender proteins.
Troubleshooting Your Dish
If you feel overwhelmed, create a "flavor map." Before you serve, ask yourself three questions:
If the answer to any of these is "no," you have the knowledge to fix it right now. Use the four pillars as your diagnostic tool: if it’s boring, add salt; if it’s heavy, add acid; if it’s thin, add fat; if it’s undercooked, add heat.
Final Thoughts
Mastering the balance of salt, fat, acid, and heat is a lifelong journey, not a destination. The kitchen is a place where mistakes are rarely fatal and almost always teachable. By internalizing these four principles, you transition from being a cook who hides behind complicated recipes to a chef who can look into a nearly empty refrigerator and see the potential for a masterpiece.
Remember that your palate is a muscle that strengthens with use. The more you taste, the more you will understand the subtle interplay between these four forces. Don't be afraid to over-salt a tiny sample to learn what "too much" feels like, or to burn a little butter to understand the threshold of your stove. Experience is the only ingredient that cannot be bought, only earned through time spent at the range.
At "Blame The Chef," we believe that the best meals are the ones where you can taste the intent behind every decision. You aren't just heating food; you are curating an experience. So, the next time you step into the kitchen, take a deep breath, trust your senses, and start building your flavors with confidence. You now have the roadmap to move beyond the limitations of the written page. Now, go forth and create something truly memorable—and if something goes wrong, well, you know exactly who to blame, but more importantly, you’ll know exactly how to fix it. Happy cooking!

Get the Next Recipe
Weekly recipes, techniques, and gear picks — straight to your inbox.
