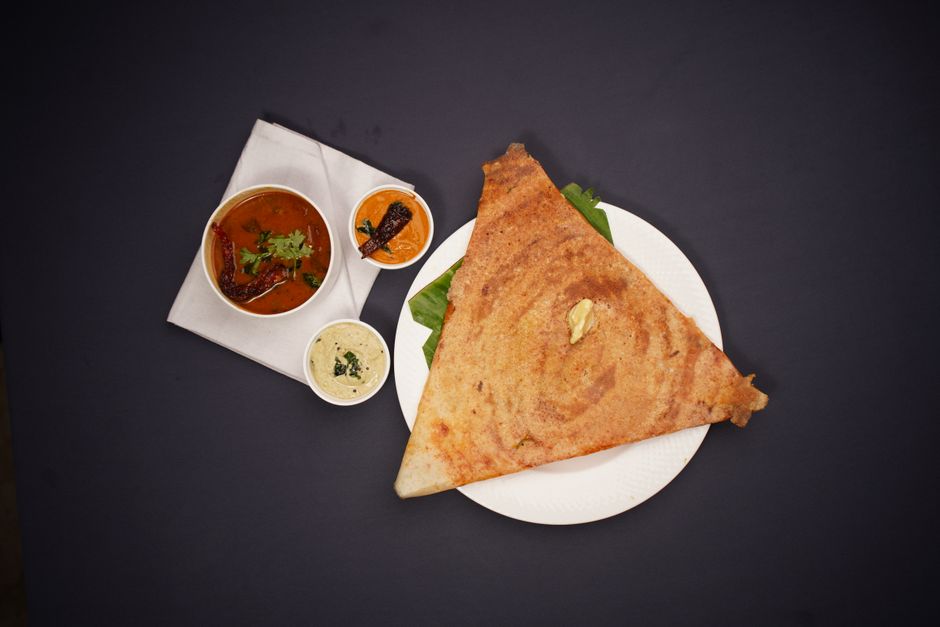
The Home Cook's Guide to South Indian Dosa: Fermenting Rice and Lentil Batter for Crispy, Lacy Crepes
There is an undeniable magic that happens when simple pantry staples are transformed through the ancient art of fermentation. For the uninitiated, the dosa may appear to be nothing more than a thin, golden-brown crepe, but to those who understand its soul, it is a feat of culinary engineering. Originating from the southern reaches of the Indian subcontinent, this fermented rice and lentil pancake is the ultimate test of a home cook’s patience and intuition. Achieving that hallmark lacy, shattered-glass texture while maintaining a pillowy, soft interior requires more than just a recipe; it requires a deep respect for the transformation of starches and proteins.
Many home cooks approach the dosa with trepidation, intimidated by the perceived complexity of the batter-making process. I am here to tell you that the process is entirely manageable, provided you respect the ratios and the invisible world of wild yeast. When we soak, grind, and ferment, we are not just preparing food; we are engaging in a biological process that predates modern convenience. It is a slow, rhythmic dance between water, grain, and ambient temperature that results in a sourdough-like complexity that simply cannot be replicated by store-bought, shelf-stable mixes.
As you embark on this journey, you will find that the dosa is a forgiving teacher if you are an observant student. You will learn to listen to the sound of the tawa as it hits the perfect heat, and you will learn to read the bubbles that populate the surface of your batter like a topographical map of flavor. By the end of this guide, you will no longer view the dosa as a restaurant-only luxury, but as a staple in your own kitchen repertoire. Let us strip away the intimidation and focus on the science of the fermentation and the art of the spread.
The Chemistry of the Batter: Why Ratios Matter
The foundation of a perfect dosa lies in the delicate balance between parboiled rice and urad dal (split black gram). The rice provides the structure and the crunch, while the urad dal provides the protein and the essential enzymes needed for fermentation. A classic, reliable ratio for a crispy dosa is 3:1—three parts rice to one part urad dal. Some variations call for a touch of fenugreek seeds (methi), which act as a catalyst for fermentation and add a subtle, nutty bitterness that rounds out the earthy profile of the lentils.
Selecting Your Ingredients
Quality starts at the source. Use idli rice or any short-grain parboiled rice, as these varieties contain the necessary starch content to ensure a cohesive batter. Avoid basmati or long-grain aromatic rices, as they do not provide the structural integrity required for the structural lattice of a dosa. For your lentils, always opt for whole or split skinless urad dal. Ensure your grains are fresh; old lentils will not ferment effectively, leaving you with a flat, lifeless batter that refuses to crisp up on the pan.
The Soaking Ritual
Soaking is where the hydration phase begins, essentially waking up the grains for the grinding process. You should soak your rice and lentils in separate bowls for at least 4 to 6 hours. This ensures that both components reach the ideal hydration level to be pulverized into a smooth, emulsified slurry. Always use clean, filtered water, as chlorine in tap water can potentially inhibit the delicate bacterial colonies responsible for the fermentation process.
"The dosa is not merely a dish; it is a living, breathing testament to the intelligence of traditional fermentation. When you master the batter, you master the chemistry of time and temperature."
The Art of the Grind: Texture and Consistency
Once your ingredients have soaked, it is time to turn them into a smooth paste. While a high-speed commercial wet grinder is the gold standard in South Indian households, a powerful high-speed blender will suffice for the home cook. The goal is to achieve a consistency similar to heavy cream. If the batter is too gritty, the dosa will tear when you attempt to spread it; if it is too thin, it will fail to develop that signature lacy structure during cooking.
Mastering the Grinding Technique
When grinding the urad dal, add small amounts of ice-cold water gradually. This serves two purposes: it prevents the friction of the blades from overheating the batter—which can kill the beneficial enzymes—and it helps whip air into the protein, leading to a fluffier final result. You are looking for a frothy, white consistency that triples in volume once ground. The rice should be ground to a slightly coarser texture, acting as the structural backbone of the crepe.
Incorporating the Fermentation Starter
Once you combine the rice and lentil mixtures, stir them together with your clean, bare hand. This is not a stylistic choice; the human hand carries unique microflora that can actually jumpstart the fermentation process. After mixing, ensure your container has enough head space, as the batter will rise significantly as the gasses produced by the Lactobacillus bacteria begin to build up. Cover the container loosely, allowing for minimal air exchange, and place it in a warm, draft-free spot.
The Fermentation Window: Patience is the Key
Fermentation is the most critical stage of the process, and it is here that most home cooks falter by rushing the clock. Depending on your ambient room temperature, the batter should ferment for anywhere between 8 to 12 hours. In warmer climates, it may happen faster; in colder regions, you might need to utilize the "proof" setting of your oven or place the bowl inside a turned-off oven with the light on.
Identifying the Signs of Success
You will know the batter is ready when it has increased in volume by at least 50% to 100%. Upon opening the lid, you should be greeted by a faintly sour, yeasty, and pleasant aroma. The surface should be covered in tiny, uniform bubbles. These bubbles are the trapped carbon dioxide that will create the beautiful, lacy patterns on your dosa when the heat hits it. If the batter smells overly pungent or acidic, it has over-fermented; if it smells like raw flour, it needs more time.
Salt and the Fermentation Pause
Always add your salt after the fermentation is complete. Salt acts as an inhibitor to bacterial growth; adding it before fermentation can slow the process down significantly and lead to an uneven rise. Once the batter has reached its peak, stir in a teaspoon of fine sea salt until fully incorporated. If the batter is too thick after fermentation, add a tablespoon of water at a time to bring it to a pourable, ribbon-like consistency.
The Tawa Ritual: Controlling the Heat
The tawa (or a heavy-bottomed, well-seasoned cast-iron skillet) is your primary tool. Dosa requires a high-heat surface to cook rapidly, locking in moisture while crisping the bottom. If your pan is too cold, the batter will stick; if it is too hot, the batter will set before you can spread it into a thin circle. The secret is to have a small bowl of cold water and a halved onion or a clean cloth nearby to regulate the temperature of the surface between batches.
Achieving the Perfect Spread
To spread the dosa, take a ladleful of batter and pour it into the center of the preheated, lightly oiled pan. Using the bottom of the ladle, apply gentle pressure and move in a continuous circular motion, starting from the center and working your way outwards in an expanding spiral. This motion is a skill that takes practice; do not be discouraged if your first few crepes are uneven or thicker than desired.
Achieving the Lacy Look
The lace pattern, or the small perforations seen on a perfectly cooked dosa, is a result of the steam escaping from the bubbles created during fermentation. By lightly drizzling a teaspoon of ghee or clarified butter around the edges and onto the surface, you facilitate the frying process. The butter seeps into those pores, resulting in an incredibly crisp texture that is essentially a savory, fried sourdough wafer.
"The sound of the batter hitting the hot tawa is the culinary heartbeat of South India. It is a sharp, sizzling applause that signals the birth of something crisp, golden, and profoundly nourishing."
Troubleshooting Common Dosa Disasters
Even the best chefs encounter issues when dealing with wild fermentation. If your batter fails to rise, do not toss it out immediately. Check your water temperature—was it too cold? Is your kitchen too chilly? Sometimes, a quick move to a sun-drenched windowsill or a warmer room is all it takes to revive the colony. If the batter remains dense, you may have used too much water during the grinding stage, preventing the aeration of the lentils.
Why Is My Dosa Sticking?
A sticking dosa is usually the result of a pan that isn't seasoned properly or a temperature that is inconsistent. If you are using a new cast-iron pan, you must ensure it has been "cured" with several layers of oil. Alternatively, the batter itself might be too low in rice content, lacking the starch required to form a release layer between the metal and the crepe. A quick trick is to rub a cut onion over the surface of the hot pan; the sulfur compounds in the onion react with the metal to create an incredibly slick, non-stick surface.
The "Rubber" Syndrome
If your dosa is chewy rather than crispy, you likely pulled it off the tawa too soon. The moisture needs time to evaporate from the center. Adjust your heat; if the bottom burns before the top is crisp, your flame is too high. If the dosa remains limp even after minutes of cooking, you may have over-diluted your batter. Remember, consistency is the difference between a sad, soggy pancake and a masterclass in textures.
The Accompaniments: Beyond the Batter
A dosa is rarely eaten alone. It is designed to be a vessel for complex, spicy, and cooling chutneys. A classic coconut chutney—made with fresh grated coconut, green chilies, ginger, and a splash of roasted gram dal—provides the perfect refreshing contrast to the warm, fermented notes of the crepe. The acidity of the dosa balances the richness of the coconut, creating a harmonious bite.
Sambar and Potato Masala
For a more substantial meal, sambar—a spicy, tamarind-based lentil stew loaded with drumsticks, carrots, and shallots—is the standard pairing. The soup provides depth and umami. The masala filling is made of tempered potatoes with mustard seeds, turmeric, and curry leaves. When you fold a crispy dosa over a spoonful of spiced potato mash, you achieve the ultimate comfort food experience that hits every flavor note: salty, sour, spicy, and earthy.
The Importance of Aromatics
Do not underestimate the power of the tempering (tadka). Heating oil and adding mustard seeds, curry leaves, and dried red chilies until they pop is a foundational skill in this cuisine. This technique releases the essential oils of the spices, adding a layer of flavor that permeates every element of the meal. Whether you are tempering your chutney or your potato filling, these aromatics are the "chef's signature" that elevates a home meal to a professional standard.
Final Thoughts: The Journey of Mastery
Cooking is a cumulative skill, and the dosa is perhaps one of the most rewarding milestones you can reach. It forces you to step away from the rigid precision of baking and enter the fluid world of sensory cooking. You are not following a timer; you are following the smell of fermentation, the sight of the bubbles, and the sound of the sizzle. As you continue to experiment with your ratios and your fermentation times, you will develop a "gut instinct" that no cookbook can teach.
Remember that every batch is a learning opportunity. If a dosa tears, treat it as a practice run. If a batch is too sour, turn it into a savory porridge or use it to thicken a soup. The beauty of the fermented batter is its versatility. By mastering the dosa, you are not just learning a recipe; you are connecting with a deep, historical culinary tradition that values the alchemy of time and patience. Keep your kitchen warm, your batter well-rested, and your tawa seasoned, and you will soon find that the perfect, lacy dosa is well within your grasp.
As you look back on your journey from the first soak of the grains to the final, crisp flip of the crepe, take pride in the process. You have cultivated a culture, you have manipulated proteins, and you have controlled heat—all the hallmarks of a true home chef. The "Blame The Chef" philosophy is built on the belief that the only way to fail is to stop trying. So, reset your kitchen, gather your ingredients, and begin your next batch with the confidence of an expert. The art of the dosa is now yours to command.

Get the Next Recipe
Weekly recipes, techniques, and gear picks — straight to your inbox.
