The Home Cook’s Guide to Spherification: Mastering Sodium Alginate and Calcium Bath Techniques for Modern Culinary Textures
The world of modern gastronomy often feels like a restricted club reserved for scientists in lab coats and avant-garde chefs working in Michelin-starred kitchens. We gaze at photos of shimmering caviar pearls that burst with liquid flavor and assume that such wizardry is lightyears beyond the reach of a home kitchen. However, the art of spherification—the process of creating delicate spheres from liquids using gelling agents—is surprisingly accessible once you understand the underlying chemistry. By stripping away the intimidation factor, we can transform simple fruit juices, broths, or even cocktail bases into stunning, professional-grade components that will leave your dinner guests absolutely speechless.
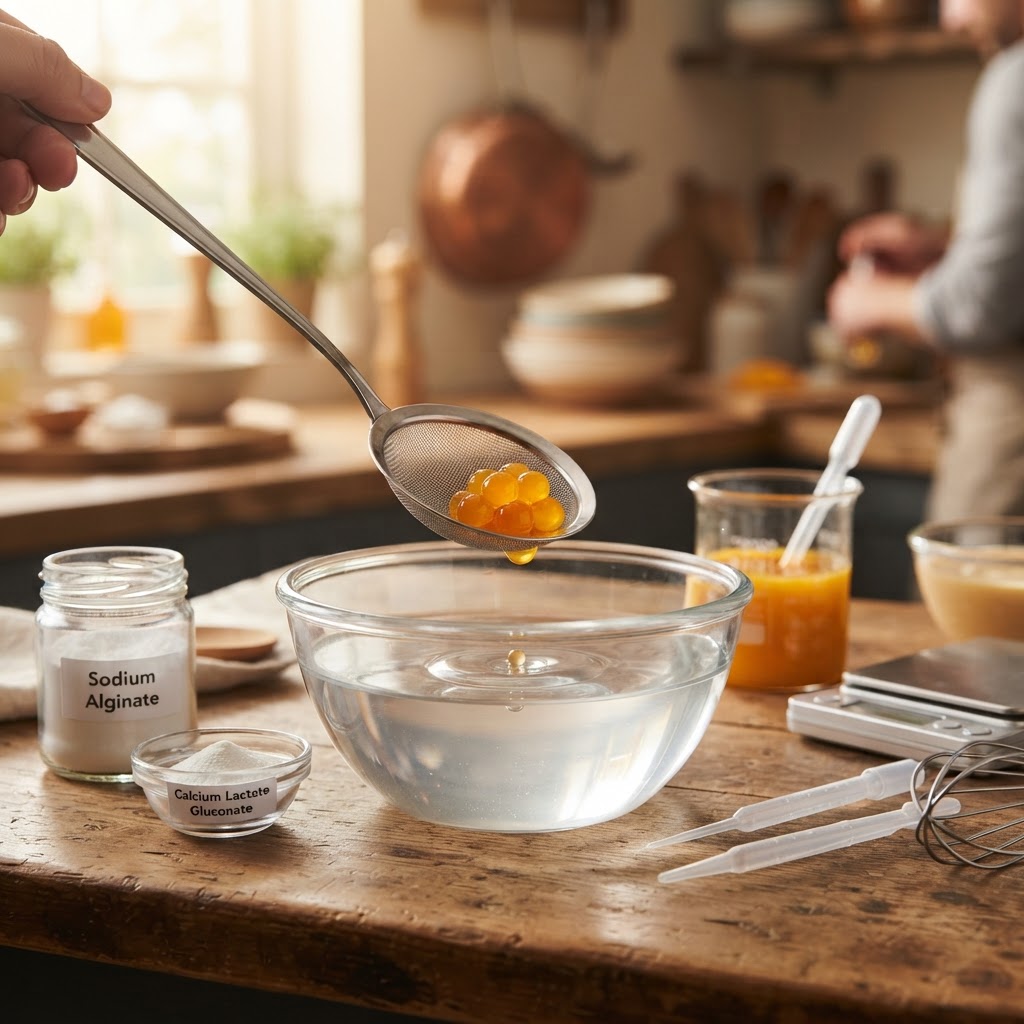
The primary secret to this technique lies in the reaction between two specific hydrocolloids: sodium alginate and calcium lactate. When a liquid containing sodium alginate is dripped into a bath of calcium, the ions migrate to create an instantaneous, thin, gelatinous membrane around the droplet, leaving the interior in a perfect liquid state. It is a dance of molecules that turns fluid into form, allowing us to rethink texture entirely. In this guide, we are going to walk through the essential equipment, the precise ratios, and the troubleshooting tips that move you from amateur enthusiast to a master of the hydrocolloid arts.
Before you begin, remember that patience is as much an ingredient as your chosen liquid base. Because we are dealing with chemical reactions that are sensitive to pH and acidity, you may find that your first few attempts require slight adjustments in terms of dilution or resting time. Do not be discouraged if your initial "caviar" doesn't look perfect; the beauty of this technique is in the iterative process. Grab your digital scale and your pipettes, because today we are going to demystify one of the most exciting techniques in the modern culinary canon and elevate your home cooking to a level of sophistication you never thought possible.
The Chemistry Behind the Magic
At its heart, spherification is a structural reaction. Sodium alginate, a natural polysaccharide extracted from brown seaweed, acts as the gelling agent. When it interacts with calcium ions, it undergoes cross-linking, forming a stable, semi-permeable membrane. This is what allows the droplet to maintain its spherical shape while the interior remains completely fluid. If you have ever enjoyed a "boba" pearl or a high-end dessert topped with "fruit caviar," you have already experienced this reaction.
For the home cook, understanding this reaction is about controlling your variables. Water quality, for instance, is surprisingly influential. If your tap water has a high mineral content, it might contain calcium that triggers the gelling process prematurely, causing your sodium alginate mixture to thicken before you have even dropped it into the bath. Using distilled water is the single best way to ensure consistent results, especially when you are first learning the mechanics of the technique.
Precision is the hallmark of a great chef, and this is nowhere more true than in the measurement of your powders. Using volume measurements like teaspoons will almost always lead to inconsistent textures. Instead, you must use a micro-scale that measures in 0.1-gram increments. Without the right ratio of alginate to liquid, you will end up with either a soup that refuses to gel or a rubbery, inedible ball that lacks that delightful "pop" upon biting.
The Role of Calcium Sources
While calcium chloride is the traditional salt used for the bath, it can sometimes leave a slightly bitter, metallic aftertaste. For home cooks looking for a cleaner profile, calcium lactate or calcium lactate gluconate are far superior choices. They are essentially tasteless and much more forgiving in terms of flavor profile, especially when you are working with delicate juices like melon, lychee, or elderflower.
"True culinary artistry is not about following a recipe to the letter; it is about understanding the molecular interactions that turn a simple liquid into an experience for the palate."
Essential Equipment for the Modern Kitchen
You do not need a commercial lab to perform spherification at home. In fact, most of the equipment you need is likely already in your kitchen, or easily acquired through culinary specialty shops. The most important tool, as mentioned, is your digital scale. Because these chemicals are potent, accuracy is not negotiable. A fraction of a gram can be the difference between a liquid-filled sphere and a hard, gelatinous pellet.
Beyond the scale, you will need a reliable immersion blender. When incorporating sodium alginate into your liquid base, it tends to clump up like flour in gravy. An immersion blender creates the high-shear environment necessary to hydrate the powder fully without introducing excessive air. If you do introduce air—which will appear as tiny bubbles in your base—you must let the mixture sit, preferably under vacuum or in the refrigerator, to allow those bubbles to dissipate before you start dropping.
For the actual "dropping" process, you have a few options. A simple pipette or a plastic syringe is perfect for creating small, caviar-sized spheres. If you are aiming for larger, ravioli-sized spheres, you might look into a spherical mold or a specialized spoon. You will also need a fine-mesh slotted spoon or a small strainer to retrieve your pearls from the calcium bath and transfer them to a rinse bath.
Setting Up Your Workspace
Create a "production line" of bowls on your counter. Bowl one should hold your base mixture; bowl two is your calcium bath; bowl three is a bowl of fresh, clean water for rinsing. This assembly line prevents cross-contamination and keeps your station organized. Having a paper towel nearby to wipe your tools between batches will save you from the dreaded "stuck-together" clumps that can occur when droplets hit the bath too close together.
Basic Spherification: The Method
Basic Spherification is the most common technique and is best used for liquids that will be served immediately. Because the gelling process continues even after the spheres are removed from the bath, they will eventually turn into solid jellies if left to sit for too long. If you are preparing a dish for a party, plan to create your spheres no more than thirty minutes before service to ensure they retain that signature liquid center.
To begin, you will need to prepare your alginate base. A standard ratio is 0.5% to 1% sodium alginate by weight of your total liquid. For example, if you are using 200g of strawberry juice, use 1g of sodium alginate. Blend this until perfectly smooth and allow it to rest for at least two hours—or ideally overnight—to ensure all air bubbles have migrated to the surface. This rest time is critical; if you try to work with a bubbly mixture, your spheres will have jagged edges and inconsistent membranes.
Next, prepare your calcium bath. Dissolve 5g of calcium lactate into 1 liter of distilled water. Stir until completely clear. Once your base has rested and your bath is prepared, fill your syringe with the base. Hold it about 3-4 inches above the surface of the bath and begin to drip the liquid into the bowl. The height is important; if you are too low, the droplet won't form a round shape, and if you are too high, the force of the impact may break the forming membrane.
Managing pH and Acidity
One of the biggest hurdles in spherification is acidity. Many juices, especially citrus, have a low pH that prevents the calcium from binding with the alginate. If your liquid is naturally acidic, you will need to add a small amount of sodium citrate to buffer the mixture and bring the pH level up to a neutral range. Without this step, your droplets will simply dissolve into the bath rather than forming a sphere.
Reverse Spherification: For the Long Haul
If you need to prepare your pearls in advance, or if you are working with a liquid that is rich in calcium (like dairy or yogurt), you must use Reverse Spherification. In this version, the roles are flipped: the calcium is in the liquid base, and the sodium alginate is in the bath. Because the alginate does not penetrate into the center of the sphere, the process stops once you remove the sphere from the bath, meaning your spheres will hold their liquid consistency for hours or even days.
This is the preferred method for high-end catering and professional prep. You can make these spheres hours ahead of time, store them in a flavorful liquid (like a thin syrup or a clarified stock), and they will remain perfectly stable. The texture of reverse-spherified spheres is also generally more robust, making them slightly easier to plate and manipulate without fear of them popping prematurely.
For this technique, add 1-2% calcium lactate to your ingredient base. Because the base is now the carrier of the calcium, you don't have to worry as much about the pH of your ingredients, making this a much more versatile technique for a wider variety of liquids. The bath, meanwhile, is made by dissolving 0.5% sodium alginate in water.
Why Texture Matters
The thickness of the membrane in reverse spherification is controlled by time. If you leave the spheres in the bath for longer, the membrane becomes thicker. This is actually a desirable trait if you want to create "ravioli" that can be plated on top of a warm dish. The heat of the dish will warm the liquid center, creating a surprising burst of temperature-contrast for the diner, while the membrane remains firm enough to hold its shape.
"The difference between a home cook and a chef is the intentionality of the texture. With reverse spherification, you are not just plating food; you are engineering a sensory experience."
Troubleshooting Common Failures
Every chef has a story about their first attempt at spherification. Perhaps the droplets flattened into discs, or perhaps they turned into a gloopy, jelly-like mess. Do not be discouraged. These failures are usually the result of one of three things: improper hydration, air bubbles, or incorrect water chemistry. Let’s break down the common pitfalls so you don't have to learn the hard way.
If your spheres are breaking or tearing, the membrane is likely too thin. This usually happens if you haven't given the spheres enough time in the bath, or if your calcium concentration is too low. Try increasing the time in the bath by 30-second increments. Conversely, if your spheres taste bitter or "soapy," you have likely used too much calcium chloride or your liquid has been sitting in the bath for far too long. Switch to calcium lactate for a cleaner taste.
If you find that your droplets are not forming spheres and are instead trailing into "worms," your liquid base is likely too thin or you are dispensing the liquid too quickly. If your liquid is very thin, try adding a small amount of a thickening agent like xanthan gum to the base. A tiny pinch—barely a 1/8th of a teaspoon—will increase the viscosity just enough to help the droplet maintain its shape as it enters the bath.
The Importance of Purity
Always ensure that your rinse water is kept clean. If you are doing multiple batches, the water will eventually pick up traces of calcium or alginate. Even a small amount of contamination can lead to the spheres sticking to one another. Keep a pitcher of fresh water nearby and change your rinse bowl frequently. This simple step is the mark of a disciplined kitchen and will drastically improve the clarity and shine of your finished product.
Creative Applications and Plating
Once you have mastered the basics, it is time to get creative. Spherification is not just for dessert; it is a powerful tool for savory courses as well. Imagine a balsamic vinegar caviar served over a caprese salad, or soy sauce spheres added to a ginger-scented carrot soup. By capturing flavors in a concentrated sphere, you allow the diner to control the intensity of the flavor by deciding when and where to "pop" the sphere on their tongue.
Consider the role of temperature. You can make hot-stable spheres by incorporating a tiny amount of specific gelling agents that can handle higher heat. This opens up possibilities for serving spheres in warm broths. Or, experiment with different colors and opacities by blending in natural purees or even using edible gold leaf mixed into your base. The visual impact of a translucent sphere with a tiny, glittery inclusion is hard to beat.
When plating, think about contrast. A bright green basil-oil sphere looks stunning against a white porcelain plate, especially if it is accompanied by a brush of bright red tomato emulsion. Because these spheres are uniform in size and shape, they offer a level of geometric precision that is otherwise impossible to achieve with traditional cooking methods. It allows you to create patterns and shapes that feel truly modern and artistic.
Balancing Flavors
Keep in mind that when you serve a sphere, you are providing a concentrated burst of flavor. Ensure that the liquid inside the sphere complements the surrounding components. If you are serving a sweet dish, perhaps a lemon-thyme sphere acts as a palate cleanser. If you are serving a savory dish, a splash of acid via a vinegar-based sphere can cut through the richness of a fatty protein. Treat the sphere as a seasoning, not just a decoration.
Mastering the Ratio: A Chef's Cheat Sheet
To keep your workflow efficient, it helps to have a quick reference guide. While you should always be prepared to adjust for specific ingredients, these ratios serve as the foundation for almost every dish I prepare in my own kitchen. Remember that for Basic Spherification, your bath is the calcium source, and for Reverse Spherification, your liquid is the calcium source.
Standard Base (Basic):* 200g liquid + 1g sodium alginate (0.5% concentration).
Standard Bath (Basic):* 1000g distilled water + 5g calcium lactate (0.5% concentration).
Standard Base (Reverse):* 200g liquid + 2g calcium lactate (1% concentration).
Standard Bath (Reverse):* 1000g distilled water + 5g sodium alginate (0.5% concentration).
When you are scaling these recipes up, always rely on weight, not volume. Even professional chefs have a bad day when they try to eyeball measurements. Your scale is your best friend in this endeavor. Keep a small notebook in your kitchen where you record your ratios, the type of liquid used, and the length of time the spheres were submerged. Over time, this journal will become your most valuable resource for repeating your successes and refining your technique.
Refining Your Workflow
Phase 1: Prep.* Calculate your ratios, blend your base, and let it rest for at least 4 hours.
Phase 2: The Bath.* Prepare your chemical bath in a clear, wide container so you can see the spheres forming.
Phase 3: The Drop.* Use a pipette for small batches, or a multi-dropper tool if you are producing in larger quantities.
Phase 4: The Rinse.* Ensure your rinse water is at room temperature to avoid shocking the delicate structure.
Phase 5: Storage.* Store in a container with a small amount of the original liquid to keep them from drying out.
Final Thoughts
Stepping into the world of molecular gastronomy does not require a complete overhaul of your identity as a cook. It is simply an expansion of your toolkit. By learning to harness the power of sodium alginate and the precise application of calcium baths, you are gaining the ability to manipulate the very physics of your ingredients. This is a skill that encourages playfulness, precision, and a deeper understanding of the foods we eat every day.
Remember that the ultimate goal of any technique—whether it is searing a steak or creating liquid caviar—is to provide pleasure to the person eating the meal. If a technique makes the food taste better, look more beautiful, or provides a surprising, delightful texture, then it is a success. Don't be afraid to fail, don't be afraid to experiment with strange flavors, and most importantly, don't forget to have fun in the process. You are the chef in your own home, and the kitchen is your laboratory.
As you become more comfortable with these methods, you will find that your confidence in the kitchen grows. You will begin to look at ingredients not just for their flavor, but for their structural potential. You will see a bowl of fresh fruit and imagine a dozen different ways to serve it, from traditional slices to delicate, bursting pearls. That shift in perspective is the true mark of a master. Keep pushing the boundaries, keep refining your ratios, and keep finding new ways to surprise yourself. Happy cooking, and remember: if it doesn't work the first time, you can always just blame the chef!
Get the Next Recipe
Weekly recipes, techniques, and gear picks — straight to your inbox.
