The Home Cook’s Guide to Thermal Processing: Mastering Par-Boiling and Shocking Techniques for Perfectly Al Dente Vegetables and Pastas
The journey toward professional-level cooking at home often feels like a series of small, mysterious hurdles that stand between you and the results you see in restaurant kitchens. One of the most common complaints I hear from home cooks is that their vegetables lose their vibrancy or turn into mush, and their pasta never quite achieves that elusive, toothsome bite that defines true Italian cooking. This is rarely a failure of your recipe or your equipment, but rather a fundamental disconnect in your understanding of thermal processing. Mastering the transition between extreme heat and immediate cooling is the difference between a sad, gray pile of broccoli and a plate of vibrant, crisp-tender greens that command attention. By understanding the science behind how heat destroys cell walls and how rapid temperature changes halt that process, you gain total control over your final product.
At its core, par-boiling and shocking are techniques born from efficiency and precision. In a professional kitchen, we operate on a tight schedule, often prepping components hours before service begins to ensure that the final dish comes together in mere minutes. These techniques allow us to stop the cooking process at the exact moment of perfection, ensuring that the integrity of the ingredient remains intact regardless of when it is eventually served. You are effectively "locking in" the chlorophyll, the texture, and the structural integrity of your food through thermal manipulation. Once you grasp these concepts, you are no longer just following a set of instructions; you are managing the biological reality of your ingredients.
I want you to look at your stove not just as a heater, but as a laboratory where you control the chemical environment of your ingredients. We are going to strip away the guesswork and provide you with a masterclass on heat management. Whether you are blanching a bundle of asparagus for a spring salad, par-boiling potatoes for the crispiest roast you’ve ever tasted, or setting your pasta up for a perfect marriage with a sauce, these techniques will change the way you cook forever. Put on your apron, sharpen your knife, and prepare to elevate your home kitchen to a level of technical excellence you previously thought was reserved for the professionals.
The Science of the Cell Wall: Why We Par-Boil
At the most basic level, cooking is simply the application of heat to break down cellular structures. In vegetables, this involves the breakdown of pectin, the "glue" that holds plant cells together. When you boil a vegetable for too long, that pectin dissolves completely, leading to a limp, unappealing texture. Par-boiling, or partial boiling, allows us to soften the vegetable just enough to reach a pleasant texture while preserving the crunch that indicates freshness. By stopping the heat before the internal structure fully collapses, we maintain the bright colors and natural sweetness that are often cooked away during longer, uncontrolled boiling.
The importance of the water-to-vegetable ratio cannot be overstated. When you drop a large amount of cold produce into a small pot of water, the temperature of the water plummets. This is the death of the blanching process, as it leads to "leaching," where flavors and nutrients bleed into the water rather than staying trapped inside the food. You want a high volume of boiling, salted water—think of it like the ocean—to ensure that the temperature drop is minimal and the recovery time is near-instant. This speed is essential for the chemical reactions we want to facilitate.
Salt as a Catalyst
Salt is not just for seasoning; it is an essential tool in thermal processing. Salting your water does three things: it increases the boiling point of the water slightly, it helps break down the outer skin of hardy vegetables, and it ensures that the food is seasoned from the inside out. Do not fear the salt; a well-prepared blanching liquid should taste like the sea. If the water is undersalted, your vegetables will taste flat, and you will find yourself oversaltng the finished dish to compensate, which never yields the same balanced profile as seasoning during the cooking phase.
"The difference between a home cook and a chef is often found in the water—if your blanching water doesn't taste like the sea, your vegetables are already losing the battle."
Mastering the Ice Bath: The Art of Shocking
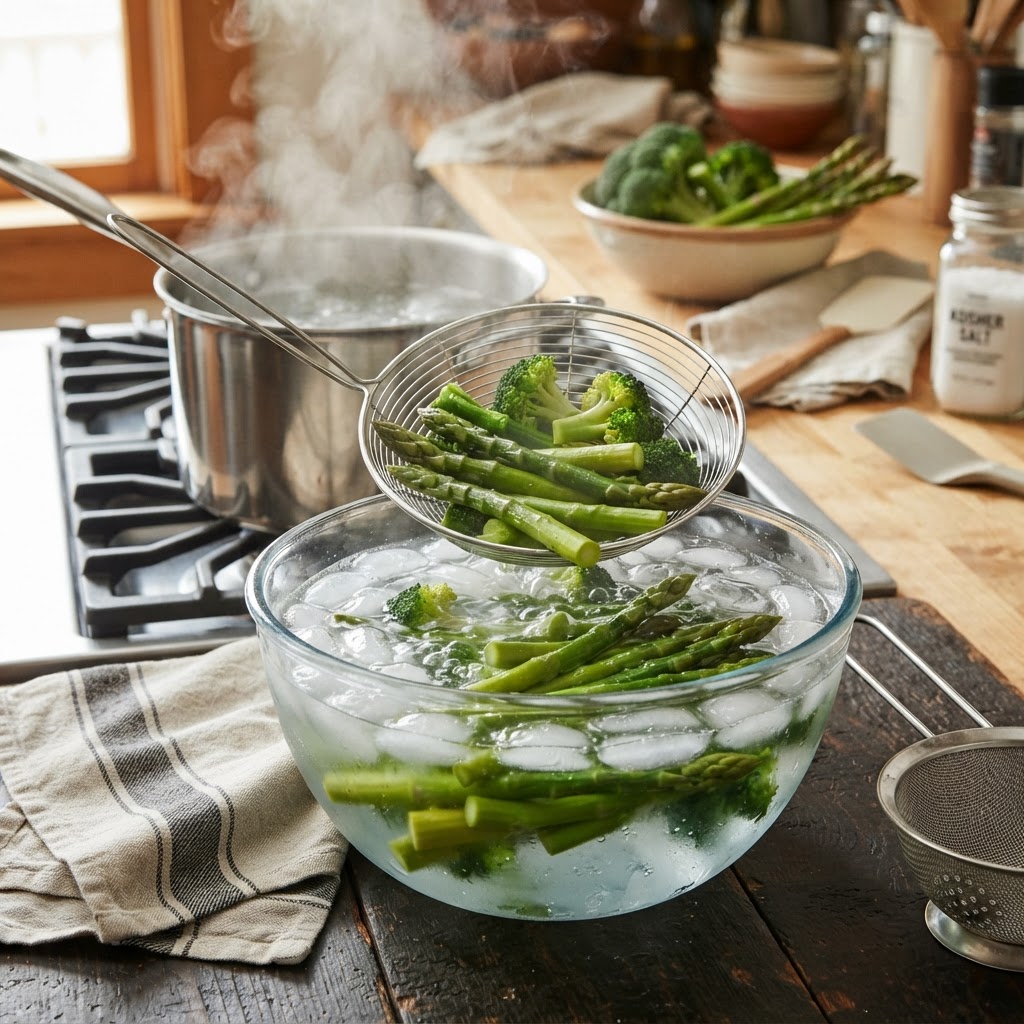
Once you have achieved that perfect texture, you have to hit the "stop" button on the cooking process. Even when you remove a vegetable from boiling water, it retains residual heat that will continue to cook it for several minutes. This is known as carryover cooking, and it is the hidden enemy of the home cook. Shocking—the act of submerging your hot ingredient into an ice bath immediately after par-boiling—instantly halts this carryover, locking in the vibrant color and that desirable, crisp-tender texture.
The ice bath needs to be substantial. Using a small bowl with three or four cubes is ineffective; you want a large vessel filled with at least fifty percent ice and fifty percent cold water. If you are blanching large batches, have a backup bowl of ice ready. The moment the ingredients hit the icy water, the temperature drop should be instantaneous. This thermal shock is what forces the chlorophyll to set in green vegetables, ensuring they remain vibrant rather than turning into that dull, olive-drab color we often associate with canned or overcooked greens.
Timing Your Ice Bath
Different ingredients require different amounts of time in the ice bath. For delicate items like spinach or peas, thirty seconds in the ice bath is often plenty. For heartier items like root vegetables or green beans, you might need two to three minutes. The goal is to bring the ingredient down to room temperature so that no further cooking occurs. Once they are sufficiently chilled, remove them from the water immediately. Leaving them to soak too long will lead to waterlogging, which will dilute the flavor and ruin your texture.
Par-Boiling Potatoes: The Secret to Crispy Roasts
If you have ever struggled to get a potato that is fluffy on the inside and glass-shatteringly crispy on the outside, you need to add par-boiling to your repertoire. The goal here is to gelatinize the surface starches of the potato. When you par-boil a potato in salted water, the exterior layer begins to soften and break down, creating a starchy "slurry" or fuzz on the surface. When you later roast these potatoes, that starch expands and hardens, creating a crust that is far superior to anything you could achieve by simply tossing raw potatoes into the oven.
To do this correctly, cut your potatoes into uniform sizes. Place them in cold, salted water and bring them to a boil, then lower to a simmer for about 8 to 12 minutes, depending on the size of the chunks. You are looking for a fork to pierce the exterior easily, while the center remains slightly resistant. Drain them thoroughly—steam is your enemy here—and let them sit in the colander for a minute or two. Once they are dry and slightly "fuzzy" on the surface, they are ready for the oven with your fat of choice.
The Role of Acid in Par-Boiling
Some chefs suggest adding a splash of white vinegar to the boiling water for potatoes. This is because the acid helps the pectin hold its shape, preventing the potatoes from disintegrating into mush during the par-boiling process. This is especially helpful if you are working with starchy potatoes like Russets. By controlling the structural integrity of the outside while allowing the inside to hydrate, you create a perfect internal environment for the heat of the oven to work its magic.
"A potato that has been properly par-boiled is a potato that has been primed for greatness; you are building a crust before the oven is even turned on."
The Pasta Paradox: Why Par-Boiling Changes Everything
Pasta is perhaps the most misunderstood ingredient in the home kitchen. We are taught to boil it until it is "done," but in a restaurant, we almost always pull the pasta out of the water 2 to 3 minutes before it is technically edible. We then finish the pasta in the sauce, allowing the starch from the pasta water to emulsify with the fat in the sauce, creating a silky, cohesive coating. This is the mantecare technique, and it is impossible to achieve if you have already cooked your pasta to completion in the water.
When you par-boil pasta, you are reserving the starches that are normally poured down the drain. This "liquid gold"—the cloudy, starchy water remaining in the pot—is the secret to binding any sauce to your pasta. Whether you are making a simple aglio e olio, a rich carbonara, or a complex ragù, adding a splash of that pasta water to the pan while the pasta finishes cooking in the sauce creates a stable emulsion. It binds the sauce to the pasta, ensuring that every bite is perfectly flavored rather than having sauce pooled at the bottom of the bowl.
Managing the Timing
To master this, you must taste your pasta constantly. Stop relying on the time suggested on the back of the box, as that assumes the pasta will be served immediately and often results in overcooked strands. If the box says 10 minutes, pull it at 7 or 8. Toss it into your pan with the sauce and a half-cup of your reserved pasta water, and stir vigorously over medium-high heat. You will see the sauce transform from a separate liquid into a glossy, thick coat that clings to the noodles. This is the moment you have been waiting for.
* Always salt your pasta water until it tastes like the sea.
* Never rinse your pasta; the starch on the exterior is necessary for the sauce to grip the noodles.
* Reserve at least one cup of pasta water before draining.
* Finish the cooking process in the pan with the sauce.
* Use a wide pan rather than a deep pot for tossing, if possible.
Advanced Techniques: Blanching and Shocking Proteins
While we usually associate these techniques with vegetables and starches, they are also incredibly useful for certain proteins. Take, for example, the preparation of sweetbreads or the quick-blanching of shellfish. By briefly submerging scallops or shrimp in boiling water, you can "set" the exterior of the protein, which makes them easier to handle or even prepares them for a quick sear. This technique is also used to remove impurities from bones when making a high-end consommé or a clear stock.
When you blanch bones for a stock, you boil them for 5 to 10 minutes and then rinse away the grey foam that rises to the surface. This foam consists of denatured proteins and impurities that, if left in the pot, would cloud your finished product. By starting your stock with blanched bones, you ensure that your finished broth will be crystal clear. It is an extra step, but for the discerning home cook, it is the difference between a murky, bitter base and a liquid that is as pure as mountain spring water.
The Thermal Buffer
When dealing with delicate seafood, the ice bath is your safety net. If you are preparing a shrimp cocktail, you want the shrimp to be cooked perfectly to the center, but you don't want them rubbery. By pulling them out the moment they turn pink and dropping them into an ice bath, you stop the heat immediately. The result is a shrimp that is firm, sweet, and perfectly tender, rather than one that has continued to cook in its own residual heat until it becomes tough.
Maintaining Consistency in Your Kitchen Workflow
The true beauty of mastering these techniques is that they bring a sense of order to your kitchen. When you learn to par-boil your carrots, blanch your green beans, and partially cook your potatoes in advance, you can prepare a complex meal for guests without the stress of everything needing to be finished at once. You can execute these steps in the morning, store your perfectly blanched ingredients in the refrigerator, and then perform a final "sauté" or roast to bring everything to the table while it is piping hot.
Consistency is the hallmark of a professional. By removing the variables associated with uncontrolled cooking, you ensure that your dish tastes the same on a Tuesday night as it does on a special occasion. Your timing becomes more precise, your seasoning becomes more accurate, and your confidence in the kitchen grows. You are no longer guessing if the broccoli is done; you know it is done because you controlled the thermal processing from start to finish.
"A well-organized kitchen is a quiet kitchen; by mastering thermal processing, you eliminate the panic of the final minute and replace it with the calm of a calculated execution."
Final Thoughts
The journey toward culinary mastery is paved with the technical skills that many take for granted. By embracing the principles of par-boiling and shocking, you have moved beyond the role of a passive cook and into the role of a culinary technician. You have learned that heat is a variable to be managed, not a force to be feared. Whether you are perfecting the crunch of a garden-fresh vegetable, the structural perfection of a roast potato, or the ideal texture of a silk-coated pasta dish, these skills serve as your foundation.
Remember that the goal is always balance—balancing texture with flavor, and heat with cooling. Don't be discouraged if your first attempt isn't perfect; thermal management is a physical skill that improves with muscle memory. Keep your water salted, keep your ice bath ready, and never stop paying attention to the way your ingredients respond to the heat. With every meal you prepare, you are building a deeper understanding of the chemistry of the kitchen, and that is where the true joy of cooking begins.
Go forth and experiment. Take these techniques and apply them to your favorite ingredients, observe the differences, and embrace the results. The professional kitchen might seem like a mysterious place, but with these tools in your hand, you are already halfway there. You have the knowledge; now, you just have to put it to the test. Your friends and family will notice the difference, not just in the presentation of the food, but in the vibrancy and the texture of every single bite. Happy cooking, and remember: blame the chef, but make sure you’re the one holding the tongs.
As you continue to refine these skills, think of your kitchen as a living, breathing space. Each time you prepare a meal, you are engaging in a dialogue with your ingredients. Are the potatoes firm enough for the next step? Is the pasta water cloudy enough to act as a binder? These questions, once answered with intuition and practice, will lead you to a level of consistency you never thought possible. You are moving from a cook who follows a recipe to a chef who understands the 'why' behind every motion.
The importance of the equipment you use shouldn't be overlooked. A large, heavy-bottomed stockpot is essential for maintaining the high water temperature required for effective blanching. If you are using a thin, small pot, you are fighting against the physics of your own tools. Invest in quality pots and pans that hold heat effectively; it makes the process of thermal management significantly easier. Your tools are extensions of your hands, and in the world of professional thermal processing, you want tools that are as committed to the process as you are.
Finally, document your successes and your failures. Keep a small notebook near your workstation to record times—how long for the carrots, how long for the asparagus, how long for the specific pasta brand you prefer. You will find that these times become second nature, and you will eventually be able to gauge "done-ness" by sight and smell alone. That is the moment where the science ends and the art begins. Enjoy the process, trust in the thermal science, and keep pushing your boundaries. There is always a new technique to learn, a new ingredient to master, and a new plate to present. Keep striving for that perfect bite, and the rest will follow.
The art of the blanch is not merely about preserving color; it is about respecting the integrity of the harvest. Whether you are using vegetables from your own garden or produce picked up at the local farmer's market, these techniques allow you to highlight the natural beauty of the food. It is a way of saying that you value the ingredient enough to handle it with precision. Never rush the process; the few minutes you spend prepping your ice bath and monitoring your boiling water are minutes that pay dividends on the plate.
As we wrap up this guide, remember that the most important ingredient in any dish is your own attention to detail. Thermal processing is the ultimate expression of that attention. By controlling the heat, you are effectively choosing the texture, the flavor, and the final experience of your guests. It is an act of care and an act of skill. I look forward to hearing about your success in the kitchen. Keep those pots boiling, keep the ice ready, and keep cooking with heart. This is just the beginning of your journey toward mastering the professional kitchen, and I am honored to be your guide along the way. Your kitchen is now a space of transformation, where raw ingredients become culinary art, all thanks to your mastery of the heat. Stay curious, stay precise, and most importantly, enjoy every step of the delicious path ahead. Your kitchen is your canvas, and now you have the tools to paint with perfect precision. Go make something incredible today—the heat is waiting, and you are ready.
Get the Next Recipe
Weekly recipes, techniques, and gear picks — straight to your inbox.
