The Home Cook's Guide to Vietnamese Pho: Building Layered Broth with Charred Aromatics and Rice Noodles
There is an almost mystical quality to a steaming bowl of Vietnamese Pho. It is not merely a soup, but a masterclass in balance, patience, and the profound extraction of flavor from humble ingredients. Many home cooks approach this dish with a sense of trepidation, fearing the complexity of the broth or the precision required for the perfect noodle texture. However, once you understand the fundamental chemistry behind the charred aromatics and the long, slow simmer of protein-rich bones, you realize that the process is deeply rewarding and surprisingly accessible. We are going to strip away the intimidation factor and break this down into a manageable, professional-level workflow that you can replicate in your own kitchen.
To master pho, one must first surrender to the concept of time. This is not a weeknight meal that comes together in thirty minutes; it is an all-day affair that demands your presence and your attention. You are essentially building a landscape of flavor, starting from a foundation of clarity and ending with a complex, spice-forward aromatic profile that lingers on the palate. By focusing on high-quality ingredients—specifically marrow-rich beef bones and fresh, high-quality spices—you are setting the stage for a restaurant-quality experience. The goal is to produce a broth that is crystal clear yet deeply concentrated, smelling of star anise, cinnamon, and the smoky essence of charred ginger.
In this guide, we will move beyond the basic recipes found in standard cookbooks and dive into the specific techniques used by seasoned professionals to ensure a clean, vibrant result. We will discuss the crucial importance of the parboil-and-scrub method to remove impurities, the delicate art of toasting spices to unlock volatile oils, and the precise ratios required for a balanced spice bag. Prepare your kitchen, sharpen your knives, and get ready to dedicate a day to the art of the broth. By the time you ladle your first bowl, you will have gained not just a delicious meal, but a deeper understanding of one of the world's most iconic culinary traditions.
The Foundation: Selecting and Prepping Your Bones
The soul of a great beef pho lies entirely in the bones. If you cut corners here, the broth will lack the essential body and mouthfeel that characterizes a truly great bowl. You are looking for a combination of bones that serve different purposes: marrow bones for richness, knuckle bones for the gelatin that provides the silky texture, and neck bones for a deep, meaty flavor. When you are at the butcher, don't be shy about asking for specific cuts; aim for a mix that provides both collagen and marrow.
The Importance of the Parboil
One of the most common mistakes home cooks make is skipping the parboiling step. You must place your raw bones in a large stockpot, cover them with cold water, and bring them to a rolling boil for ten to fifteen minutes. You will see a thick, grey foam rise to the surface—this is essentially blood, impurities, and coagulated proteins that will cloud your final product. Once this foam has surfaced, drain the entire pot and scrub every single bone under cold running water. This "reset" is what separates a murky, bitter-tasting liquid from a refined, elegant consommé.
The Ratio of Bone to Water
To achieve the correct concentration of flavor, your bone-to-water ratio should be precise. A good rule of thumb is to use approximately three pounds of bones for every gallon of water. If you use too much water, you will end up with a diluted, watery soup; use too little, and you may find the broth too heavy or overly salty once reduced. Always start with cold, filtered water, as it helps extract the proteins more efficiently as the temperature rises. Remember that you are building the liquid volume to account for evaporation during the long simmer, so factor in an extra quart for the long cooking duration.
The Art of Charring Aromatics
The characteristic depth of pho is impossible to achieve without the smokiness provided by charred ginger and yellow onions. In professional Vietnamese kitchens, this is often done over an open flame, but you can easily achieve the same result at home using a broiler or a heavy cast-iron skillet. The charring process isn't just about color; it is about caramelizing the natural sugars in the aromatics and creating a subtle, earthy smoke that anchors the spices.
"A bowl of Pho is a dialogue between the sharpness of ginger, the sweetness of onions, and the warmth of toasted spices. If you omit the char, you are simply drinking salt water."
Preparing the Ginger and Onions
Take a large knob of fresh ginger—about four to six inches—and slice it in half lengthwise. Peel two medium-sized yellow onions and halve them as well. Do not remove the skins from the onions entirely, as they impart a beautiful golden hue to the broth and add a touch of sweetness. Place these under your broiler or directly onto a gas burner grate until the skins are blackened and the flesh begins to soften and release its juices. This should take about ten to twelve minutes depending on your heat source.
Why the Char Matters
The carbonization of the outer layers acts as a flavor bridge. When these charred aromatics hit the simmering broth, they release complex volatile compounds that balance out the rich, fatty mouthfeel of the beef bones. You are essentially looking for a "char-to-flesh" ratio where the outside is dark brown or black, but the inside remains tender and sweet. Once charred, scrape off the excess burnt skin, rinse the aromatics briefly to remove any grit, and give them a light bash with the side of your knife to release the essential oils before they head into the pot.
Spices: The Backbone of Pho Aromatics
The spice blend is the signature of your pho. While there are traditional ratios, the beauty of being a home cook is the ability to adjust these to your personal preference. The core "holy trinity" of pho spices consists of star anise, cloves, and cinnamon sticks. To these, many chefs add coriander seeds, fennel seeds, and a single black cardamom pod for a deeper, more resinous aroma.
Toasting for Maximum Potency
Never throw raw spices into your pot. To unlock their full potential, you must lightly dry toast them in a skillet over medium-low heat. Keep the spices moving constantly to prevent them from burning, which would turn them bitter. You will know they are ready when your kitchen begins to smell intensely fragrant—this usually takes about three to five minutes. Once toasted, wrap them in a piece of cheesecloth or a dedicated spice infuser bag. This ensures that you can remove them easily after an hour or so, preventing the broth from becoming overly "medicinal" or aggressive.
The Spice Infusion Timeline
Patience is required here. If you leave your spices in the broth for the entire six-to-eight-hour simmer, the volatile oils will degrade and the flavor profile will lose its brightness. Add your spice bag to the broth only after you have skimmed the initial impurities and the stock is simmering clearly. Let it infuse for sixty to ninety minutes, then remove it. This creates a balanced, layered flavor where the spices provide a high-note fragrance rather than a heavy-handed, overpowering medicinal taste.
The Slow Simmer and the Clarity Technique
Once your bones are clean, your aromatics are charred, and your spices are ready, the actual cooking begins. A perfect pho broth is defined by its clarity. You want a liquid that is pale, golden, and sparkling, not cloudy or dense. Achieving this requires constant vigilance during the first hour of the simmer and a steady, low-temperature cook for the remainder.
Maintaining the Low Simmer
The biggest enemy of a clear broth is a rolling boil. If the water boils aggressively, it emulsifies the fat and the proteins, turning the broth cloudy. Once you have reached a boil, turn your heat down to the absolute lowest setting. You want a gentle bubble that breaks the surface occasionally—what chefs often call a "smile" in the pot. This allows the collagen to slowly break down into gelatin without clouding the liquid.
Consistent Skimming
During the first hour of the simmer, you must stand by the pot with a fine-mesh skimmer. As the bones release their final remnants of protein, a thin layer of scum will form on the surface. Skim this off religiously. Once you have achieved a clean surface, add your charred ginger, onions, and the spice bag. Place the lid on partially, leaving an opening for steam to escape, which helps keep the broth concentrated.
"True clarity in a broth is a reflection of the chef's discipline. If you walk away from the pot, the broth will surely walk away from you."
Monitoring and Adjusting
Throughout the process, monitor the volume of your broth. If the water level drops too far, feel free to add a splash of hot water, but do so sparingly to avoid diluting the hard-won flavor. You should aim for a total simmer time of at least six hours, though eight is often better for optimal collagen extraction. When you reach the final hour, taste the broth and adjust with high-quality fish sauce and a small amount of rock sugar. The rock sugar is vital; it provides a mellow sweetness that rounds out the saltiness of the fish sauce.
Selecting and Preparing Rice Noodles
The rice noodle is the bridge between the broth and the bowl. There is nothing more disappointing than a beautiful, fragrant broth accompanied by mushy, overcooked noodles. You want a noodle that maintains a slight "al dente" snap even after it has been submerged in the hot soup for several minutes.
Understanding Noodle Varieties
For pho, look for dried banh pho (flat rice noodles) at your local Asian grocer. They come in varying widths, but a medium width is the gold standard for traditional bowls. When shopping, check the ingredients list—the best noodles contain only rice flour, water, and perhaps a small amount of tapioca or cornstarch for structure. Avoid noodles that contain additives or bleaching agents, as they often have a chemical aftertaste.
The Perfect Cook
Never boil your noodles in the broth. This will cloud your soup with excess starch and create a gritty texture. Instead, bring a separate pot of water to a rolling boil. Drop your noodles in and cook them for the exact time indicated on the package—usually between two to four minutes. Test one; it should be firm but flexible. Immediately drain the noodles and rinse them thoroughly under cold running water to stop the cooking process and wash away the surface starch. This step is crucial for preventing them from clumping together before they hit the bowl.
The Build: Assembling the Perfect Bowl
Assembly is where the scientific effort of the broth meets the artistic expression of the cook. You are balancing textures, colors, and temperatures. Start with a warmed bowl—this keeps the broth at the optimal temperature to cook your thinly sliced raw beef upon impact.
The Beef Selection
For a traditional bowl, use a combination of thinly sliced raw beef (sirloin or eye of round) and, if you are adventurous, brisket that has been simmered in the broth until tender. The key to the raw slices is the cut: you must slice the beef against the grain, paper-thin. A sharp sashimi knife or a chef's knife kept at a slight angle works best. If you find it difficult to slice thinly, pop the beef in the freezer for twenty minutes until it is firm but not frozen solid.
The Finishing Touches
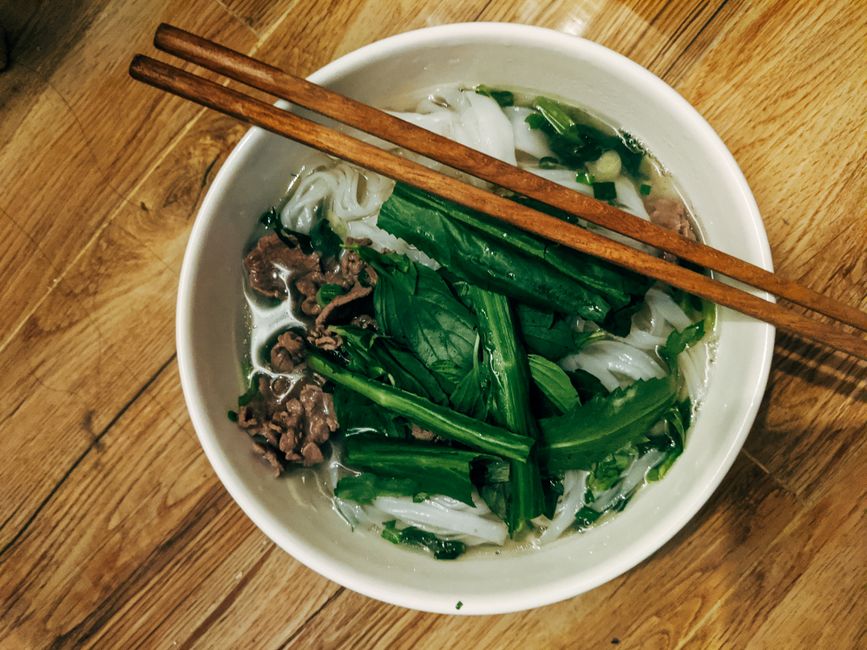
Arrange your noodles in the bowl, drape the raw beef over the top, and add any cooked brisket. Ladle the boiling-hot broth directly over the beef slices; this will cook them instantly, ensuring they remain succulent and tender. Top with a handful of fresh Thai basil, culantro, thinly sliced bird’s eye chilies, and a squeeze of lime juice. The final result should be a beautiful harmony of aromatic broth, tender meat, and the fresh, herbaceous snap of the garnishes.
Professional Chef Tips for Home Excellence
Conclusion
Mastering Vietnamese Pho is a rite of passage for any dedicated home cook. It is a dish that rewards your patience and celebrates the beauty of building flavor from the ground up. By focusing on the parboil-and-scrub technique, meticulously charring your aromatics, and respecting the timeline of your spice infusion, you are doing more than just following a recipe; you are practicing the craft of traditional extraction. This process teaches you that the quality of your output is entirely dependent on the rigor of your input.
Do not be discouraged if your first attempt feels like a learning experience. Every pot of broth you make will teach you something new about the temperament of your stove, the intensity of your ingredients, and the importance of balancing salt, sweetness, and aroma. The beauty of this recipe is that it is infinitely adjustable. Once you have established the base technique, you can begin to tweak the spice profile or experiment with different cuts of meat to find your "signature" bowl.
Ultimately, pho is meant to be shared. There is a profound sense of satisfaction in placing a steaming, fragrant bowl in front of a friend or family member—a bowl that you built with your own hands over the course of an entire day. It represents time, care, and a genuine love for the culinary arts. Keep your broth clear, keep your spices balanced, and most importantly, enjoy the ritual. You have transformed a handful of humble bones and spices into something truly extraordinary. That, in the end, is what we mean when we talk about elevating the home kitchen experience. Your culinary journey is just beginning, and this bowl is a perfect milestone to celebrate your progress. Happy cooking.

Get the Next Recipe
Weekly recipes, techniques, and gear picks — straight to your inbox.
