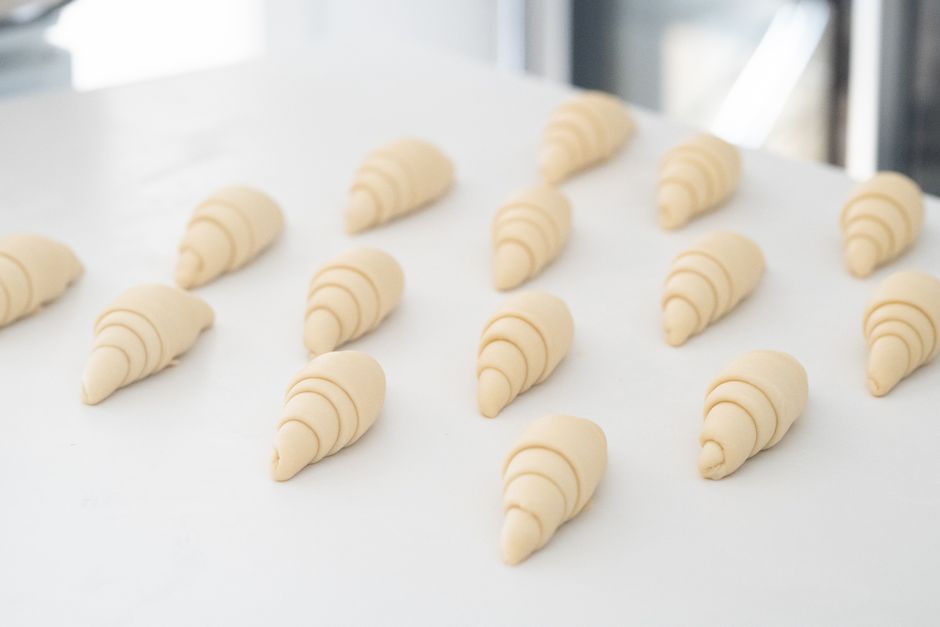
The Lamination Technique: Creating Perfect Croissants and Danish Pastries
Techniques

The Lamination Technique: Creating Perfect Croissants and Danish Pastries

C
By The Chef
|March 27, 2026|13 Min Read

The world of baking is filled with enchanting aromas, delightful textures, and flavors that can transport you to a Parisian café or a cozy Scandinavian bakery. Among the most revered techniques in the pastry arts is lamination—a process that transforms humble dough into layers of flaky, buttery perfection. When executed correctly, lamination offers the satisfaction of biting into a warm, fresh croissant or a sumptuous Danish pastry, each layer delicately separating to release an explosion of flavor. This technique, while seemingly complex, is accessible to home bakers willing to dive into the art of pastry making.

At its core, lamination involves the intricate process of folding butter into dough multiple times, creating thin layers that are then rolled out. Each fold is essential for developing the flaky texture we admire in pastries. This method might feel intimidating, but it is an opportunity for bakers to develop a deeper understanding of dough and its capabilities. Unlocking the secrets of lamination not only results in breathtaking pastries but also fosters a sense of accomplishment and creativity in the kitchen.

As we embark on this journey, we will explore the fundamentals of the lamination technique, breaking it down into foolproof steps. From choosing the right ingredients to perfecting the folding process, our aim is to equip you with the knowledge needed to create show-stopping croissants and Danish pastries in your own kitchen. So, preheat your oven and prepare your rolling pin—it's time to bring the magic of laminated dough to your home baking repertoire.

Understanding the Basics of Lamination

Before we dive into the practical aspects of creating croissants and Danish pastries, it's essential to understand the science behind lamination. At its most basic level, lamination relies on the interaction between flour, water, and fat—in this case, butter. The right combination of these ingredients not only contributes to flavor but also impacts the texture of the final pastry.

The Ingredients

Creating perfect laminated pastries begins with selecting high-quality ingredients. Here are the essential components you'll need:

●All-Purpose Flour: While you can use bread flour for more structure, all-purpose flour strikes the right balance for most pastry recipes.
●Butter: Choose a high-fat butter, preferably European-style butter with at least 82% fat. The higher fat content provides more moisture, contributing to a flakier texture.
●Water: Cold water is crucial as it helps keep the dough cool during the lamination process, preventing the butter from melting.
●Yeast: For croissants, active dry or instant yeast is necessary to create that airy structure.
●Salt: Enhances flavor and strengthens gluten, which is vital for the dough's structure.

Additionally, you might want to include milk or sugar for added richness in your dough.

The Role of Temperature

Temperature management is a key aspect of lamination. Cold butter is essential; it should be pliable but not too soft, as this can lead to the fat seeping into the dough rather than creating those exquisite layers. Keeping your workspace and ingredients cold throughout the process is vital to achieving that desired flakiness.

●Maintain the dough temperature below 70°F (21°C) during the lamination process to ensure the butter remains solid.
●If you find that your dough becomes too warm, refrigerate it for 10-15 minutes to regain its firmness.

Understanding these basics will prepare you to face the more intricate steps of the lamination process.

Preparing the Dough

Now that you've chosen your ingredients and grasped the importance of temperature, it’s time to prepare your dough. The process typically involves creating a lean dough before incorporating the butter. Here’s how to do it.

Making the Dough

1.Combine the Ingredients: In a large mixing bowl, add 4 cups (500g) of all-purpose flour, 1 1/2 teaspoons (7g) of instant yeast, 1 teaspoon (5g) of salt, and 3 tablespoons (30g) of granulated sugar. Whisk these dry ingredients together until evenly mixed.
2.Add Liquid: Gradually mix in 1 1/4 cups (300ml) of cold water and 1/4 cup (60ml) of milk (optional for additional richness). Mix until a rough dough forms.
3.Knead the Dough: Transfer the dough to a floured surface and knead for about 5-7 minutes until it becomes smooth and elastic. You should be able to easily stretch the dough without tearing, indicating gluten development.
4.Rest the Dough: Shape the dough into a ball, lightly coat it with oil, and place it in a bowl covered with plastic wrap. Allow it to rest in the refrigerator for at least 1 hour, or up to overnight, which helps to relax the gluten and makes the rolling process easier.

Preparing the Butter Block

While the dough is resting, it's time to prepare the butter block that will be incorporated into your dough during the lamination process.

1.Begin with Cold Butter: Use about 1 1/4 cups (285g) of cold, high-fat butter. It's best if your butter is refrigerated or just slightly softened but still firm.
2.Shape the Butter: Cut the butter into small pieces and place it between two sheets of parchment paper. Using a rolling pin, pound the butter into a rectangle approximately 8 inches (20 cm) wide and 1/2 inch (1.3 cm) thick. Chill the butter block in the refrigerator for about 30 minutes to keep it cold.

“The secret to beautifully laminated dough lies in the temperature — keeping everything cool ensures your layers will be distinct and flaky.”

Laminating the Dough

With your dough and butter block ready, it's time to get into the exciting part: the lamination process itself. This step involves several folds to create the layers of fat and dough that give croissants and Danish pastries their distinctive texture.

The First Fold (Single Fold)

1.Roll Out the Dough: On a floured surface, roll out your rested dough into a rectangle about 18 inches (45 cm) wide and 12 inches (30 cm) long.
2.Place the Butter: Position your chilled butter block in the center of the dough, ensuring there’s equal space on all sides.
3.Encase the Butter: Fold the two ends of the dough over the butter, to create a package that completely encases the butter. Ensure there are no gaps that would allow butter to escape.
4.Seal the Edges: Gently press down the edges with your fingers to seal in the butter.
5.Roll and Fold: Roll the dough into a rectangle again, maintaining the size around 18 x 12 inches. Once rolled, conduct your first fold:

- Fold the dough into thirds, as if you were folding a letter. This is known as a single fold. After folding, the dough should now be about 6 x 12 inches.

6.Chill the Dough: Wrap the folded dough in plastic wrap and chill it in the refrigerator for at least 30 minutes. This rest period helps relax the gluten and keeps the butter firm.

The Second Fold (Double Fold)

For the second fold, you can opt for a double fold to add even more layers.

1.Roll Out Again: After chilling, roll the dough again into a rectangle, approximately 24 inches (60 cm) wide and 8 inches (20 cm) long.
2.Fold the Dough:

- Fold one-third of the dough into the center, then fold the other third over this layer, creating a book-like effect. This is a double fold that allows you to create even more layers.

3.Chill Again: Wrap the dough and refrigerate for another 45 minutes to maintain the butter’s shape and ensure you can maintain those layers.

Final Folds

1.Repeat the Rolling and Folding: For optimal results, aim to perform two to three more single folds or double folds, chilling the dough for at least 30 minutes between each fold. Each time you roll and fold, you’re creating layers, so be sure to rotate the dough 90 degrees before rolling out to maintain an even thickness.
2.After the final fold, wrap the dough tightly and allow it to rest in the refrigerator for at least an hour or overnight. This extended chilling allows the gluten to relax, making it easier to roll out for shaping into croissants or pastries.

“Patience is key—allowing your dough to rest is just as important as the folding themselves, yielding a more manageable dough and superior results.”

Shaping Croissants and Danish Pastries

Once your dough has completed its lamination process, it's time to shape it into your desired pastries. The shaping technique varies between croissants and Danish pastries, so we'll explore each method separately.

Shaping Croissants

1.Roll Out the Dough: After its final chill, roll the dough out into a large rectangle about 1/4 inch (0.6 cm) thick.
2.Cut Triangles: Divide the dough into smaller rectangles (about 4 inches wide by 8 inches long). Cut each rectangle diagonally to form triangles.
3.Fill with Filling (Optional): If desired, place a small amount of filling, such as chocolate, almond paste, or fruit preserves, at the broad end of each triangle.
4.Roll the Croissant: Starting from the broad end, roll each triangle tightly toward the point to form a crescent shape, tucking the tips underneath for a neat finish.
5.Proof the Croissants: Place the shaped croissants on a parchment-lined baking sheet, leaving space for them to expand. Cover them loosely with plastic wrap and allow them to proof at room temperature for 1-2 hours or until they have doubled in size.

Shaping Danish Pastries

Danish pastries are slightly more complex in their shape, often involving filling and a different folding technique.

1.Roll Out the Dough: Roll the laminated dough into a rectangle about 1/4 inch (0.6 cm) thick. Cut into smaller 4-inch squares for individual pastries.
2.Create a Center Pocket: On each square, make a 1-inch (2.5 cm) cut from each corner toward the center, ensuring not to cut all the way through.
3.Add Filling: Place a dollop of cream cheese or fruit filling in the center of the square.
4.Fold the Corners: Fold every other corner towards the center to create a beautiful pinwheel shape. Pinch to seal.
5.Proof the Danish: Allow the shaped Danish to rest and proof just like the croissants, ensuring they puff up beautifully.

“A well-proven pastry is light and airy. Don’t rush this stage; it’s where the magic happens!”

Baking Perfect Croissants and Danishes

Once your croissants and Danish pastries are shaped and properly proofed, it’s time to bake them to golden perfection. The baking temperature and process can greatly influence the final product.

Preheat Your Oven

1.Set the Oven: Preheat your oven to 400°F (200°C). A hot oven is crucial for creating that initial burst of steam that gives pastries their lift.
2.Prepare for Baking: Before baking, make an egg wash using one beaten egg. Brush this egg wash over the tops of your pastries for a glossy, golden finish.

Baking Time

1.Bake the Pastries: Place your trays in the oven, ensuring there’s ample space for air circulation. Bake for about 15-20 minutes, until golden brown and puffed.
2.Check for Doneness: A well-baked croissant should sound hollow when tapped on the bottom. Use an instant-read thermometer to ensure they hit about 190°F (88°C) internally.

Cooling

1.Cool on a Rack: Once baked to perfection, transfer your pastries to a wire rack to cool slightly before enjoying.
2.Storage Suggestions: Pastries are best enjoyed fresh, but you can store leftover ones in an airtight container at room temperature for up to two days. For longer storage, freeze the unbaked shaped pastries and bake them directly from the freezer, adding a couple of minutes to the baking time.

Flavor Variations and Fillings

While classic croissants and Danish pastries are delightful, there are countless variations you can explore to customize your pastries. Using different fillings and flavorings can add exciting twists to your baked treats.

Popular Fillings for Croissants

●Chocolate: Place chocolate sticks or chunks at the base before rolling for a rich, decadent treat.
●Almond Paste: A sweet almond filling made from ground almonds, sugar, and butter can add a delightful flavor.
●Ham and Cheese: For a savory twist, fill with thinly sliced ham and cheese before rolling.

Popular Fillings for Danish Pastries

●Cream Cheese: An easy mixture of cream cheese, sugar, and vanilla makes a delightful filling.
●Fruit Compotes: Use homemade or store-bought fruit fillings like apricot, raspberry, or blueberry for a fresh taste.
●Custard: A rich pastry cream adds indulgence, especially when topped with fruit.

Experimenting with Flavors

In addition to fillings, consider infusing flavors into your dough for even more creativity. For instance, adding orange zest, cinnamon, or cardamom can elevate the taste profile of your pastries.

“Don’t be afraid to experiment! The world of pastries is a playground for flavors and creativity.”

Troubleshooting Common Issues

Even the most skilled bakers encounter challenges when working with laminated dough. Here are some common pitfalls and how to address them:

Butter Leaking During Baking

Issue: Butter seeps out during baking, leading to a greasy texture.

Solution: Ensure the butter is cold and properly encased during folding. If your dough warms too much, chill it again before rolling out.

Croissants Not Rising

Issue: Croissants do not puff up during baking.

Solutions:

●Ensure proper proofing time; the dough should double in size.
●Confirm your yeast is active by blooming it in warm water first.

Dense Pastries

Issue: The final product is not flaky and seems heavy.

Solutions:

●Check your ingredient ratios, ensuring enough water and fat to create steam.
●Ensure each fold is thorough—insufficient folds can lead to fewer layers.

Conclusion

Mastering the lamination technique may feel daunting at first, but with practice, patience, and the right guidance, you’ll find yourself creating delectable croissants and Danish pastries worth celebrating. The transformation of simple ingredients into beautifully layered pastries is a rewarding experience that enhances both your baking skills and confidence in the kitchen.

Don’t be afraid to explore your creativity with various flavors and fillings—baking is as much an art as it is a science. Each attempt is an opportunity to learn and refine your technique further. So, roll up your sleeves, embrace the process, and let your kitchen become a haven of sweet and flaky temptations. The world of laminated dough awaits, and with each bite, you can blame the chef for the magic unfolding before your eyes.

With joy, the sound of a crackling croissant, and the heavenly scent of freshly baked pastries, you will enjoy the fruits of your labor as you share them with loved ones. Happy baking!


🧰 Gear for this recipe
Tools our chefs reach for when cooking this
Miyabi Birchwood Chef Knife 9.5 inch
Knives & Cutting
Miyabi Birchwood Chef Knife 9.5 inch
★★★★★4.9
$250-$320
View on Amazon
Thermapen ONE Instant Thermometer
Thermometers
Thermapen ONE Instant Thermometer
★★★★★4.9
$99-$109
View on Amazon

As an Amazon Associate we earn from qualifying purchases.

🍳

Get the Next Recipe

Weekly recipes, techniques, and gear picks — straight to your inbox.

No spam, ever. Unsubscribe anytime.

YesChef - Learn from the world's best chefs
© 2026 Blame The Chef
🍳

Never Miss a Recipe

Weekly recipes, kitchen tips, and gadget picks — straight to your inbox.

No spam, ever. Unsubscribe anytime.