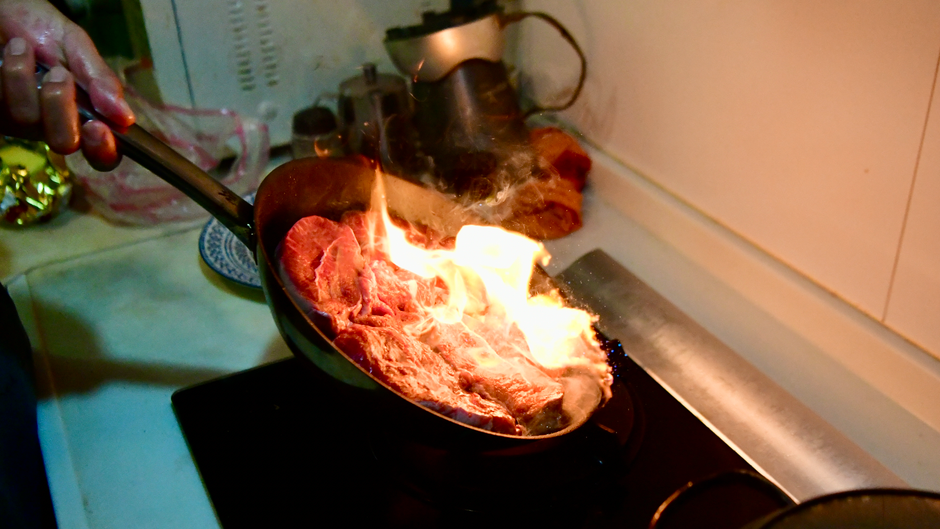
The Magic of the Maillard Reaction: Why Browned Food Tastes Better
Every home cook has stood over a pan, watching a piece of steak or a batch of onions transform from a lackluster, pale shade into a deep, inviting mahogany. We often call this "browning," but to the professional chef, it is nothing short of alchemy. It is the defining line between food that is merely sustenance and food that provides a profound sensory experience. When you master the art of coaxing color out of your ingredients, you aren't just cooking; you are unlocking a complex chemical library of flavors that simply do not exist in raw or boiled components.
The science behind this transformation is known as the Maillard Reaction, a phenomenon discovered by French chemist Louis-Camille Maillard in the early 20th century. While it sounds intimidatingly academic, understanding it is the single most effective way to level up your culinary game. It is a chemical reaction between amino acids and reducing sugars that gives browned food its distinctive flavor profile. Without it, our world would be devoid of the aroma of toasted bread, the depth of a perfectly seared ribeye, and the complexity of roasted coffee beans.
In this deep dive, we are going to peel back the layers of this essential culinary process, exploring exactly how you can manipulate heat, time, and chemistry to your advantage. We will move past the superficial advice of "sear it hard" and look at the variables that actually change the outcome of your meals. Whether you are working with proteins, vegetables, or even pastry dough, knowing how to trigger and control this reaction will turn your kitchen into a laboratory of deliciousness. Get ready to stop guessing and start engineering flavors that will leave your guests asking for your secret.
The Chemistry of Flavor: Breaking Down the Maillard Reaction
At its core, the Maillard Reaction is not just one reaction, but a series of reactions that occur when food is exposed to heat. Unlike caramelization, which involves the pyrolysis of sugars alone, the Maillard reaction requires both proteins and sugars to dance together. When you heat food to a range of approximately 280 degrees Fahrenheit to 330 degrees Fahrenheit (140 to 165 degrees Celsius), the molecules begin to break down and rearrange themselves. This creates hundreds of different flavor compounds, each contributing to the savory, complex aroma we associate with high-quality cooking.
The Role of Temperature and Moisture
To trigger the Maillard reaction, you must overcome the biggest enemy of browning: moisture. If there is too much surface water on your food, the heat energy from your pan is first spent evaporating that water. Since water cannot exceed 212 degrees Fahrenheit (100 degrees Celsius) at sea level, the temperature of the pan will remain too low to spark the reaction until the surface is bone dry. This is why "patting your meat dry" is the most common, and perhaps most important, piece of advice you will hear in a professional kitchen.
The Maillard reaction is not merely a cooking technique; it is the fundamental bridge between raw ingredients and the deep, savory satisfaction we crave in a finished dish.
Professional chefs often use a dry brine technique to assist in this process. By salting your protein and leaving it uncovered in the refrigerator for several hours or overnight, the salt draws out surface moisture and then reabsorbs it, while the circulating air in the fridge dehydrates the surface. This creates a superior canvas for the Maillard reaction, ensuring that the moment the protein hits the hot oil, the browning begins immediately. You are essentially pre-programming your food for success before the fire is even turned on.
Mastering the Pan: Material, Heat, and Timing
The equipment you choose is almost as important as the technique you employ. Not all pans are created equal, especially when it comes to heat retention and conductivity. For optimal browning, you want a material that holds onto heat well, such as cast iron or stainless steel. When you drop a cold piece of protein into a thin aluminum pan, the surface temperature plummets, and the food begins to steam in its own juices. By using a heavy-bottomed pan, you ensure that the thermal mass remains high, keeping the heat steady throughout the searing process.
The Importance of Heat Management
Managing the heat source is a skill that separates the amateur from the pro. You want to maintain a consistent temperature, but you must also be mindful of your oil selection. Never use extra virgin olive oil for a high-heat sear; its low smoke point will result in a bitter, acrid flavor as the fats break down. Instead, opt for oils with high smoke points, such as grapeseed oil, avocado oil, or refined coconut oil. These fats can withstand the high temperatures necessary for the Maillard reaction to flourish without burning.
Vegetable Alchemy: Unlocking Hidden Sugars
We often think of the Maillard reaction strictly in terms of steaks and chops, but it is equally transformative for vegetables. Think about the difference between a raw carrot and a roasted one, or the way onions transform from pungent and crisp to sweet and jammy after an hour of sweating and caramelizing. Vegetables contain their own natural sugars and small amounts of protein, which, when properly handled, undergo the same browning process that meat does, creating a savory depth that can anchor an entire dish.
Techniques for Vegetal Browning
Roasting is the most effective way to achieve a uniform Maillard reaction on vegetables. By tossing vegetables in a high-quality fat and spreading them in a single layer on a rimmed baking sheet, you maximize surface area contact. It is essential not to overcrowd the tray. If the vegetables are piled on top of one another, they will steam. Aim for a temperature of 400 to 425 degrees Fahrenheit (200 to 220 degrees Celsius). This higher heat ensures that the surface dries out quickly and the Maillard reaction takes hold before the interior becomes mushy.
You haven't truly tasted a vegetable until you've tasted one that has been kissed by the Maillard reaction, turning simple produce into a complex, umami-rich masterpiece.
Another secret to browning vegetables is to utilize the "glaze effect". If you are sautéing vegetables, consider adding a small splash of water or stock toward the end of the cooking process once you have achieved a decent sear. This helps to lift the fond (the browned bits stuck to the bottom of the pan) and coats the vegetables in a concentrated flavor reduction. This technique creates a glossy finish and intensifies the flavor of the vegetables tenfold, proving that the reaction is not just about the exterior color, but also about the flavor-packed juices that remain behind.
The Role of pH and Additives
Did you know that you can manipulate the chemistry of your food to speed up or improve the Maillard reaction? It comes down to pH balance. The Maillard reaction occurs much more rapidly in an alkaline environment. In professional baking, this is why pretzels are dipped in a lye or baking soda solution before hitting the oven. The alkalinity causes the surface proteins and sugars to react almost instantly upon contact with heat, resulting in that deep, mahogany-brown crust that is impossible to achieve through heat alone.
Controlling the Reaction
For savory cooking, you can apply this principle in subtle ways. A tiny pinch of baking soda added to the onions you are caramelizing can drastically reduce the time it takes to get them to a deep, dark brown. Be careful, though—use too much and you will introduce a soapy, metallic aftertaste. A quarter teaspoon per pound of onions is usually the upper limit. This is a pro-tip that saves time during dinner service, but it requires a light touch and a refined palate to balance the flavor profile properly.
* Baking soda: Increases alkalinity, speeding up browning.
* Sugar: Adding a tiny touch of sugar (like a pinch of brown sugar) to a rub can provide extra fuel for the Maillard reaction.
* Salt: While it doesn't directly cause the reaction, it draws out moisture to ensure the surface is dry enough to brown properly.
Common Pitfalls: Why Your Food Isn't Browning
If you find that your food is turning out gray or pale despite your best efforts, you are likely hitting one of three common roadblocks. First, check your patience. Many home cooks are afraid of burning their food and tend to flip it too often. A sear requires time for the crust to develop. If the food is sticking to the pan, it means it isn't ready to be flipped. If you wait, the proteins will naturally release from the metal once the Maillard reaction has formed a stable, non-stick crust.
Avoiding the "Gray Meat" Syndrome
Secondly, look at the temperature of your ingredients. If you take a cold, wet steak directly from the refrigerator and place it into a pan, you are drastically lowering the temperature of the cooking surface. You should always let your proteins rest at room temperature for at least 20 to 30 minutes before cooking. This helps the exterior reach the target temperature faster, ensuring a much more even sear across the entire surface of the food.
Lastly, consider the purity of the surface. If you are using a rub or a marinade that contains high amounts of herbs or sugar, those components may burn and turn bitter before the Maillard reaction has completed its work. It is often better to sear the meat first, achieving that perfect crust, and then adding herbs, garlic, and aromatics toward the end of the cooking process. Using a basting technique with butter and herbs at the very end allows you to infuse flavor without sacrificing the beautiful, crusty exterior you worked so hard to achieve.
The Secret of the Fond: Building Sauces from Browning
The fond is perhaps the most overlooked treasure in the home kitchen. Those dark, stubborn bits stuck to the bottom of your pan after you sear meat are pure concentrated flavor. They are the physical manifestation of the Maillard reaction that has occurred on the surface of your protein. When you deglaze the pan with wine, stock, or vinegar, you are essentially dissolving those flavor compounds into a liquid form, creating the base for the most incredible pan sauces you will ever taste.
How to Deglaze Like a Professional
To properly deglaze, you must first remove the meat from the pan and let it rest. Pour off excess fat, leaving behind a thin coating. Add your liquid—be it a dry white wine, a rich beef stock, or even a splash of balsamic vinegar—while the pan is still over medium-high heat. Use a flat-edged wooden spoon to scrape the bottom of the pan, releasing every last bit of browned material. This process not only cleans your pan but creates a liquid that is rich with the essence of everything you just cooked.
Your pan is not dirty; it is a canvas waiting for a deglaze. The fond is the secret weapon that separates a five-minute weeknight meal from a restaurant-quality experience.
Once the fond is dissolved, you can reduce the liquid until it reaches a syrupy consistency. Finish the sauce by swirling in a cold knob of unsalted butter. This creates a technique known as monter au beurre, which emulsifies the sauce, giving it a glossy, rich mouthfeel. This simple process turns what would have been a dry piece of protein into a centerpiece dish that is juicy, flavorful, and elevated by the very chemical reactions you ignited on the stove.
Beyond the Stove: Browning in the Oven and Grill
While we focus heavily on the pan, the oven and the grill are equally effective venues for the Maillard reaction. In the oven, you have the benefit of convection, which circulates hot air around the food, constantly drying the surface and encouraging a more even browning. This is why roasted meats often have a more uniform crust than pan-seared ones. For the best results, use a high-temperature roasting environment, around 450 degrees Fahrenheit (230 degrees Celsius), to jumpstart the process.
Utilizing the Grill for Maximum Effect
The grill provides the added benefit of radiant heat from the coals or burners, which acts like a direct laser of energy on your food. To achieve the best grill marks and overall browning, ensure your grates are screaming hot and brushed clean. A dirty grate will stick to the food and tear the crust you are trying to build. Furthermore, don't move the food too often. If you want those professional-looking diamond marks, rotate the protein 45 degrees halfway through the sear on each side, but resist the urge to keep moving it around.
* Use high heat: The Maillard reaction thrives between 280-330°F.
* Keep it dry: Never skip the pat-dry step before grilling.
* Be patient: Allow the crust to form before attempting to move the food.
* Rest your proteins: Carry-over cooking will finish the job while the juices redistribute.
The Science of Texture: Why Browning Equals Crunch
Texture is the third pillar of flavor, right alongside taste and aroma. The Maillard reaction contributes to the formation of a crisp matrix on the surface of foods. When you bite into a well-browned piece of crusty bread or a perfectly seared scallop, you are not just experiencing a change in color; you are experiencing a change in structural integrity. This contrast—a crisp exterior leading into a tender, juicy interior—is a universal hallmark of professional cooking.
Balancing the Experience
The goal of any cook should be to create a sensory journey. When every bite has a consistent texture, the brain eventually loses interest. By ensuring your cooking methods result in a browned, textured crust, you provide the "crunch" that signals to the brain that the food is fresh, prepared with care, and rich in flavor. If you find your food is always soft or limp, you are likely not using enough heat or you are not controlling the moisture effectively. It is time to turn up the dial and embrace the power of the sear.
Remember that the Maillard reaction is a tool, not a rule. You want to aim for a deep, rich brown, but there is a fine line between "browned" and "burnt." Burnt food introduces carbon, which is bitter and acrid—a sign that the reaction has gone too far. As you develop your skills, you will begin to recognize the specific scent of the Maillard reaction. It is a nutty, savory, complex aroma that differs significantly from the pungent smell of burning fat or charred sugars. Trust your nose, trust your pan, and start experimenting with the heat levels that work best for your specific kitchen setup.
Final Thoughts
The Magic of the Maillard Reaction is one of the most accessible yet profound lessons any home cook can learn. It is the bridge between the bland and the bold, the ordinary and the extraordinary. By managing moisture, controlling temperature, selecting the right tools, and understanding the chemistry at play, you gain the ability to turn humble ingredients into something truly memorable. You no longer need to be a professionally trained chef to achieve restaurant-level flavor; you just need to be a scientist of your own kitchen.
As you move forward, I challenge you to treat your next meal as an experiment. Pay attention to the sound the food makes when it hits the pan—that aggressive sizzle is the sound of moisture leaving and flavor building. Watch the color develop, and don't rush the process. When you scrape that fond into a sauce or serve a perfectly golden-brown roast to your friends, you’ll know that it wasn't just luck—it was chemistry. Now, get back into the kitchen, turn up the heat, and start creating the deep, complex flavors you deserve. Happy cooking, and remember: if the food is a bit pale, you’ve simply left a little bit of magic on the table.

Get the Next Recipe
Weekly recipes, techniques, and gear picks — straight to your inbox.
