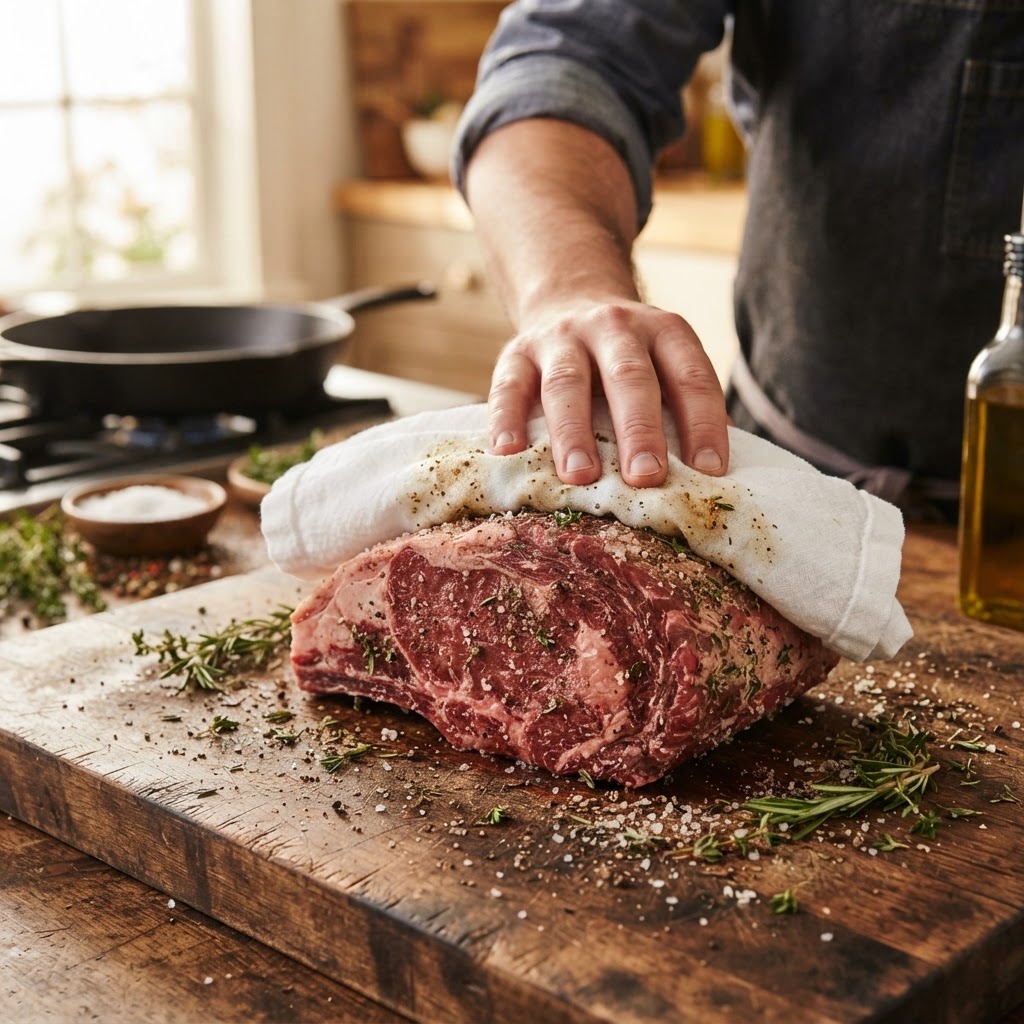
The Physics of Moisture: How to Master the "Pat Dry" Technique for Crispier Roasts and Searing
The kitchen is often viewed as a place of intuition, governed by the rhythm of chopping knives and the aromatic symphony of simmering pots. Yet, beneath the sensory delight of a perfect meal lies a rigid framework of scientific principles that dictate every outcome, from the snap of a crust to the tenderness of a cut of beef. Many home cooks struggle with achieving that elusive, restaurant-quality sear or a roast with skin that shatters like glass, often blaming their equipment or their ingredients for a lackluster result. In reality, the culprit is usually something far more mundane, something that resides on the surface of your protein: moisture. By understanding the interaction between water and heat, we can transform our cooking from a guessing game into a repeatable, high-performance craft that produces consistently exceptional results.
Moisture is the primary enemy of the Maillard reaction, the complex chemical process responsible for browning, flavor development, and that irresistible savory aroma. When you place a wet piece of meat into a hot pan, the immediate energy of the burner is diverted toward evaporating the surface water rather than searing the proteins and sugars. This process creates a steam barrier that traps heat, effectively boiling the exterior of your food instead of searing it, leading to a gray, flaccid crust that lacks depth. Mastering the art of the surface is not merely about aesthetics; it is about manipulating thermodynamics to ensure that every joule of energy is focused on building complexity and texture where it matters most.
When we talk about "patting dry," we are engaging in a foundational technique that bridges the gap between amateur frustration and professional precision. It seems overly simple, perhaps even pedantic, to harp on the necessity of a paper towel, but the physics of phase transition demands it. To turn liquid water into vapor, a significant amount of latent heat is required, and while that water is evaporating, the temperature of your pan will plummet, ruining your searing potential before it even begins. By removing this barrier before the food touches the metal, we set the stage for an immediate, aggressive interaction that creates the foundation for a meal worth talking about. Welcome to the technical side of the kitchen, where we learn how to master the surface.
The Thermodynamics of the Sear
When you introduce a protein—be it a steak, a scallop, or a chicken thigh—into a preheated pan, you are essentially initiating a race against time and energy. The Maillard reaction, which occurs between amino acids and reducing sugars, typically requires temperatures above 285°F (140°C) to accelerate efficiently. If your food surface is covered in moisture, the temperature of that surface will be tethered to the boiling point of water, 212°F (100°C), until every drop has evaporated. This means that for those crucial first minutes of cooking, you are not searing; you are steaming, which wastes the thermal capacity of your pan and prevents the development of the complex, nutty, and savory notes that define a world-class crust.
"A surface saturated with water is a surface incapable of greatness; you are fighting the physics of the pan before you even have a chance to build flavor."
Beyond the loss of browning, there is the issue of heat management. In a residential kitchen, our burners rarely possess the sheer BTUs of a commercial range, meaning our pans have limited thermal mass. When you drop a wet piece of cold meat into a pan, you are effectively "quenching" the pan. If the moisture is excessive, the temperature drop is catastrophic, causing the pan to struggle to recover its heat. This leads to the all-too-common scenario where the meat sticks, tears, and releases its internal juices, turning the bottom of your pan into a soggy, gray mess that is impossible to deglaze properly.
Surface Tension and Evaporative Cooling
The concept of evaporative cooling is what keeps us alive in the summer, but it is the death knell for a beautiful sear. As water molecules transition from liquid to gas, they absorb heat from the surrounding environment—the very surface of your steak. By patting your ingredients dry, you remove this energy sink, allowing the surface temperature of the protein to climb rapidly toward that sweet spot where browning occurs instantly upon contact. This is why the sound of a sizzle is so important; it is the auditory signal that the energy is going directly into the proteins and fats, rather than into the work of moving water molecules into the air.
Preparing the Protein: Beyond the Paper Towel
The preparation phase is where the most significant mistakes occur. Many home cooks make the fatal error of taking a steak out of the refrigerator and dropping it immediately into a pan. This not only introduces surface moisture from condensation but also creates a significant temperature differential that stresses the muscle fibers. The ideal preparation involves removing the protein from its packaging, letting it sit at room temperature for roughly 20 to 30 minutes, and then performing a thorough surface moisture extraction using high-quality paper towels.
The Salt and Time Method
Salt is a powerful tool in your moisture management arsenal, but it requires patience to use effectively. If you salt your meat immediately before cooking, the salt will draw moisture to the surface via osmosis, actually creating more water for you to deal with. Instead, apply your salt at least 45 minutes before cooking—or even better, leave it uncovered in the refrigerator on a wire rack for several hours. This is the dry-brining technique. The salt will draw the moisture out, then the salt will dissolve in that moisture and be reabsorbed into the muscle, leaving the exterior significantly drier and more receptive to heat.
The Physics of Crisp Skin: Poultry and Seafood
When dealing with chicken skin or delicate seafood like sea bass or scallops, moisture management is not just a preference; it is a structural requirement. Chicken skin is composed of subcutaneous fat that needs to be rendered out slowly while the skin itself undergoes the Maillard reaction. If the skin is wet, it will become gummy and tough as it cooks, failing to reach that crisp, glass-like finish that every home cook desires. Similarly, with fish, the proteins are so delicate that they will stick to even the most well-seasoned cast-iron skillet if they are not perfectly dry, leading to a heartbreaking disintegration of your fillet when you attempt the flip.
Achieving the Glassy Skin
To achieve the perfect roasted chicken, you must treat the skin as a distinct component of the bird. After patting the bird dry, consider using a baking powder trick. A light dusting of baking powder (not baking soda) on the skin alters the pH levels and breaks down the peptide bonds in the skin, which helps it crisp up more effectively in the oven. When combined with a thorough drying, this method creates a surface that is essentially optimized for heat absorption, resulting in skin that sounds like cellophane when you tap it with your fork.
"Cooking is the science of manipulation; you are manipulating the surface of your ingredient to create an interface that responds to heat with texture and flavor."
For seafood, the mantra is "dryer is better." Because fish cooks so rapidly, you have a very narrow window to achieve a crust before the delicate internal structure begins to overcook. By ensuring the surface is bone-dry, you enable an immediate crust formation. This crust acts as a protective shield, sealing in the moisture of the fillet while providing a textural contrast that elevates the dish from a simple protein to a composed masterpiece. Always use a paper towel to press down on the fish fillets; don’t just wipe them, as the pressure helps ensure you’ve reached the crevices of the flesh.
The Role of Fats and Oils
Once you have successfully removed the moisture, the choice of fat becomes the next critical variable. You are looking for a high smoke point oil, such as avocado oil, grapeseed oil, or clarified butter (ghee). These fats can withstand the intense heat required for a sear without breaking down into acrid compounds. When you add the fat to a hot pan, you are creating a conductive medium that bridges the gap between the metal and the meat. Because you have already removed the surface water, the oil can coat the protein evenly, ensuring that every square millimeter is browning at the same rate.
Managing the Oil Film
The depth of your oil matters. If you use too little, the protein will stick to the dry spots on the pan; if you use too much, you are essentially deep-frying the exterior, which can lead to a greasy finish. A good rule of thumb is to use enough oil to coat the bottom of the pan—about one to two tablespoons for a standard skillet. Wait for the oil to shimmer, which is the visual indicator that it is approaching its smoke point, before introducing the meat. This ensures that when the protein hits the pan, the oil is ready to transfer that heat immediately into the surface of the food.
Avocado Oil:* Excellent for extremely high-heat searing due to a 520°F smoke point.
Grapeseed Oil:* Neutral flavor, ideal for delicate seafood and chicken.
Clarified Butter:* Provides a rich, nutty flavor, perfect for finishing steaks in the last few minutes.
Refined Coconut Oil:* A stable, clean-burning option that works well for tropical or fusion-style preparations.
Avoiding Crowding: The Hidden Moisture Factor
Even if you have meticulously patted every inch of your protein dry, you can still trigger a "steaming" event if you crowd the pan. Every piece of food contains internal moisture that will eventually be released as the temperature rises. If the pan is overcrowded, the steam released by one piece of meat will be trapped by the proximity of the others, creating a humid microclimate that prevents browning. This is a common trap during dinner parties, where the urge to cook everything at once overrides the need for individual space and optimal airflow within the pan.
The Power of Batch Cooking
Professional chefs almost always work in batches, ensuring that there is at least one inch of space between items in the pan. This allows steam to escape freely into the ventilation hood rather than being trapped around the proteins. If you are cooking a large quantity of food, be patient. Sear in smaller groups, keep the seared batches warm in a low-temperature oven, and perform the final assembly only when everything has achieved its perfect golden-brown crust. This commitment to the space-to-surface ratio is what separates the home cook who produces a stewed mess from the one who produces a masterfully browned feast.
Troubleshooting the Sear: Why Your Crust Isn't Perfect
Sometimes, even after your best efforts, the crust fails to develop, or worse, it sticks to the pan. This usually points to one of two things: a failure in pan preheating or a failure in surface integrity. If your pan wasn't hot enough, the food will release its juices as it struggles to reach the temperatures required for the Maillard reaction. If the food sticks, it is almost certainly because you tried to flip it too early. Proteins will naturally release from a hot pan once a proper crust has formed; if you meet resistance when you try to lift it with your tongs, let it be. The protein is telling you it isn't ready.
The "Wait and Flip" Technique
The most difficult aspect of searing is the mental hurdle of waiting. When you put a piece of meat down, resist the urge to peek or move it. Give it at least 2-3 minutes of uninterrupted time on the first side. This is when the caramelization happens. If you move it too soon, you disrupt the process and lower the surface temperature, leading to uneven browning. Use the sound of the sear as your guide; when the sputtering dies down, it’s a good sign that the surface has developed the structural integrity to be flipped.
Final Thoughts
Mastering the "pat dry" technique is more than just a chore; it is an act of culinary discipline that acknowledges the powerful influence of physics in your kitchen. By removing the veil of moisture that sits between your food and the heat, you unlock the ability to generate deep, complex flavors and textures that transform the ordinary into the extraordinary. Whether you are searing a thick ribeye, crisping the skin of a roast chicken, or perfecting a pan-seared fillet of fish, the principles remain the same: reduce the barrier, manage your heat, respect the space in your pan, and have the patience to let the chemistry do its work.
The next time you find yourself frustrated by a meal that didn't quite live up to your expectations, look not to the quality of the ingredient, but to the condition of the surface. Ask yourself: did I remove every drop of moisture? Was my pan hot enough? Did I give the proteins the space they needed to breathe? Cooking is a craft of small adjustments, and the most impactful adjustment you can make is to treat the surface of your food with the care it deserves. Once you internalize these lessons, you’ll find that "Blame The Chef" no longer refers to an error in the kitchen, but rather to the standard-setter who knows exactly how to command the physics of the sear. Keep cooking, keep testing, and never stop paying attention to the details that make the plate sing.


Get the Next Recipe
Weekly recipes, techniques, and gear picks — straight to your inbox.
