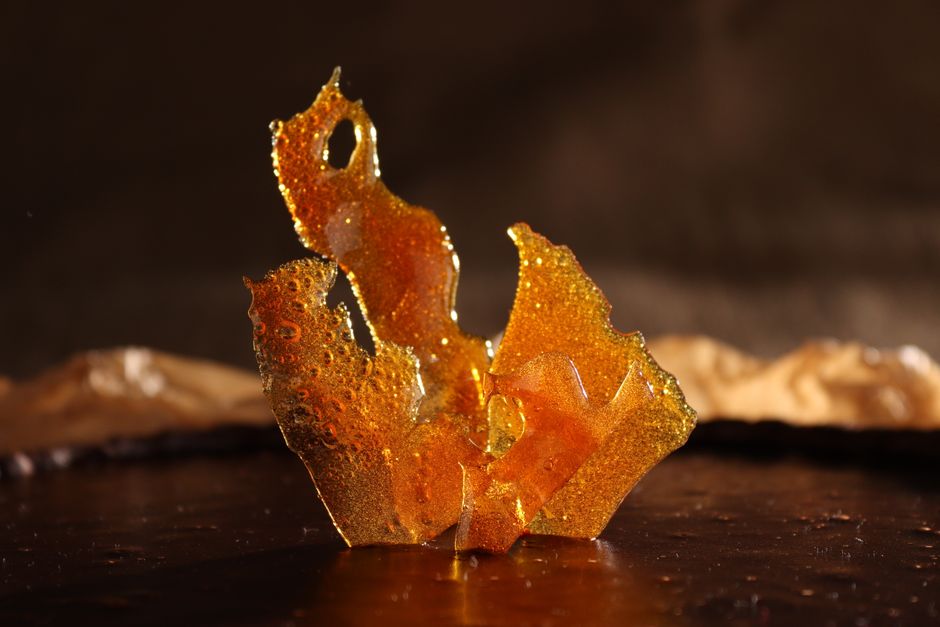
The Science Behind Perfect Caramelization: Chemistry in Your Pan
Have you ever stood over a sizzling pan, watching a sliced onion transform from a pale, translucent sliver into a deep, mahogany-colored ribbon of pure flavor? That transformation is not merely a result of heat; it is a complex, multi-layered chemical dance known as caramelization. For many home cooks, this process is shrouded in mystery, often treated as a lucky accident or a result of "cooking it long enough." However, understanding the science behind the flame allows you to transition from following recipes to truly mastering the medium of heat. When you command the chemistry of your pan, you unlock the ability to deepen the profile of soups, transform boring vegetables into gourmet side dishes, and achieve that elusive, professional-grade crust on a steak.
The culinary world often divides heat-induced browning into two distinct categories: caramelization and the Maillard reaction. While they are cousins in the kitchen, they rely on entirely different molecular pathways. Caramelization is the pyrolytic decomposition of sugar—the breakdown of sugar molecules by heat alone—while the Maillard reaction involves the interaction between amino acids and reducing sugars. Both are essential for creating the depth of flavor that defines great cooking. By learning to control the variables of time, temperature, and moisture, you can manipulate these reactions to suit your specific culinary goals, effectively turning your stovetop into a high-end laboratory.
In this deep dive, we are going to peel back the layers of the chemistry that makes your kitchen smell like heaven. We will explore why high-sugar ingredients react differently than proteins, how to prevent the dreaded bitter notes of burnt sugar, and how to balance acidity to create complexity that dances on the palate. Whether you are searing a scallop or slowly reducing a balsamic glaze, these principles remain constant. Prepare to look at your skillet not just as a piece of hardware, but as a reaction vessel designed to extract maximum pleasure from every ingredient you encounter. Welcome to the art of the perfect sear and the science of the perfect sweet.
The Chemistry of Sugar Degradation
At its most fundamental level, caramelization begins when sugar molecules reach their melting point and start to break down. This is not a single reaction but a complex series of non-enzymatic processes that occur when heat, specifically temperatures above 320°F (160°C) for sucrose, is applied. As the sugar molecules lose water and polymerize, they create hundreds of new flavor compounds, ranging from nutty and buttery to complex, slightly bitter, and toasted notes. This chemical evolution is what turns a plain white granular substance into the rich, amber-hued syrup we identify as caramel.
The Role of Temperature and Time
The window for perfect caramelization is remarkably narrow. If the heat is too low, you are simply dehydrating your food, leading to mushy textures rather than that sought-after golden finish. If the heat is too high, you bypass the subtle, aromatic stages of caramelization and head straight into carbonization—the bitter, acrid state of burning. For most home cooks, maintaining a steady, medium-high heat is the key. You want to provide enough kinetic energy to break those molecular bonds without scorching the surface of your ingredient.
Molecular Changes
As the sugar molecules (sucrose, glucose, and fructose) vibrate with intensity, they undergo dehydration, followed by isomerization and condensation. These steps produce new molecules, including diacetyl (which provides a buttery flavor), esters and lactones (which give fruity or floral notes), and maltol (which provides a toasted, bread-like aroma). It is this specific combination of chemical offspring that makes caramelized onions or roasted carrots taste infinitely more complex than their raw counterparts. Mastering the timing of these molecular changes is what distinguishes a beginner from a professional chef.
"True culinary mastery is not found in the ingredients alone, but in the precise manipulation of heat to force molecules to rearrange themselves into more delicious configurations."
The Maillard Reaction: Protein's Partner in Crime
While caramelization is the star of the sugar show, the Maillard reaction is the heart of savory cooking. Named after French chemist Louis-Camille Maillard, this reaction occurs between the amino acids of proteins and the reducing sugars present in the food. Unlike caramelization, which can happen with just sugar, the Maillard reaction requires both protein and sugar, and it generally begins to occur at lower temperatures, often starting around 285°F (140°C). This is the secret behind the golden-brown crust on a seared scallop, the savory depth of a roasted chicken skin, and the rich, dark exterior of a loaf of sourdough bread.
Moisture Management
The greatest enemy of the Maillard reaction is water. Because water boils at 212°F (100°C), it acts as a thermal buffer, preventing the surface of your food from reaching the temperatures necessary for browning. If your pan is overcrowded or if your meat is wet when it hits the skillet, the energy from your stove will be spent evaporating the moisture instead of browning the surface. This is why professional chefs emphasize the importance of patting proteins dry with paper towels before seasoning and searing.
Surface Area and Searing
To maximize the Maillard reaction, you must prioritize surface-to-pan contact. Use a heavy-bottomed pan, preferably stainless steel or cast iron, which holds heat efficiently. When searing a steak, resist the urge to flip it every thirty seconds. You need to let the heat penetrate the surface layer of the meat until the chemical bonds have fully rearranged into those delicious, savory crust compounds. Once the crust develops, it will naturally release from the pan—this is the physics of flavor working in your favor.
The Equipment: Why Pan Choice Matters
Not all pans are created equal when it comes to the science of heat distribution and surface browning. Your choice of cookware dictates how effectively you can control the thermal mass of your cooking surface. A thin, aluminum pan will fluctuate in temperature the moment you add a cold protein, leading to uneven browning and steaming rather than searing. Conversely, a thick, multi-clad stainless steel or cast iron pan retains heat, ensuring that when you add ingredients, the pan stays hot enough to trigger the chemical transformations we desire.
Cast Iron vs. Stainless Steel
Cast iron is legendary for its heat retention and naturally porous surface, which, when seasoned, creates a semi-nonstick layer that is perfect for developing deep crusts. However, stainless steel is often preferred for deglazing and pan sauces. Because stainless steel lacks the seasoning of cast iron, it allows for the accumulation of fond—the browned bits stuck to the bottom of the pan. This fond is a concentrated collection of caramelized sugars and proteins that serve as the foundation for the most incredible pan sauces you will ever taste.
Conductivity and Evenness
Understanding the conductivity of your pan material is crucial. Copper is the most conductive, reacting almost instantly to temperature changes, while stainless steel is slower to heat but holds it longer. By choosing the right tool for the job, you gain the ability to manage the delicate balance between the interior cooking of the ingredient and the external browning. A chef who understands their gear knows exactly how much to turn down the dial to prevent a piece of fish from burning while still achieving that golden-brown finish.
"A pan is not just a container; it is an extension of the heat source. If your pan cannot hold its temperature, your ingredients will never reach their true potential."
Mastering the Deglaze: Extracting the Fond
Once you have successfully achieved a beautiful layer of browning—whether through caramelization or the Maillard reaction—you are left with the most precious commodity in the kitchen: the fond. Many home cooks clean their pans too quickly, scrubbing away the very essence of the dish. The technique of deglazing is the science of using a liquid to dissolve those brown bits back into the pan, creating a complex, flavorful sauce that bridges the gap between the ingredient and the plate.
Choosing Your Deglazing Liquid
The choice of liquid determines the final character of your sauce. Wine (dry white or full-bodied red) provides acidity, which balances the sweetness of caramelized sugars. Stocks provide body and depth, while vinegars like balsamic or sherry add a bright, sharp note that cuts through the richness of the sear. The trick is to pour your liquid into the hot pan while it is still on the heat, using a wooden spoon to scrape the bottom until the fond is fully incorporated into the simmering liquid.
Reduction and Emulsification
After deglazing, you are looking to reduce the liquid, which concentrates the flavors and thickens the sauce. As the water evaporates, the remaining sugars and proteins become more intense. For a professional finish, finish your pan sauce by mounting it with a tablespoon of cold butter (known as monter au beurre). The butter creates an emulsion, giving the sauce a glossy, luxurious texture that clings perfectly to your food. This process turns a simple sear into a restaurant-quality dish.
* Select your liquid based on the protein: white wine for fish/poultry, red wine for beef/lamb.
* Always ensure the pan is hot enough to create steam upon adding the liquid.
* Scrape firmly with a wooden spoon to ensure every bit of flavor is released.
* Reduce by half to concentrate the flavor profile.
* Whisk in cold butter off the heat to create a silky, stable emulsion.
The Vegetable Transformation: Onion Alchemy
There is no better way to observe the science of caramelization than through the humble onion. Onions are high in natural sugars and water, making them the perfect candidate for a masterclass in patient cooking. When you sauté onions over low heat, you are essentially dehydrating the cells and breaking down complex carbohydrates into simpler sugars, which then undergo the caramelization process. This requires time, often 40 to 60 minutes, which is why "quick-caramelized" recipes are often a myth.
Controlling the Heat and Moisture
To get deep, jammy caramelized onions, you must control the evaporation rate. If the pan gets too hot too fast, the sugars will burn before the onions fully soften. If the pan is too cold, the onions will stew in their own juices. Use a wide, heavy-bottomed pan to maximize the surface area, allowing moisture to escape efficiently. Adding a tiny pinch of salt at the beginning helps draw the water out of the cells through osmosis, speeding up the process slightly while ensuring the onions cook down into a uniform, sweet mass.
The Balancing Act
Because caramelized onions are so sweet, they can become cloying if left unchecked. A pro tip is to introduce a bit of acidity toward the end of the process. A splash of balsamic vinegar or cider vinegar not only stops the cooking process by cooling the pan slightly but also provides a necessary brightness that prevents the palate from becoming fatigued by the intense sweetness of the sugar. This contrast is the hallmark of a balanced dish, and it is a technique you should apply to any roasted vegetable or slow-cooked sugar-heavy dish.
The Sweet Side: Beyond the Skillet
While we often focus on savory applications, the chemistry of caramelization is the foundation of pastry and dessert arts. Consider the difference between a pale cookie and one with a rich, golden-brown edge. That difference is entirely due to the extent of the Maillard reaction and caramelization occurring in the oven. In baking, the higher pH (often achieved with baking soda) actually accelerates the browning process, which is why cookies made with alkaline ingredients develop such distinct, toasted notes compared to those made without.
The Danger of Scorch
Sugar is notoriously difficult to work with because it goes from "perfectly golden" to "burnt and bitter" in a matter of seconds. When making caramel for sauces or toppings, the sugar is heated until it melts and begins to decompose. This process is so fast that professionals often use an ice-water bath to stop the cooking process the moment the desired color is reached. This is a vital lesson for home cooks: chemical reactions involving sugar don't just stop because you turn off the heat; the residual heat of the pan will continue to darken the sugar unless you physically intervene.
Temperature Tracking
If you are serious about your sweets, a digital infrared thermometer or a standard candy thermometer is a must-have tool. Caramelization happens in stages:
By tracking the temperature, you remove the guesswork and can replicate your results with professional consistency. The science is constant; the only variable that changes is your ability to monitor and respond to the physical changes in your ingredients.
Troubleshooting Common Failures
Every chef has dealt with a scorched pan or a gray, lifeless steak. Usually, these failures stem from a misunderstanding of how heat behaves within the pan. If you find your food is turning out bitter, you have likely pushed the sugar past the caramelization phase into carbonization. This happens when the pan temperature spikes too high or when you leave the ingredient sitting on the heat source for too long without movement. Remember that the smoke point of your fat is also a factor; if your oil is smoking, it has already begun to break down, which will impart a harsh, burnt flavor to your food before the caramelization is even complete.
The Crowded Pan Syndrome
Another common failure is the "steaming" effect. When you crowd a pan, you trap steam between the ingredients, preventing the pan from getting hot enough to brown. Your mushrooms turn into rubbery, watery gray lumps instead of deep, savory, golden-brown delights. Always work in batches, even if it feels like a tedious extra step. You are far better off cooking in two rounds to ensure each piece gets the contact it needs to trigger the chemical reaction.
Uneven Heat Sources
If you are cooking on a glass-top or induction range, pay attention to the "hot spots." Most pans have a diameter that is larger than the burner, meaning the edges of your pan may be significantly cooler than the center. To mitigate this, rotate your pan every few minutes. By being conscious of the physical heat distribution, you can ensure that every inch of the food in your pan participates in the browning process, rather than having a perfectly seared center and an undercooked, pale perimeter.
"When your dish falls flat, don't blame the ingredients; look to the chemistry. Was the pan dry? Was the heat high enough? Did you allow the reaction time to complete? The answer is almost always in the pan."
Conclusion
Understanding the science behind caramelization and the Maillard reaction is perhaps the most significant step a home cook can take toward professional proficiency. It shifts your perspective from being a follower of instructions to being a master of variables. By respecting the requirements of temperature, time, and moisture, you gain the ability to manipulate the very molecules of your food, extracting hidden depths of flavor that were previously unreachable.
Remember that these processes are patient. They require a steady hand, a hot pan, and an eye for color. Do not fear the brown; embrace it. Watch as your onions melt into mahogany silk and your proteins develop that coveted, savory crust that signals success. The chemistry happening in your kitchen is one of the most rewarding parts of the culinary experience, turning simple, raw inputs into something profound and delicious.
As you move forward in your cooking journey, keep these principles in the back of your mind. Test the temperatures, experiment with different fats, and always keep your pan clean enough to develop a beautiful fond. The more you practice, the more intuitive the process will become. Eventually, you won't need to think about the chemical bonds or the amino acids—you will simply know, by the sound of the sizzle and the scent in the air, exactly when the transformation is perfect. Now, go turn on the stove, heat up that heavy pan, and start your next experiment. The science is waiting, and your dinner is about to become a whole lot better.
Final Thoughts: Mastering these techniques does not happen overnight, but the results are immediate. The next time you find yourself staring at a pan of aromatics, remember that you are holding the power of transformation. Stay curious, stay precise, and always remember to blame the chef—because when it comes to the chemistry of the pan, you are the one in control of the outcome. Keep pushing the boundaries of your craft, keep questioning why certain methods work better than others, and continue to refine your intuition. The kitchen is, and will always be, the greatest laboratory on earth. Happy cooking, and may your crusts always be golden, your fond always rich, and your caramel always perfectly balanced.
Get the Next Recipe
Weekly recipes, techniques, and gear picks — straight to your inbox.
