The Science of Chocolate Tempering: Mastering Cocoa Butter Crystallization for Glossy, Snappable Confections
There is a profound moment in every pastry chef’s journey where they stop seeing chocolate merely as a sweet treat and start seeing it as a complex, temperamental engineering project. When you bite into a professionally crafted truffle or a perfectly molded bar, that distinctive, satisfying snap is not an accident; it is the physical manifestation of a precise, crystalline structure. Achieving this requires moving beyond simple melting and embracing the rigorous science of chocolate tempering. It is a process that intimidates many home cooks, yet it is entirely achievable once you peel back the layers of thermodynamic theory and focus on the behavior of fat molecules. At "Blame The Chef," we believe that mastering this skill is the ultimate bridge between a hobbyist and a true artisan.
The secret to professional-grade chocolate lies entirely in how we manipulate cocoa butter, the primary fat responsible for the texture, shine, and melting point of your creations. When chocolate is melted, its internal crystalline structure is completely dismantled, turning it into a disorganized liquid mass. If you simply allow this liquid to cool on its own, it will re-solidify into a dull, streaky, and soft mess that lacks that desirable "snap." To prevent this, we must guide the cocoa butter through a controlled cooling and reheating process known as tempering. By inducing specific crystal formations, we create a stable, durable matrix that remains glossy at room temperature but melts instantly upon contact with your palate.
As we dive into this guide, I want you to set aside any fear of "ruining" your chocolate, as failure is simply a lesson in heat control. Tempering is less about intuition and more about the strict adherence to specific temperature curves and constant movement. You will need a reliable digital thermometer, a heat-proof spatula, and a fair amount of patience. Whether you are aiming to make delicate pralines or simply want to dip strawberries in a coating that won't smear the moment you pick them up, the following techniques will provide the foundation for perfection. Let’s embark on the journey of turning messy, molten cocoa into polished, high-performance confectionery art.
The Chemistry of Cocoa Butter Polymorphism
At the molecular level, cocoa butter is a marvel of polymorphism, meaning it can solidify into several different crystalline forms depending on the temperature at which it cools. There are six distinct types of crystals, labeled Form I through Form VI, each with its own unique melting point and stability. Form I crystals are the most unstable, forming at very low temperatures and melting almost immediately, while Form VI crystals are the most stable but take months to form naturally. For the chocolatier, we are exclusively interested in Form V (Beta) crystals. These are the "Goldilocks" of the chocolate world; they provide the tightest molecular structure, the highest gloss, and that signature, loud snap when the chocolate is broken.
Understanding the Crystal Forms
To manage these crystals, you must understand their behavior under thermal influence. When you melt chocolate completely above 115°F (46°C), you wipe the slate clean, effectively destroying all existing crystal structures. As the chocolate cools, it begins to form different shapes. If it cools without agitation or temperature control, you end up with a mix of Form I, II, III, and IV—all of which are prone to blooming, which is the unsightly white or grey film that ruins the aesthetic of your work. By introducing "seed" crystals of Form V and carefully controlling the temperature, we encourage the liquid fat to organize itself into that highly desirable, stable matrix.
Why Tempering is Non-Negotiable
Without proper tempering, your chocolate will suffer from fat bloom, where cocoa butter separates and migrates to the surface, resulting in a dull, dusty finish. Furthermore, untempered chocolate will not contract as it sets, making it nearly impossible to release from professional polycarbonate molds. Proper tempering ensures that the chocolate shrinks ever so slightly as it solidifies, allowing for a clean release and a mirror-like finish. This is the difference between a homemade chocolate bar that looks like a melted blob and one that looks like it belongs in the display case of a Parisian chocolatier.
"Tempering is not about forcing the chocolate to change; it is about providing the precise environmental conditions for the cocoa butter to naturally organize itself into the strongest structure possible."
Essential Equipment for the Home Kitchen
Before you melt a single gram of chocolate, you must ensure your workspace is prepared for precision. Tempering is a game of millimeters and seconds, and having the right tools is the difference between success and a bowl of muddy, grey-streaked chocolate. First and foremost, you need a high-quality digital infrared or probe thermometer. Accuracy is paramount here; if your thermometer is off by even two or three degrees, your tempering curve could fail entirely. A sturdy silicone spatula is also essential, as constant agitation is required during the cooling phase to ensure that crystals form evenly throughout the mass.
Choosing Your Chocolate
Not all chocolate is created equal for tempering. You should always use couverture chocolate, which has a higher percentage of cocoa butter (usually 32% or more) compared to standard supermarket baking chips. The added fat makes the chocolate more fluid and responsive to temperature manipulation. Avoid using chocolate chips from the grocery store aisle, as they often contain vegetable oils or emulsifiers like soy lecithin in quantities that make consistent tempering very difficult. Stick to professional brands or high-quality bars with a clean list of ingredients: cocoa mass, cocoa butter, sugar, and perhaps a touch of vanilla and lecithin.
Setting Up Your Bain-Marie
A bain-marie (or double boiler) is the safest way to melt chocolate without the risk of burning it. Simply place a heat-proof bowl over a pot of gently simmering water, ensuring the bottom of the bowl does not touch the water. Steam is enough to provide the gentle heat required. If even a drop of water—or steam—gets into your chocolate, it will seize, turning into a stiff, clumpy paste that cannot be saved. Keep your workspace dry, keep your utensils dry, and always work with a bowl that is wider than your pot to prevent steam from escaping up the sides.
The Seeding Method: A Proven Technique
The seeding method is arguably the most reliable technique for home cooks because it relies on the introduction of stable Form V crystals from pre-tempered chocolate. This "seeds" the melted chocolate, encouraging the liquid fat to follow the crystalline structure of the added solids. It is a foolproof way to maintain control without needing a marble slab or professional tempering machine. The key is to start with high-quality chocolate that is already in temper and use it as a catalyst for the molten mass.
Step-by-Step Seeding Process
Troubleshooting the Temper
If your chocolate doesn't set within a few minutes, don't panic. You likely didn't reach the target working temperature or you introduced too much heat, melting your seed crystals. If it's too warm, simply continue stirring to allow the heat to dissipate, or add another small handful of tempered seed chocolate and stir until it dissolves. If it gets too cool, you can apply a very brief burst of heat—literally just a few seconds over the steam—to bring it back into the working range. Remember, constant movement is the best way to prevent the temperature from spiking or dropping too quickly.
Tabling: The Professional’s Choice
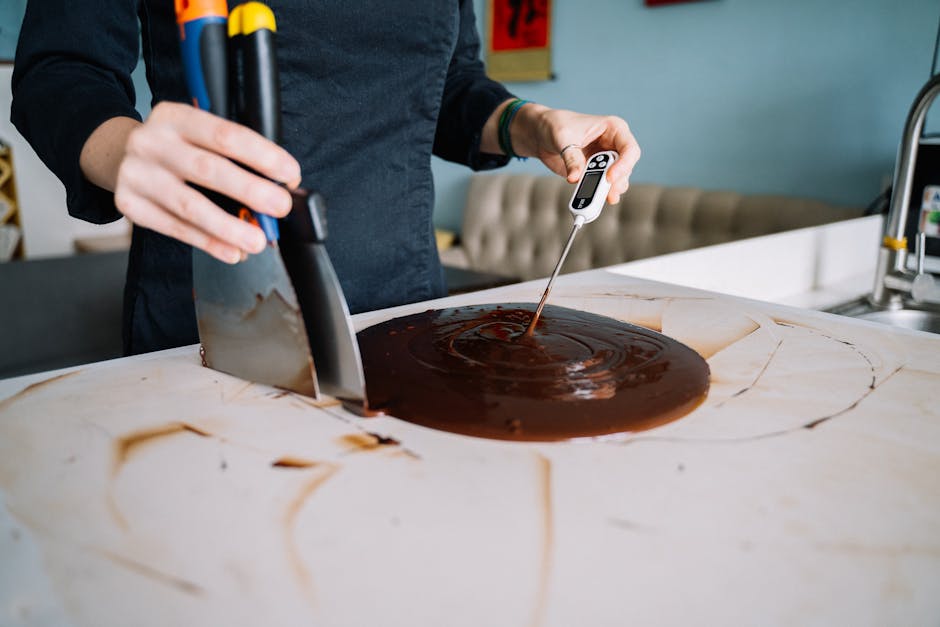
For those looking to advance their technique, tabling is the traditional method used in professional kitchens. It involves spreading the melted chocolate across a cool, non-porous surface—typically a granite or marble slab—to rapidly and evenly cool the fat molecules. This method allows for a much faster transition between temperatures and ensures that the crystals are distributed throughout the mass through physical agitation. It is messier, certainly, but it is also the fastest way to temper large quantities of chocolate.
Mastering the Motion
To table chocolate, pour about two-thirds of your fully melted chocolate onto your clean, cool slab. Using a large offset spatula and a bench scraper, move the chocolate back and forth, spreading it into a thin layer and then scraping it back into a pile. This repetitive motion ensures that every molecule of the chocolate is exposed to the cooler surface, preventing the outer edges from cooling faster than the center. Continue this process until the chocolate begins to thicken and reaches the "on-the-verge-of-setting" stage.
Incorporating Back into the Bowl
Once the tabled chocolate has reached the target temperature, scrape it back into the bowl containing the remaining one-third of the melted chocolate. The cooled, crystal-rich chocolate will bring the temperature of the entire mass down into the perfect working range. Stir gently but thoroughly to combine. Because you have physically worked the cocoa butter into a crystalline structure, you will find that the resulting mass is much more stable and glossy than anything achieved via the seeding method alone. Practice makes perfect here; the speed and rhythm of your scraper are what determine the quality of the temper.
"The sound of a perfectly tempered bar snapping is the sound of professional discipline. It is the audible proof that you have mastered the thermodynamic behavior of fat."
Working with Different Chocolate Varieties
Each type of chocolate—dark, milk, and white—has a different cocoa butter content and melting profile, which requires adjustments to your tempering curve. Dark chocolate, with its higher cocoa solid content, is the most robust and forgiving. It typically requires higher temperatures to melt and a higher working temperature to maintain fluidity. Milk chocolate, which contains milk solids (proteins and sugars), is more sensitive to heat and prone to scorching. White chocolate, consisting entirely of cocoa butter and milk solids with no cocoa solids, is the most delicate and must be handled with extreme care to avoid burning the milk sugars.
Dark Chocolate
Dark chocolate is the benchmark for tempering. Because it lacks milk solids, it handles heat better and holds its temper longer. When working with high-percentage dark chocolate (70% or higher), you will find the mass becomes quite thick quickly. You can often increase the working temperature by a degree or two to keep it workable, provided you don't exceed 91°F (33°C).
Milk and White Chocolate
Milk and white chocolates are much more sensitive to fat bloom. Because they contain more sugar and milk fat, they have a narrower working window. If you overheat white chocolate, it will "break" or curdle, becoming grainy and unusable. Always use a lower temperature for melting these varieties, and keep your workspace slightly cooler to ensure they set properly. The addition of milk fat slightly lowers the melting point of the crystals, so if your room temperature is above 75°F (24°C), you will struggle to keep these chocolates in temper.
Maintaining Temper: The Daily Grind
Tempering is not a one-and-done event; it is a state that must be maintained. Throughout the process of dipping or molding, your chocolate will gradually lose its temper due to air contact, fluctuations in room temperature, and the physical act of working the chocolate. You must keep a close eye on your bowl. If you notice the chocolate beginning to thicken noticeably, or if it loses its high-gloss finish, it is a sign that it is falling out of temper. This is perfectly normal in a professional kitchen environment and requires a simple adjustment.
The "Re-tempering" Trick
When you see your chocolate thickening, you don't necessarily have to start over. If you have kept a small amount of "seed" chocolate on the side, you can occasionally stir in a tiny amount to bring it back into line. If the chocolate is just getting too cool and becoming difficult to use, a gentle "warm up" is required. Hold a hair dryer (on the lowest heat setting) over the bowl for a few seconds while stirring constantly. This adds just enough energy to keep the crystals in the proper Form V alignment without melting them entirely.
Managing Workflow Efficiency
Organization is key to success. Don't try to dip 100 truffles if you aren't comfortable managing the temperature for more than 15 minutes. Start small. Temper just 500 grams of chocolate at a time. It is much easier to maintain the temper of a smaller, more manageable quantity than a massive, heavy bowl of chocolate. If you feel overwhelmed, stop, put the chocolate aside, and re-evaluate your temperature. Professionalism in the kitchen is defined by the ability to remain calm and methodical, even when the cocoa butter refuses to cooperate.
Storage and Preservation of Finished Confections
Once you have successfully tempered your chocolate and used it to coat your ganache centers or fill your polycarbonate molds, the final stage is storage. Tempered chocolate is sensitive to both humidity and light. If you store your finished confections in a refrigerator, you must ensure they are properly sealed in an airtight container with desiccants if possible. The high humidity of a standard kitchen fridge can cause the sugar in the chocolate to absorb moisture, leading to sugar bloom, which manifests as a gritty, rough surface that effectively ruins the appearance of your hard work.
The Ideal Environment
The ideal storage environment for tempered chocolate is a cool, dry place—ideally between 60°F and 68°F (15°C and 20°C)—with a humidity level below 50%. A wine cooler or a dedicated pantry shelf away from heat sources is perfect. If you have done your tempering correctly, your creations will have a long shelf life. The stable crystalline structure of Form V acts as a protective barrier, preventing the fat from migrating and keeping the chocolate snappy and glossy for months.
The Final Snap Test
When you are ready to serve or gift your chocolates, perform the final check. If you snap a piece in half, it should make a sharp, audible "crack." If the snap is soft or the chocolate bends before it breaks, your tempering was either not quite finished or the room was too warm during the setting process. If the chocolate shows streaks, you know it was either not cooled properly or not agitated enough. Learning to read the chocolate is a skill that develops over time, and every single batch is a step toward perfection.
Conclusion
The pursuit of the perfect temper is a journey of precision, patience, and scientific understanding. It turns the raw, chaotic energy of cocoa butter into a refined, elegant confection that brings joy to everyone who tastes it. By mastering the six forms of cocoa butter crystals, you have learned the language of chocolate, allowing you to manipulate its properties to achieve the mirror-like shine and satisfying snap that define true professional quality. While it may seem daunting at first, the science is consistent; the cocoa butter will always react the same way to the same thermal stimuli.
Remember that tempering is a skill that favors the disciplined. It is about checking your thermometer, stirring with intention, and understanding that you are working with a material that is constantly reacting to its environment. When you get it right, the satisfaction is immense—not just because the chocolate looks professional, but because you understand exactly how and why it reached that state. There is a deep, quiet power in knowing exactly how to command your ingredients.
As you continue to refine your technique, don't be afraid to experiment with different types of chocolate or to incorporate techniques like tabling into your repertoire. Each batch of chocolate you temper is an opportunity to practice, observe, and grow. So, clear your workspace, calibrate your thermometer, and start melting. You are no longer just a home cook; you are a chocolatier. And if the chocolate doesn't turn out perfectly the first time? Don't worry about it. Just blame the chef, melt it down, and try it all over again—because in the science of chocolate, every failure is just a step closer to the perfect snap. Enjoy the process, embrace the precision, and let the cocoa butter do its beautiful, crystalline work.
Get the Next Recipe
Weekly recipes, techniques, and gear picks — straight to your inbox.
