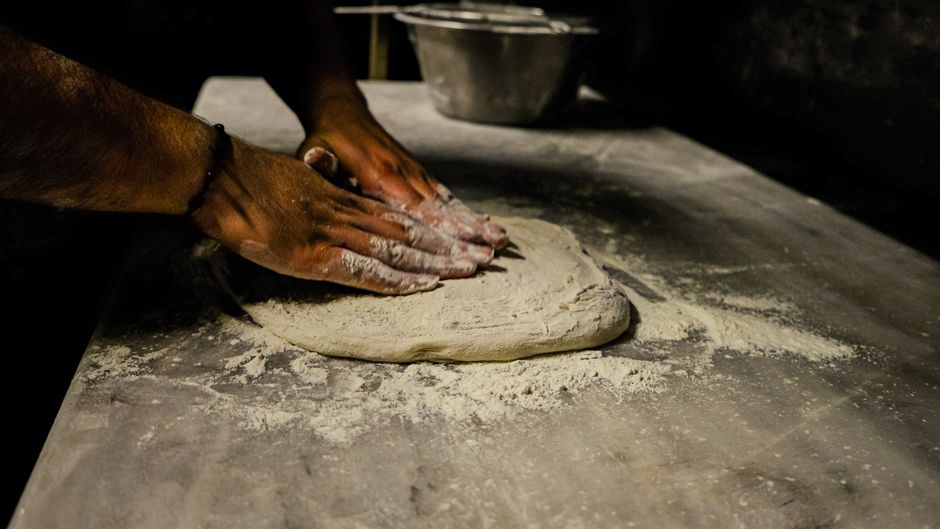
The Science of Gluten Development: How Kneading Transforms Dough Structure
Baking is often described as both an art and a science, a delicate dance where intuition meets precise chemical reactions. When you step into the kitchen to bake a loaf of crusty sourdough or a batch of buttery brioche, you are essentially acting as a laboratory technician for yeast and flour. Understanding the underlying mechanisms at play—specifically the structural transformation of dough—is the difference between a dense, uninspired brick and a loaf that possesses that coveted open, airy crumb. It is not merely about following a recipe; it is about respecting the biological and physical properties of the ingredients you hold in your hands.
At the heart of every successful bread-making endeavor is the development of gluten. Many home cooks view kneading as a chore or a test of physical endurance, but in reality, it is a purposeful manipulation of proteins. Through mechanical force and hydration, we align the strands of protein that give bread its strength, elasticity, and ability to trap gas. Without this structural foundation, the carbon dioxide produced by fermentation would simply bubble to the surface and vanish, leaving you with a flat, lackluster product that fails to rise to the occasion.
In this deep dive, we will peel back the layers of flour science to understand exactly what occurs at a molecular level when you knead. We will explore how hydration, agitation, and time interact to build the gluten network, and how you can optimize your technique to achieve professional results at home. Whether you are aiming for the tight, chewy texture of a bagel or the delicate, lacy interior of an artisan baguette, the principles remain consistent. By mastering the science of the dough, you move from merely following instructions to truly orchestrating the crumb you desire.
The Chemistry of Flour: Proteins and Bonds
To understand gluten development, one must first understand what is inside a bag of wheat flour. Wheat flour is primarily composed of starch and protein, with the protein component consisting largely of two specific types: gliadin and glutenin. These two proteins are inert and disorganized when dry, but once introduced to water, they become dynamic. This is the starting line of your bread-making process, the moment where potential energy turns into structural capability.
The Role of Gliadin and Glutenin
When you add water to flour, gliadin provides the dough with its extensibility—that is, its ability to stretch without snapping back immediately. Conversely, glutenin provides the elasticity and strength, acting as the rubber band that allows the dough to hold its shape. As these proteins hydrate, they begin to bond together. Kneading is the physical catalyst that encourages these proteins to line up and form the long, interconnected chains we identify as the gluten network.
"Gluten is not present in the flour itself; it is a structural result of hydration and mechanical work. You are the architect building the frame of the house before the yeast provides the expansion."
Hydration and the Autolyse
Before you even begin the physical process of kneading, you can gain a significant advantage by utilizing a technique called the autolyse. By mixing your flour and water and letting it rest for 20 to 60 minutes before adding salt or yeast, you allow the flour to hydrate fully. This resting period initiates the bonding process passively, making the dough significantly more extensible and reducing the amount of manual labor required later. It is a professional secret that transforms the texture of the finished bread.
The Mechanics of Kneading: Agitation and Alignment
Once hydration is underway, the physical act of kneading takes over. The goal here is not just to mix ingredients, but to create a cohesive matrix. Imagine the proteins as thousands of tangled, unorganized threads. As you fold, push, and stretch the dough across your work surface, you are physically orienting these threads in a specific direction, creating a web that can trap the gases produced by fermentation.
The Push and Fold Technique
The most effective way to build this structure is the classic push-and-fold method. You press the dough away from your body with the heel of your hand, then fold it over itself and rotate it 90 degrees. This repetitive action is crucial because it constantly introduces new layers into the mix, forcing the proteins to interact and link up. You should perform this rhythmically, ensuring you do not tear the dough. If you tear the dough, you are breaking the very bonds you are working so hard to create.
Identifying the Windowpane Test
How do you know when your dough is ready? The Windowpane Test is the gold standard for bakers. To perform this, take a small marble-sized piece of dough and gently stretch it out between your fingers. If it pulls into a thin, translucent membrane that allows light to pass through without tearing, your gluten is fully developed. If it snaps immediately, the network is not yet stable enough to hold the gas. It is important to remember that dough hydration levels change the feel, so a high-hydration dough (like ciabatta) will behave differently than a standard sandwich loaf.
* Low Hydration (55-60%): Requires more vigorous, sustained kneading.
* Medium Hydration (65-70%): The "sweet spot" for most artisan loaves.
* High Hydration (75%+): Benefits from fold-and-rest cycles rather than aggressive kneading.
Factors That Influence Gluten Formation
While kneading is essential, several variables can accelerate or hinder the development of your dough. Temperature, for instance, plays a massive role in the enzymatic activity of the flour. When the kitchen is warm, the proteins are more malleable, and the yeast becomes more active, potentially leading to over-proofed, slack dough if you are not careful. Conversely, cold dough is stiff, resistant, and requires more patience to work with.
The Impact of Salt
Salt is more than just a flavor enhancer; it is a dough strengthener. It tightens the gluten network, making the dough more manageable and slowing down the fermentation rate so that the yeast doesn't exhaust itself too quickly. If you forget to add salt, you will notice your dough feels sticky and "slacker" than usual, losing its form even after extensive kneading. Always incorporate salt once the initial hydration phase is complete to ensure it does not inhibit the yeast's early growth.
Fats and Sugars
When baking enriched doughs like brioche, fats (butter, eggs, oil) and sugars act as "tenderizers." They coat the protein strands, preventing them from bonding too tightly. This is why a brioche is soft and pillowy rather than chewy like a sourdough loaf. If you are working with an enriched dough, you must knead for significantly longer because the fats are essentially fighting against the gluten formation.
"In the world of baking, fats and sugars are the enemies of structure, but the best friends of flavor and crumb tenderness. Managing this balance is the hallmark of a master baker."
The Science of Fermentation and Gluten Development
The relationship between kneading and fermentation is symbiotic. While kneading provides the structural walls for the dough, fermentation provides the gas to fill those walls. As yeast consumes sugars in the flour, it produces carbon dioxide and ethanol. These gases create pressure within the gluten network. If your gluten is strong, it will expand like a balloon. If it is weak, the gas will escape, and your bread will result in a dense, tight crumb.
The Rise and Fold Technique
In many modern artisan breads, we use the stretch-and-fold technique instead of heavy kneading. By placing the dough in a bowl and stretching the sides up and over the center every 30 minutes during the bulk fermentation, we gently build the gluten structure over several hours. This is particularly beneficial for high-hydration doughs where sticky, wet doughs are difficult to knead on a counter. This technique preserves the aeration created by the yeast while simultaneously strengthening the network.
Managing Proofing Times
Properly managing your fermentation time is vital to maintaining the integrity of your gluten. If you leave the dough to proof for too long, the acid production from the yeast begins to break down the protein strands. This is known as "over-proofing," and it leads to a loaf that collapses as soon as it hits the hot oven. Your goal is to catch the dough when it is at the peak of its strength and elasticity, just before it begins to lose its structural integrity.
Troubleshooting Common Gluten Failures
Even with the best intentions, things can go wrong. Perhaps the most common complaint among home bakers is that the dough is "sticky" or "doesn't hold its shape." This is often a misunderstanding of how hydration affects gluten. A very wet dough will always be sticky, but it can still have a strong, organized gluten network. Don't be tempted to keep adding more flour, as this will result in a dry, heavy, and dense loaf.
The Problem of Over-Kneading
It is possible to knead too much. If you work the dough until the gluten becomes too tight and rigid, it loses its ability to expand, resulting in bread that is tough and "rubbery." This usually happens when using a stand mixer on too high a speed for too long. Stick to lower speeds (setting 1 or 2 on most mixers) to develop the gluten gently. Once the dough pulls cleanly away from the sides of the bowl, stop.
Handling "Slack" Dough
If your dough remains slack despite vigorous kneading, check your flour. Are you using an all-purpose flour with low protein content (around 9-10%)? For bread, you should look for bread flour (12-14% protein content). The higher the protein, the more potential for gluten development. If you only have all-purpose flour, consider adding a tablespoon of vital wheat gluten to boost the protein content and assist in forming a stronger structure.
Advanced Techniques: Bulk Fermentation to Baking
Once your gluten is developed, the final stage is moving the dough from the bulk fermentation container to the proofing basket. This is where you finalize the "shape" of the loaf. Handling the dough gently is paramount. You want to maintain the air bubbles created by the yeast during fermentation, so avoid aggressive degassing. Treat the dough like a living, breathing entity.
Shaping for Tension
Shaping is the final opportunity to strengthen the outer skin of the loaf. By pulling the dough taut across the counter during the shaping process, you create a surface tension that forces the bread to rise upward in the oven rather than spreading outward. This tension is the secret to a high-rising loaf with a beautiful "oven spring." If you fail to create this tension, your bread will be wide, flat, and pancakesque.
The Role of Steam in the Oven
During the first few minutes of baking, the exterior of the loaf needs to remain flexible to allow for maximum expansion. Professional bakers use steam to keep the crust soft for the initial blast of heat. At home, you can achieve this by placing a tray of boiling water in the bottom of the oven or using a Dutch oven. The steam prevents the crust from setting too early, allowing the gluten network to stretch to its maximum potential before the structure finally hardens into a golden crust.
The Science of the Crumb
Finally, we must consider the crumb structure. A "good" crumb is subjective, but scientifically, it relates to the balance between gluten strength and gas production. A large, open crumb (like in ciabatta) requires a strong, well-developed gluten network that is capable of stretching significantly without tearing. A tighter crumb (like in a sandwich loaf) suggests a shorter, more compact gluten structure.
Why Crumb Consistency Matters
The consistency of your crumb is a direct result of how you managed your dough during its journey from bowl to oven. If your dough was not properly kneaded, the holes in the bread will be small and uneven, or the loaf will have large, unsightly "tunnels." If you are aiming for a professional-grade crumb, focus on three pillars:
Protein Quality:* Start with good flour.
Time:* Let the fermentation work for you.
Temperature:* Control the environment to keep the yeast happy.
When you master the science behind the dough, you are no longer guessing. You can predict the outcome of your bake, understand why a loaf didn't rise, and adjust your techniques accordingly. You begin to understand that gluten development is not just about muscle; it is about providing the structure for yeast to perform its magic.
Final Thoughts
The path to baking the perfect loaf is paved with experimentation and an appreciation for the chemistry occurring on your countertop. While there is a wealth of complex science involved in the transformation of water and flour into artisanal bread, the most important tools you have are your hands and your patience. Do not fear the sticky mess of a high-hydration dough, and do not be discouraged by a flat loaf. Every failure is simply a data point in your journey toward becoming a better baker.
Remember that gluten development is a process of unfolding and strengthening. By giving your dough the time it needs to rest, the water it needs to hydrate, and the gentle manipulation required to organize its structure, you are setting the stage for greatness. The crust will be thinner, the flavor more complex, and the crumb more tender. You are not just following a recipe; you are engaging in a process that humans have perfected over thousands of years.
As you move forward, keep a baking journal. Note the temperature of your kitchen, the type of flour used, and the total time from mixing to baking. These small details will help you refine your process and help you gain the "feel" for the dough. Before long, you won't even need to look at the clock—your hands will simply know when the gluten is ready, and your eyes will recognize the signs of a perfectly proofed loaf.
Baking is a lifetime endeavor, a continuous conversation with heat, moisture, and time. Keep experimenting with hydration levels, try longer fermentation periods, and always strive to understand the "why" behind the "how." Whether you are baking for your family or simply for the joy of the craft, the mastery of gluten is the most rewarding skill you can develop. It is the invisible architecture that holds your culinary efforts together, turning simple ingredients into a masterpiece.
As you continue your journey with "Blame The Chef," remember that the best loaves aren't just baked; they are built. Each fold, each rest, and each minute of development is a testament to your patience and precision. The science of gluten may seem daunting at first, but with consistent practice, it becomes second nature. Treat your dough with kindness, respect the variables, and never stop questioning the reactions happening right in front of you. Happy baking, and may your ovens always be hot and your crusts perfectly blistered.
The process of kneading and structural development is, at its essence, an act of creation. You are taking raw, disordered elements and, through intention, guiding them into something extraordinary. This is the beauty of the kitchen—the ability to influence matter to create sustenance, joy, and community. Every loaf you produce is a lesson, a reflection of the time you invested, and a reward for the discipline you’ve cultivated.
Take heart in the fact that even the most celebrated bakers in the world were once confused by the complexities of flour and water. They, too, had to learn the feeling of a properly developed dough and the sight of a perfect windowpane. They, too, experienced the frustration of a collapsed loaf. The difference between the novice and the expert is simply the dedication to understanding the science, the willingness to iterate, and the passion to keep trying until the result matches the vision in their mind.
Continue to explore the nuances of different grains and fermentation styles. Experiment with whole grains, which can challenge your gluten development due to the presence of bran, and see how varying the hydration can change the final sensory experience of your bread. Each experiment is an opportunity to expand your knowledge base. When you understand the science, you become a chef who is no longer tethered to a rigid recipe, but rather, a creator who can adapt to any flour, any kitchen, and any goal.
In summary, the mastery of gluten development requires a blend of tactile skill and scientific knowledge. You must be able to feel the strength of the dough under your fingertips while understanding the biological pressures being applied from within. By balancing the autolyse, the push-and-fold method, and the proper use of temperature and time, you are in total control of the final crumb. This is the power of the home baker, and it is a power that transforms the kitchen into a place of wonder.
Thank you for joining us in this exploration of bread chemistry. May your journey be filled with successful bakes, golden crusts, and the deep, satisfying aroma of freshly baked bread. If you find yourself in the kitchen tonight, take a moment to notice the way the dough changes as you work it—the way it goes from a shaggy, disconnected mess to a smooth, supple, and living structure. That is the magic of science in the palm of your hands. Keep pushing, keep folding, and above all, keep learning. Your next masterpiece is only a few folds away.
Remember to keep your workspace clean and your ingredients at the ready. A well-organized baker is a confident baker, and confidence is the secret ingredient that carries over into the final product. Every step you take, from the weighing of the flour to the final score before the bread enters the oven, is an essential part of the story you are telling. Whether you are baking a simple rustic loaf or a complex sourdough boule, the principles of gluten development are your best friend.
As you progress, try to document your results. Tracking the hydration percentage and the ambient temperature will reveal patterns that will help you troubleshoot future bakes with ease. If you find your bread is consistently too dense, you will know to focus on your kneading technique or check the activity of your starter or yeast. If the crust is too pale, you will know to look at your oven temperature or your steam injection method. The more data you have, the more predictable and repeatable your success becomes.
Do not be afraid to push the boundaries of what you think is possible. Try incorporating seeds, herbs, or different types of flours to see how they impact the gluten structure. Every ingredient added to the dough changes the dynamic of the protein network. This is the heart of culinary innovation, and it is how you develop your own unique style as a baker. The science of gluten is the canvas, but your creativity is the paint.
As we close this guide, look back at the beginning of the process. Think of the inert, disorganized flour and the simple, transparent water. Think of how far they have traveled together to become a loaf of bread. This journey is one that has defined human civilization for thousands of years, and it is an honor to continue that tradition in your own home. You are not just making food; you are participating in a timeless ritual that connects you to the past while allowing you to express your individual skill in the present.
May your bread always rise, your crust always shatter, and your kitchen always be a place of discovery. We hope this deep dive has provided you with the foundational knowledge you need to take your baking to the next level. Stay tuned to "Blame The Chef" for more deep dives into the culinary arts, where we peel back the science to help you unlock your inner master chef. Every recipe is a puzzle, and now you have the pieces to solve it. Happy baking, and may your crumbs be ever-perfect.
The final piece of advice for the aspiring baker is this: be present. Baking is a sensory experience. Listen to the way the dough snaps when you stretch it. Smell the fermentation as it progresses. Feel the difference in tension as you shape the loaf. When you are truly present, you begin to anticipate the needs of your dough. You will know when it needs more time, when it is ready to be baked, and how it will respond to the heat of the oven. This is the intuition that comes from knowledge, and it is the greatest tool in your arsenal.
Never stop refining your technique. Even if you have baked hundreds of loaves, there is always something new to learn or a slight adjustment to be made. Perhaps it is a different way to fold, a new flour blend, or a minor tweak to your fermentation schedule. Whatever it may be, embrace the learning process. It is what makes the craft of baking so enduringly satisfying. You are never truly "finished" learning about bread, and that is exactly why it is one of the most rewarding culinary arts to master.
In closing, stay curious and keep your oven preheated. There is no feeling quite like the satisfaction of slicing into a loaf that you have built from scratch, understanding every stage of its development, and knowing exactly how you achieved that perfect result. The science of gluten is the key that opens the door to this level of mastery. We are thrilled to be part of your baking journey and look forward to hearing about your successes. Keep flour on your apron, joy in your heart, and keep on baking.
Final thoughts: Structure is everything. Without the foundation provided by the gluten network, the other elements of your recipe cannot perform their roles. By mastering the science of the dough, you are ensuring that your ingredients work together in harmony. You are the conductor of the dough, and the result is a symphony of flavor and texture that you can share with those you love. Go forth and create something beautiful. The kitchen is yours to conquer, one loaf at a time. The world of artisan baking is vast, and you have only just begun to scratch the surface. Enjoy every crumb.



Get the Next Recipe
Weekly recipes, techniques, and gear picks — straight to your inbox.
