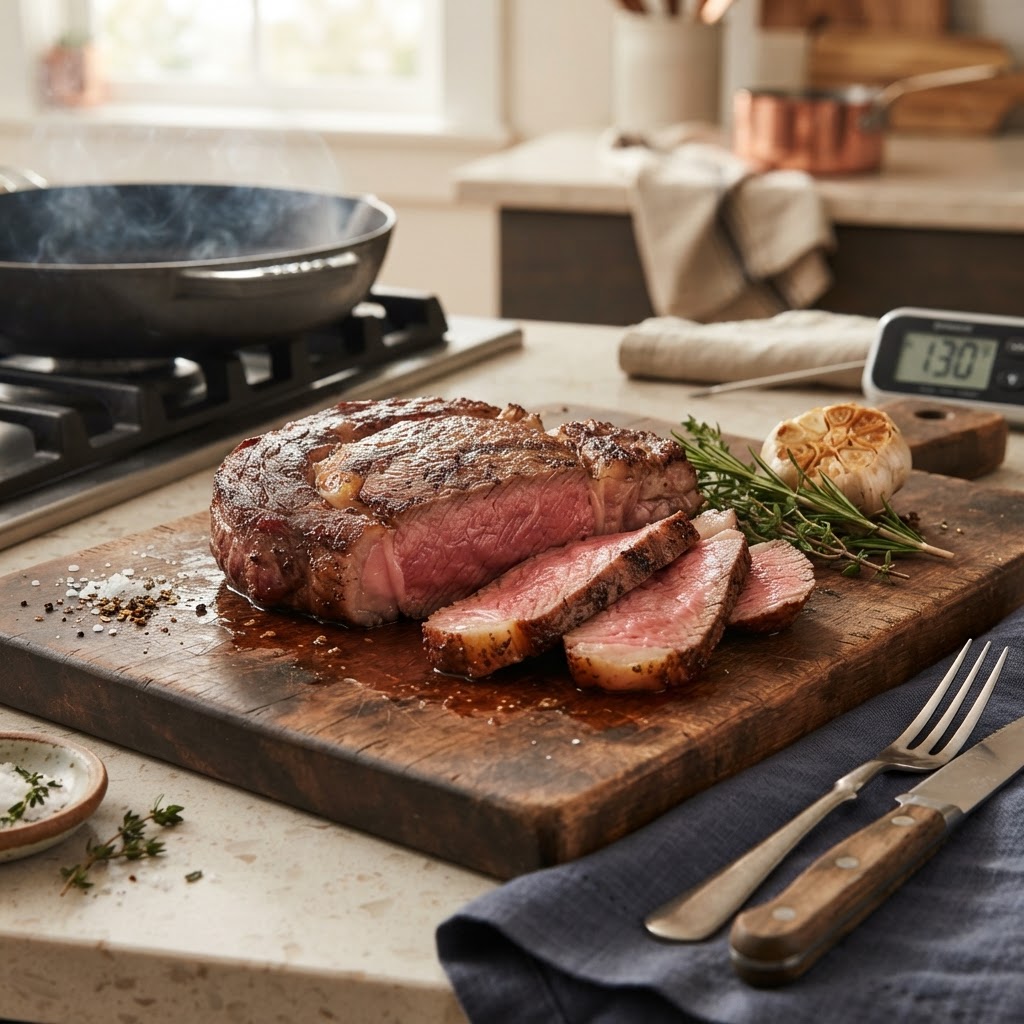
The Science of Residual Heat: How to Master Carryover Cooking for Perfectly Finished Proteins
The kitchen is a place of constant transformation, where heat, time, and biology collide to create the meals we love. Too often, home cooks fall into the trap of believing that the stove is the final authority on doneness, pulling a steak or a chicken breast only when it looks perfectly cooked while sitting on the hot iron. In reality, the moment you remove your protein from the heat source is not the end of the cooking process; it is merely the beginning of the most critical phase. This phenomenon is known as carryover cooking, and it is the secret bridge between a professional kitchen’s consistent results and the inconsistent ones often found at home. Understanding how residual heat moves through a piece of meat is the difference between a succulent, tender centerpiece and a dry, fibrous disappointment.
Mastering this technique requires a shift in perspective, moving away from watching the clock and toward respecting the physics of thermodynamics. Proteins are essentially complex networks of muscle fibers and connective tissues that behave predictably under thermal stress, yet many of us inadvertently sabotage our dinner by ignoring the rising internal temperature that occurs post-pan. When you take a steak off the grill at 135°F, it doesn't stop cooking the second it hits the cutting board; the thermal energy stored in the exterior layers continues to migrate inward, often raising the internal temperature by another five to ten degrees. By accounting for this surge, you can pull your proteins early, ensuring they hit their peak flavor and texture profile precisely when they reach the plate rather than letting them overcook in the resting phase.
As we dive into the science of thermal conductivity and heat capacity, you will find that these concepts are not just academic theories meant for scientists in white lab coats. They are practical tools that you can wield in your own kitchen every single night to elevate your roasting, searing, and braising. Whether you are working with a delicate piece of salmon or a thick, marbled ribeye, the principles of residual heat remain constant and reliable. Once you internalize how to manipulate this invisible energy, you will find yourself becoming a more confident, intuitive chef who spends less time worrying about mistakes and more time enjoying the craft of cooking. Let us peel back the layers of thermal dynamics to ensure your next meal is nothing short of restaurant quality.
The Physics of Thermal Energy Transfer
At its core, cooking is the act of transferring energy from a source—be it a gas flame, an electric coil, or a charcoal bed—into the interior of the food. When you sear a protein, you are creating a high-energy environment on the surface, which causes the Maillard reaction to occur, developing those savory, caramelized crusts we all crave. However, the internal temperature of the protein lags behind because it takes time for that heat to travel through the muscle tissue. This heat must move from the outer layers toward the center via conduction, a process that continues long after the external heat source has been extinguished.
Because of this, the center of the protein is at a lower temperature than the outside when it leaves the pan. The exterior, having been exposed to direct heat, contains a significant amount of stored thermal energy. Once the protein is removed from the pan and allowed to rest, this thermal gradient begins to equalize. The high-heat exterior effectively continues to "cook" the lower-temperature interior until the heat is distributed more evenly throughout the mass of the meat. This is why resting is not just a suggestion for flavor; it is a mechanical necessity for proper cooking.
Understanding Thermal Gradients
The temperature difference between the surface and the center is known as the thermal gradient. If you were to cut into a steak immediately after pulling it from a roaring hot cast-iron skillet, you would notice a sharp transition from a grey, overcooked outer ring to a very rare or raw center. This is the result of a steep gradient. By allowing the protein to rest, we allow for a more uniform temperature distribution, which not only finishes the cooking process but also prevents the protein from drying out, as the juices are given time to redistribute throughout the fibers rather than gushing out onto the cutting board.
"Cooking is essentially the art of managing energy; once you remove the flame, the energy you have already imparted continues to work for you, provided you respect the thermal momentum of your ingredients."
Factors Influencing Carryover Intensity
Not all proteins are created equal, and understanding the specific variables that influence carryover cooking will save you from accidental overcooking. The primary factors include the size and shape of the protein, the temperature of the heat source used, and the density of the item. A thin piece of fish will have a negligible amount of carryover compared to a three-pound roast because the roast possesses a much higher thermal mass—it has the capacity to hold onto more heat energy, which will continue to drive the internal temperature upward for a longer duration.
The intensity of your heat source also plays a major role in how much carryover you should anticipate. If you are searing a steak at high heat in a cast-iron pan, you are creating a very hot exterior crust that is dense with energy. This will result in a more pronounced carryover effect compared to a gentle sous-vide cook or a slow-poach. When you sear, you must compensate by pulling the meat at a lower temperature, sometimes as much as 10 to 15 degrees lower than your target, to account for the aggressive energy transfer from the crust.
The Role of Density and Surface Area
Proteins with a high surface-area-to-volume ratio, like thin chops or fillets, lose heat to the ambient air much faster than a thick, spherical roast. This means that if you are cooking something thin, you have a smaller window of time to utilize the residual heat before the exterior starts to lose too much energy to the kitchen environment. Conversely, a large, thick cut of meat will maintain its temperature for a much longer period, making it easier to overcook if you are not tracking the internal temp closely during the final minutes of cooking.
Essential Tools for Precision Cooking
In the modern culinary world, relying on the "touch test" or "poking the meat" is a gamble that professional chefs rarely take. To master carryover cooking, you must possess an accurate instant-read digital thermometer. This tool is the single most important instrument in your arsenal, acting as a window into the internal state of your food that would otherwise be hidden. Without objective data, you are essentially flying blind, leaving your dinner to chance rather than calculated technique.
When using a thermometer, always aim for the center of the thickest part of the protein, ensuring you are not touching a bone, which conducts heat differently and will give you a false reading. It is also beneficial to calibrate your thermometer periodically by checking it in a cup of ice water (which should read exactly 32°F) or boiling water (which should read 212°F at sea level). Precision in measurement leads to consistency in results, turning the science of heat into a repeatable habit.
Why Digital Accuracy Matters
Most analog or dial-style thermometers are too slow and often inaccurate by several degrees, which is the difference between a perfect medium-rare and a disappointing medium-well. A high-quality digital probe should give you a reading in under three seconds. This speed is vital because it allows you to check your temperature frequently as you near the finish line without letting too much heat escape from the oven or pan, keeping the cooking environment stable and predictable.
"The digital thermometer is not a crutch; it is a compass. It tells you exactly where you are in the cooking process so you can make informed decisions rather than guessing based on visual cues that can be misleading."
The Science of Resting Proteins
Resting is the most misunderstood stage of the cooking process. Many home cooks view it as a necessary wait time, but it is actually the final phase of active cooking where the internal temperature stabilizes. During the high-heat cooking phase, the muscle fibers on the outside of the protein contract and tighten, effectively pushing the juices toward the center of the meat. If you slice into the meat immediately, those juices have nowhere to go but out onto your plate, leaving the protein dry and flavorless.
When the meat rests, the muscle fibers begin to relax. As the exterior cools slightly and the heat equalizes throughout the cut, the fibers expand, allowing the juices to be reabsorbed back into the spaces between the fibers. This is why resting yields a more succulent bite and a better texture. The carryover effect happens during this window, and it is crucial that you do not cover your meat with tight aluminum foil if you want to maintain your crust.
Proper Resting Techniques
For smaller cuts like steaks or chicken breasts, a simple rest on a wire rack for 5 to 10 minutes is sufficient. The rack is key; it allows air to circulate underneath the meat, preventing the bottom from getting soggy from trapped steam. For larger roasts, you should allow at least 15 to 20 minutes of resting time. If you are worried about the roast losing too much heat, place it in a warm—not hot—spot, or tent it loosely with foil, though keeping the crust crisp is always the priority.
Troubleshooting Common Carryover Errors
Even with the best intentions, things can go wrong. The most common error is the "panic pull," where a cook, nervous that the meat isn't done, keeps it on the heat for too long. Alternatively, some cooks pull the meat too early, not accounting for the ambient air temperature, leading to undercooked results that are unpalatable. If you find your meat is consistently undercooked, try closing your oven door or moving your resting meat to a slightly warmer part of the kitchen, such as on top of the stovetop while the oven is on.
On the other hand, if you find that your proteins are constantly overcooking, look at your pan type. Heavy cast iron and enameled Dutch ovens have immense heat retention capabilities. They stay hot long after the burner is off. If you are finishing a sear in one of these pans, you must pull the protein out even sooner than you would if you were using a thinner stainless steel or aluminum pan. The pan itself becomes a heat source, adding to the carryover effect.
Adapting to Your Equipment
Every piece of cookware has a different "thermal personality." A heavy-gauge copper pan will respond quickly to heat changes, while a thick cast-iron skillet is like a freight train—it takes a long time to heat up and a long time to cool down. If you notice your meat is cooking too fast in a heavy pan, move it to a plate or a board the second you see the internal temperature hitting your pull-point. Do not leave it sitting in the hot pan, as the bottom of the meat will continue to sear and carry over much faster than the top.
Advanced Techniques: The Reverse Sear
The reverse sear is arguably the best application of carryover principles for thick steaks and roasts. By cooking the protein slowly in a low-temperature oven (usually around 225°F) until it reaches an internal temperature just below the target, you ensure that the entire piece of meat is cooked perfectly evenly from edge to edge. Because the oven environment is gentle, there is no massive thermal gradient to overcome, meaning you don't get that "bullseye" of grey meat around the edge.
After the slow cook, the meat is finished with a lightning-fast sear in a smoking-hot pan. Because the interior is already at the desired temperature, the sear only serves to create the crust. The carryover from this final sear is very predictable, typically only adding 2-3 degrees if you are quick. This method allows you to master the internal temperature while simultaneously creating a world-class crust, making it the preferred method for anyone wanting to achieve steakhouse results at home.
Why This Method Excels
The reverse sear minimizes the intensity of the carryover because the meat enters the final sear already at a temperature close to the finished state. The low-and-slow phase gently warms the center, preventing the aggressive, uneven heat that occurs with direct grilling. By the time you get to the searing phase, you aren't trying to "cook" the inside; you are only finishing the surface. This leads to much higher margins for error and a significantly better final product.
Professional Chef Tips for Consistency
Professional kitchens rely on standardization to ensure that every table gets the same quality of food. You can adopt this mindset by keeping a small notebook where you record the starting temperature of your protein, the weight, the cooking method, the pull temperature, and the final resting temperature. Over a few weeks, you will see a pattern emerge, giving you a customized "thermal profile" for your specific stove and your favorite cuts of meat.
Furthermore, always temper your meat. Pulling your steaks or chicken out of the refrigerator 30 to 45 minutes before cooking allows the core temperature to rise closer to room temperature. This significantly reduces the time it takes for heat to reach the center, which helps in preventing the exterior from overcooking before the interior is ready. It is a simple step that yields massive dividends in texture and consistency.
The Power of Tempering
When you put a cold protein into a hot pan, you create a temperature shock. The exterior takes a massive hit of energy while the center remains icy, necessitating a longer cook time that inevitably leads to a gradient of overcooked meat. By tempering, you bring the starting point of your protein closer to the finish line, allowing for a more even sear and a more efficient carryover. Even if you only temper for 20 minutes, it makes a perceptible difference in the final quality of the meal.
"Consistency is not about luck; it is about data. Every time you record a result, you are learning how to become a master of your own kitchen's unique environment."
Final Thoughts
Mastering carryover cooking is not about learning a single recipe; it is about learning a fundamental law of the universe and applying it to your culinary practice. It requires patience, attention to detail, and the willingness to step away from the pan while your food looks "almost" done. By respecting the residual heat trapped within your proteins, you take control of the finishing stage of your meal, ensuring that it arrives at the table with the texture, moisture, and flavor that you intend.
Remember that the goal is always to provide a consistent, delicious experience for yourself and your guests. The science we have explored today—thermal gradients, conduction, heat capacity, and the importance of resting—serves as the foundation upon which great cooking is built. As you continue to experiment with these techniques, you will find that the anxiety of "overcooking" begins to vanish, replaced by the calm, measured confidence of a chef who understands exactly what is happening inside the pan.
As you move forward, keep that digital thermometer handy and keep observing how different cuts of meat react to your specific cooking setup. Do not be afraid to pull that roast out at 125°F instead of 135°F, and do not be afraid to trust your intuition after you have seen the physics in action a few times. Cooking is a journey of lifelong learning, and with the science of residual heat in your repertoire, you are well on your way to becoming a true master of the flame. Happy cooking, and remember, if it turns out perfect, you can take all the credit; if it doesn't, well, that's just the nature of the science—but with these tips, you'll be hitting the mark every single time from here on out. Enjoy the process of becoming the scientist of your own kitchen, and celebrate every perfect slice you create.

Get the Next Recipe
Weekly recipes, techniques, and gear picks — straight to your inbox.
