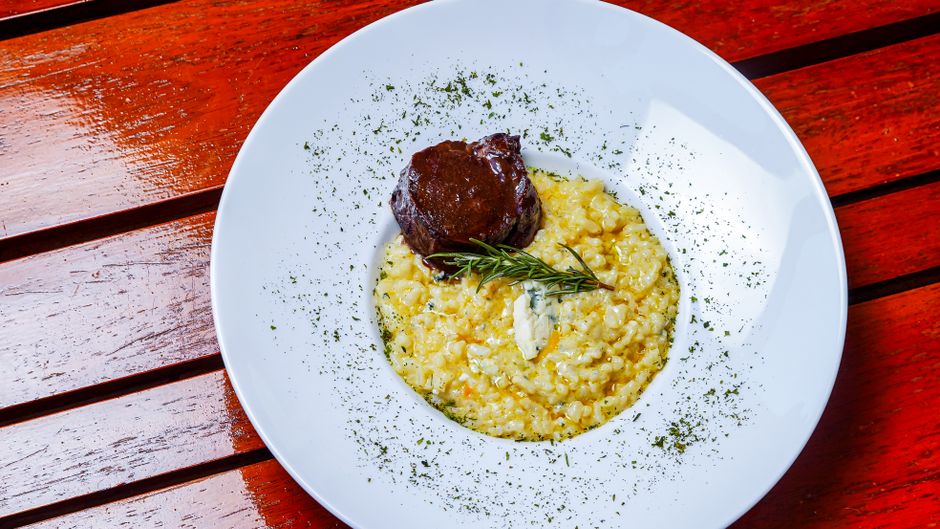
The Secret to Perfect Risotto: Technique, Timing, and the Right Rice Variety
There is perhaps no dish in the Italian culinary canon that strikes as much fear into the heart of a home cook as risotto. It sits at that precarious intersection of simple, rustic comfort and high-stakes technical execution, where a single minute of impatience can turn a bowl of creamy, elegant perfection into a gummy, starchy catastrophe. Many people approach risotto with a sense of dread, convinced that it requires an endless, meditative hour of stirring while hunched over a hot stove, or that it is a secret skill passed down only through generations of northern Italian grandmothers. In reality, risotto is a remarkably forgiving dish once you understand the basic mechanics of how rice grains interact with heat and liquid. It is not about divine intervention; it is about respecting the chemistry of the starch and the timing of the grain.
The essence of a great risotto lies in the release of amylopectin, a specific type of starch found in high-quality, short-grain rice varieties. Unlike the long-grain rice we often use for pilafs or steaming, which is prized for its ability to remain fluffy and separate, risotto rice is designed to break down slightly on the surface, creating that signature silky sauce we call the all'onda consistency. If you have ever struggled with a pot of risotto that turned out either crunchy in the center or mushy like porridge, the culprit was almost certainly a misunderstanding of how to coax that starch out while keeping the core of the grain al dente. Today, we are going to demystify the process, stripping away the intimidation factor and replacing it with the precision that makes professional kitchen work so rewarding.
At "Blame The Chef," our philosophy is that every home cook deserves to feel like a master of their own kitchen. We believe that when you understand the "why" behind the "what," recipes become redundant tools rather than rigid instructions. Cooking risotto is not a chore to be endured; it is an act of rhythm and observation that connects you deeply to your ingredients. Throughout this post, we will examine the specific rice varieties that actually work, the importance of maintaining your broth temperature, and the crucial final stage known as mantecatura that transforms a simple dish into a restaurant-quality masterpiece. Prepare to clear your schedule for a bit of culinary therapy, because after this, you will never look at a bag of rice the same way again.
The Foundation: Choosing Your Rice Variety
The most common mistake amateur cooks make when attempting a risotto is using the wrong variety of rice. If you attempt this dish with standard American long-grain rice, Basmati, or Jasmine, you will be met with profound disappointment. These rices are bred to maintain their structure and remain distinct, which is exactly the opposite of what we need. For a proper, authentic risotto, you require a short or medium-grain rice with a high starch content. The three heavy hitters in this category are Arborio, Carnaroli, and Vialone Nano. Each behaves differently, and choosing the right one will dictate the texture and final quality of your dish.
Understanding Arborio, Carnaroli, and Vialone Nano
Arborio is the most widely available variety in grocery stores, but it is actually the least preferred by professional chefs. It has a high starch content, which makes for a very creamy risotto, but it is also quite prone to overcooking. Because the grain is smaller, it can go from perfect to mush in a matter of seconds. Carnaroli, often referred to as the "king of rice," is the gold standard. It has a higher amylose content than Arborio, which helps it maintain a better shape and a firmer bite—the elusive al dente—even after twenty minutes of simmering. Finally, Vialone Nano is the favorite in the Veneto region, known for its ability to absorb a massive amount of liquid while remaining perfectly balanced.
"The difference between a good risotto and a transformative one is not the garnish, but the rice itself. Treat the grain with the respect it deserves, and it will reward you with a texture that is nothing short of silk."
When shopping for your rice, look for packages that specify these regional varieties. Do not be tempted by "quick-cook" or pre-parboiled varieties, as these have been stripped of the very starches that create the sauce. You want a raw, pearlescent grain that feels hard and substantial in the bag. A high-quality rice will be uniform in size and color, indicating that it will cook evenly throughout the pot. Remember, the rice is the protagonist of this story; if the foundation is weak, no amount of expensive Parmesan or truffle oil will be able to save the dish.
The Art of the Base: Soffritto and Toasting
The flavor of your risotto is built from the very first minute the heat hits the pan. We begin with a soffritto, which is a flavor base typically consisting of finely minced onion or shallot, sautéed gently in butter or a mixture of butter and olive oil. The goal here is not to brown the aromatics—you want them translucent, soft, and sweet, not crispy or burnt. A burnt onion will introduce a bitter, acrid note that will permeate the entire pot, so keep your heat at a medium-low level and exercise patience. This step is about laying down a gentle, aromatic cushion for the rice to build upon.
The Toasting Phase: Tostatura
Once your aromatics are translucent, it is time to add the rice. This is the tostatura phase, and it is arguably the most critical technical step in the entire process. You need to add the rice to the hot fat and stir it until every grain is coated and slightly translucent at the edges, with a white, opaque center. You should be able to smell a faint, nutty aroma rising from the pan. This toasting process essentially creates a protective shell around the exterior of the grain. This layer helps the rice hold its structure during the long, slow cooking process, preventing it from turning into a pile of starch-laden sludge too quickly.
* Keep the heat at medium to ensure the rice toasts rather than just sitting in oil.
* Stir continuously so that no single grain catches or burns on the bottom of the pan.
* Look for the "pearl" in the center of the grain; that is your sign that the toast is complete.
* Once toasted, always deglaze with a splash of dry white wine. This acidity is essential to cut through the richness of the butter and cheese we will add later.
Mastering the Liquid: The Importance of Broth
A risotto is only as good as the stock you use to hydrate it. Since the rice absorbs a significant amount of the liquid, the flavor of your broth will define the flavor of the dish. I strongly recommend using a high-quality, homemade chicken or vegetable stock. If you must use store-bought, opt for a low-sodium version so you can control the final seasoning level. A cold broth is the enemy of good risotto; adding cold liquid to a hot pan will shock the rice, causing the exterior to harden and preventing the proper, uniform absorption of moisture.
Maintaining the Thermal Equilibrium
Your broth should be kept at a gentle simmer in a separate saucepan next to your main risotto pot. By adding hot broth to the rice, you ensure that the cooking temperature remains consistent and the rice grains continue to soften steadily. If you add cold liquid, the temperature drop pauses the starch release, requiring you to reheat the whole mixture, which can lead to overcooking the outside of the grain while the center remains raw. This is a common failure point that most home cooks overlook, simply because it involves an extra burner and an extra pot to clean.
"Risotto is a dish of constant temperature management. If you add cold broth to your pan, you aren't just slowing down the cook; you are breaking the alchemy of the starch. Keep the stock hot, and the risotto will stay supple."
Be mindful of your broth volume. As a general rule, you should have about four times as much liquid as you have rice, though this can vary depending on the humidity of your kitchen and the specific variety of grain. Never dump all the broth in at once. The "little by little" method is not just a superstition; it is a way to ensure that the friction of the grains rubbing against each other, combined with the presence of liquid, encourages the release of that essential amylopectin.
The Stirring Technique: Rhythm and Patience
Many people believe that you must stir risotto non-stop for twenty minutes straight. While constant stirring does help to create that wonderful, creamy emulsion, it is possible to overdo it. If you stir too aggressively or for too long, you can actually break the grains themselves, turning the dish into a gummy paste. The goal is to stir just enough to encourage the grains to rub against one another, releasing their starch into the surrounding liquid. I like to think of it as a gentle agitation—a soft, rhythmic movement that keeps the mixture moving without destroying the integrity of the rice.
The All'onda Consistency
The term all'onda literally translates to "like a wave." When your risotto is finished, it should not sit in a stiff, immobile pile on your plate. It should be fluid enough that if you tilt the plate, the risotto moves across the surface in a gentle wave. If your risotto is thick and stands up in a peak when scooped, it has either absorbed too much liquid or, more likely, it has been cooked too long and the starches have set too firmly. The perfect risotto is a delicate balance of structure and sauce, holding its shape just enough to be elegant, but fluid enough to be decadent.
The Mantecatura: The Final Transformation
The most important step in the entire risotto process occurs after the heat has been turned off. This is the mantecatura, the final act of mounting the risotto with cold, high-quality butter and freshly grated Parmigiano-Reggiano. The butter must be cold because it emulsifies into the liquid, creating a glossy, rich, and creamy finish that cannot be achieved with room-temperature fat. The cheese provides the final touch of salt and savory depth that ties all the flavors together. This is not the time to be shy with your ingredients; use the best butter you can find, preferably a high-fat European-style butter, and grate your cheese fresh from a block.
The Rest Period
Once you have added the butter and cheese, stir the mixture vigorously for thirty seconds. Then, put a lid on the pot and let it rest for two to three minutes. This resting period allows the risotto to stabilize. The starches will settle, the flavors will marry, and the final texture will become incredibly uniform. If you skip this, your risotto will feel thin and disjointed. The rest is what separates a homemade bowl of rice from a professional culinary achievement.
It is worth noting that you can add other ingredients during the final stages of cooking, such as roasted vegetables, sautéed mushrooms, or fresh herbs. However, be careful not to overload the pan. Risotto is a minimalist dish. If you are adding delicate ingredients like fresh parsley, chives, or lemon zest, fold them in right at the very end during the mantecatura to keep their flavors bright and vibrant. If you are adding heartier items like peas or asparagus, ensure they are cooked separately and folded in just before serving, otherwise, you run the risk of them turning into mush along with the rice.
Troubleshooting Common Risotto Woes
Even with the best instructions, problems can arise. If your risotto is too thick, simply whisk in a splash of warm stock or even a little bit of hot water to loosen it up. This is a common fix used in professional kitchens; never serve a risotto that looks like it has been sitting out for an hour. If the grains are still too crunchy, add a small amount of liquid and continue cooking on low heat, but be very careful. Once rice starts to overcook, it moves from "firm" to "mush" very quickly, so taste frequently.
The Power of Seasoning
One of the most overlooked aspects of risotto is the salt level. Because you are using a large volume of broth, you must taste as you go. If you wait until the end to salt the dish, you might find that the salt doesn't penetrate the rice grains properly. Season your broth throughout the process, but remember that the addition of Parmigiano-Reggiano at the very end will significantly increase the salt content. Always err on the side of under-salting during the cooking process and adjust only after the final cheese addition.
* Is the risotto too dry? Add warm stock, one tablespoon at a time.
* Is it too bland? Check your salt, but also consider a squeeze of lemon juice or a dash of high-quality vinegar to brighten the starch.
Did the rice turn to mush? Unfortunately, this is a point of no return. The best fix is to fry it the next day as arancini* (rice balls) with some mozzarella inside.
* Is it missing "depth"? A small knob of cold butter or a final grating of aged Pecorino can often save a dish that feels flat.
Elevating Your Risotto: Professional Chef Tips
To truly excel at this dish, you must treat every variable as an opportunity to refine. For instance, consider the temperature of your rice before it even hits the pan. Some chefs prefer to warm their dry rice in a separate pan for a minute before adding it to the soffritto to ensure an even distribution of heat. Others insist on using a specific type of heavy-bottomed copper pot, which distributes heat more evenly and prevents hot spots that can cause uneven cooking. While the tools matter less than the technique, the more you cook, the more you will appreciate how heat management influences the release of starch.
The Role of Acid and Fat
Never underestimate the power of acidity. A classic risotto base involves a deglazing step with white wine. I recommend using a dry, crisp Italian white, such as a Pinot Grigio or a Verdicchio. Avoid anything too sweet or oaky, as the woodiness of the wine can clash with the creamy notes of the butter. If you don't have wine on hand, a small splash of dry vermouth is an excellent substitute, as its herbal notes add a wonderful complexity to the final bowl.
"A great chef knows when to stop. The moment your risotto hits that *all'onda* consistency, you must plate it immediately. Risotto waits for no one—if it sits, it sets, and you lose that magical, flowing texture that is the hallmark of the dish."
Finally, consider the plating. A wide, shallow bowl is the best vessel for risotto. It allows the heat to dissipate slightly so that the diner can enjoy the flavors without burning their tongue, and it provides the perfect surface area for the risotto to spread out into that beautiful, glossy wave. Serve it immediately. A risotto that is allowed to sit for five minutes on the counter is a tragedy that you have worked too hard to avoid. Keep the plates warm if you can, as the heat helps maintain the creaminess of the sauce for the duration of the meal.
Conclusion
Mastering risotto is a rite of passage for any cook who takes their craft seriously. It is a dish that humbles you, requiring you to let go of the need for instant gratification and instead embrace the slow, methodical process of transformation. By choosing the right rice—be it Arborio, Carnaroli, or Vialone Nano—and respecting the delicate balance between heat, liquid, and starch, you are engaging in a process that has been refined over centuries. The secret is not a hidden ingredient or a magical shortcut; it is simply the willingness to observe, to adjust, and to care for your ingredients from the first sauté to the final mantecatura.
As you gain confidence, you will find that you no longer need a recipe to tell you how much broth to add or when to stop stirring. You will develop an intuitive sense for the rhythm of the rice, the sound of the liquid absorption, and the exact moment when the starch has reached its peak. You will stop being a cook who follows instructions and become a chef who understands the language of food. The fear of the "gummy risotto" will vanish, replaced by the quiet confidence of knowing that you can produce a masterpiece whenever you wish.
Remember that cooking is a cumulative skill. Every time you make risotto, you learn something new about the grain and the heat. Do not be afraid to experiment with seasonal additions like spring ramps, summer truffles, or autumnal mushrooms. The base remains the same, but the possibilities are endless. Keep your broth hot, your pan wide, and your butter cold. And if things occasionally go wrong, simply turn those leftovers into something new, pour yourself another glass of that dry white wine, and try again. That is the way of the kitchen, and it is exactly how you become the master of your own culinary world. Happy cooking.


Get the Next Recipe
Weekly recipes, techniques, and gear picks — straight to your inbox.
